Pages

Tuesday, June 30, 2015

Invisible machine applique(not raw edge)

As most of you may remember I've an aunt that is new to quilting.  Unfortunately she doesn't live close, so we can only talk about quilting via the phone or email.  So far she's only pieced quilts but has expressed an interest in machine applique.  Today's post is a short tutorial with some helpful links about machine applique.  
The first thing is making the pieces.  I learned to make applique from Erin Russek's blog One Piece at a Time.  Here's a link to her applique lessons, and in my humble opinion they're the best applique tutorials on the internet.  
Erin is known for her amazing free BOM's, this years freebie is so cute!  You can find it here.  Of course I didn't come up with this method of machine applique all on my own.  Here's a link to where I learned some helpful tips on making the best invisible machine applique.
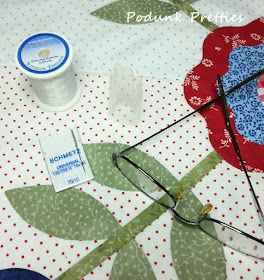
Okay after you get all your pieces made you need to stitch them down as quickly as possible before you loose your quilty mojo.  Here's what you'll need.


Let's go over these items. 
1.  Superior Mono Poly thread.  Great stuff!  It won't melt or discolor and it's invisible.  It comes in two different shades, smoke and clear.  I prefer clear because it blends best with my color palette.  You could use a matching thread if you wish but for me this works best because I don't need to change my thread several times for one project.  And should I make a mistake in stitching it's less likely to show because it's invisible.
2.  A thread net.  This may not be needed with your machine but for mine it a must because my thread holder lays on it side(picture below)  Without it the thread  tangles coming off the spool.  You can purchase them at Joann's or online shops.  But mine were free from the local florist. Yep FREE!  A lot of  flowers are shipped with thread nets around them.  Just ask your local florist if she'll save a few for you the next time you order fresh flowers.
3.  70/10 needle.  This is my go to needle and works best for me in almost all of my quilting.  I even piece with it.  When doing invisible applique it makes a tiny hole, that's all you need for this very fine hairlike thread.
4.  A pair of reading glasses, so you can see the tiny stitches as you make them.  Now not everyone is going to need these.  But my ole eyes need a little extra help.  My reading glasses aren't strong enough so I borrow Mr. Podunks when doing small machine stitches.

Below is my machine.  You can see the thread spool and net.  Before appliqueing your block make a test piece for testing your stitch tension and width.  Every machine is different, what you're looking for is the smallest stitch possible without making big puckers.   I'm using a tiny blanket stitch I programmed into my machine.   For some reason Brother thinks quilters don't need a stitch this tiny.  Thank goodness I had the option to design my own. Several different stitch styles will work for this type of applique. A blind hem stitch or a zigzag are good options.  


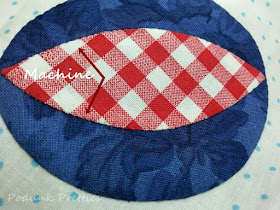
This project was started before my dad had surgery.  So I started hand appliqueing while in waiting rooms.  Well the waiting is over and I want it done.  Part of this is hand and part machine, see the difference?  It's minimal.


I'm going to bare it all today and show you my backside!  Amazing just how invisible it really is!


Okay let's take a look at the stitch in action.  First pull your bottom thread to the top. If you don't know how to do this here's a tutorial. Remember to do a tack stitch after you pull the bobbin thread to the top.  If your machine doesn't have a tack stitch do two or three back stitches to properly anchor your thread.   Don't cut your thread tails just yet, we'll need them later.    You'll want to start with your needle as close to the applique piece as possible.


Just how wide is the stitch?  About one or two threads into the applique, 3 or 4 at the most.  You can do this, I promise, just take it slow until you get the feel for the tiny stitch.  If your machine has a speed control this is a good time to try it out.  If you look a the picture of my machine above you'll see a slider button right next to the scissors button.  It's set to a fairly slow stitch.


Here's why I leave my thread tails, so I can see where I started!  They'll be clipped after I finish the circle and tack my ending stitch. 


 The completed circle.  Can you see the stitches?  Sure, but you're super close.  If any one is this close to your quilt they better be carrying a basket of ribbons and a big ole grand prize check.


Let's back up a little.


And a little more.... there's really no more distortion to the fabric than there is with hand applique.


It's so much quicker and the results are pretty darn close to handwork.  


Linking up with these fabulous bloggers, you can too!  Or hop on over and be inspired!

FreeMotionbytheriver
and
IHavetoSay
and
QuiltStory
and
ShowandTellMonday
and
Let'sBeeSocial


~ Lea Anne ~

Monday, June 29, 2015

Monsoon Monday

Hi diddly-o!  Quilty friends!  Another rainy Monday morning is allowing  me to sew till my hearts content...YEEHAW!  After wading though my fabric stash I've realized there's nothing in there.  Well nothing usable for the current project.  Wah..wah...wah...feeling  like such a cry baby this morning.  So what the heck, just do what comes natural and use what I have even though it doesn't tickle my fancy.   This piece of vintage pink pieced with another print will be my backing for the Boonie Blooms.


And when I say pieced I mean they'll be cut into squares making a large checkerboard.   This quilt will be quilted on the frame so the backing needs to be almost perfectly square.   Squaring up backings is an area I lack proper skills.  Normally I cut, and re-cut, then cut a few more times until the backing is to small for the quilt.  Since I'm better at piecing and cutting smaller pieces of fabric, it seems like the less frustrating way to go.   It'll also lend more time to think about how to quilt this girl.  If the epiphany doesn't happen soon she'll be added to the drawer of  "quilting quandary".


So here's what Podunk looks like this morning...WET!  


My ole watering can isn't getting much love this year.  So far it's working out for the best, I've been so busy trying to keep up on everything that watering the garden would be just one more chore added to the to-do list.   


Well I better run and use my sewing time wisely before the sun pops out.


~ Lea Anne ~

Sunday, June 28, 2015

Clearance Sale at 44th Street Fabric

Just popping in for a quick shout out to Beverly at 44th Street Fabrics.  Bev's a creative and fun blogger that also has an Ebay fabric store.  


She's also a lover of bright happy fabrics.   Her blog  44th Street Fabric is always an inspiration of color.  Just look at these adorable Farm Girl blocks she's working on right now.  You can see and read more about them HERE.


 So when an idea for quilt popped into my quilty mind I knew where I needed to go for the fabrics.  Bev!  I've purchased from her before and know I'll get good fabric at great prices.

My stash is lacking in the color needed to make the quilt....Orange!   I've been super busy this month dealing with dads surgery with no real time for online shopping.  Bev's Ebay store  is always packed full of brights.  Without even looking at her store I sent an email asking her if I could get an orange bundle...   Look at this lovely bundle.


I trust Bev but she still sent pictures of the bundle for my approval.


What an adorable bundle.  Remember I told you I never looked in her store before emailing her?  When I finally had a chance to poke around her store, there was no orange bundles for sale, did I get the last one?   Nope, she put together a custom bundle just for me.  YES!   So if you need a bundle don't be afraid to ask Bev, she's more than happy to cut  up a custom bundle just for you!  And I promise you'll love her prices and quick customer service. 


She's also having a clearance sale on books and patterns.  Here's a couple that caught my eye, but there's much more to choose from here on her blog.


So what's going to happen with my little bundle?  Here's a little peek at my plan.  


~ Lea Anne ~


Friday, June 26, 2015

Friday Flimsy~ Boonie Blooms

This little quilt top was finished Wednesday night.  I thought for sure I'd have some decent lighting for pictures by today.  Well there was plenty of good lighting I just wasn't home to take advantage of it.  So we'll just make the best of the situation.  The first two groups of photos will be before and afters.  The pictures will show that I'm a better quilter than photographer .


This is a quick and easy quilt.  I've no doubt that the top could be made in a day.  It has minimal applique that's super fast to do.  A great quilt for a first time appliquer.  Doing raw edge applique made it easy but it could also be made with traditional applique methods.


The Moda Charm pack, 30's Playtime by Chloe's Closet had just the right mix of colors.


The Butter yardage by Robert Kaufman added background color without being to bold, and the Kona White inner border was perfect for not taking away from the blooms, it reminds me of a white picket fence.  Of course you don't need a charm pack to make a charm pack pattern.  Scraps work great too.  Or it could be made more traditionally with all the blocks in the same prints.


There's a real challenge when making a quilt from precuts.  A lot more planning  to make sure you'll have enough fabric.  So when this one ended up having just a smidgen of scrap a little happy dance took place!  


The free pattern will be posted in a couple of days,  if you want one.  So who's up for another freebie? 


Hopefully while finishing up the pattern, there will be a quilting design epiphany.   Maybe I'll use the Bailey Home Quilter this time.  She's been sitting idle for about 6 months.  Everything has been quilted using the Domestic machine since January, just to keep things simple.  There's an urge to be a little more creative with my quilting again.


~ Lea Anne ~

Tuesday, June 23, 2015

In the Garden

 Since I've been spending so much of my free time in the garden I might as well take you on the grand tour.   I've tried a few new ideas this year for the garden.  A few years ago we fenced in the main garden due to the deer using it for a stomping ground.  In order to maximize our planting space a few things have been planted on the fence, allowing them to vine up, or just for support.  But in the corners I've planted some sunflowers for my viewing pleasure.


The main bed has heirloom tomatoes, turnips, beets, onions, sweet potatoes, cucumbers, several varieties of peppers and green beans.  The three arrows show the three new rows planted today with my late crop of beets and green beans.  In early spring these three rows were for the cold weather crops lettuce, spinach, radishes, and early beets.


Look at my new to me purple Green Beans.  Supposedly these don't toughen  if you pick them late and they turn green when cooked.  This is a first for me, so we'll see if they are all they claim to be.  


Peppers...


Peppers....


Peppers...


Cucumbers!  We might be selling some this year because we over planted after our first planting was destroyed by the moles, voles, and chipmunks.


While I was weeding this morning I kept hearing buzzing.  It took awhile for me to figure out that our honey bees like cucumber blossoms.  Humm....I wonder if the honey will taste like cukes?  Oh yes my friends what a bee gets its pollen from makes a difference in the taste of the honey.  My favorite is wildflower honey, you can taste the flowers.  There's a really dark honey that comes from up north it tastes like sorghum, not sure what that bee is eating but if I want sorghum I'll buy sorghum....YUK!  


We're also new to growing sweet potatoes.   So we're doing a soil test this year to see if it makes a difference in the crop.  We've one patch of potatoes in the main garden and then we've this raised bed with a soil mixture that is supposedly better for sweet potatoes.  Next year we'll amend the soil and plant Yukon gold potatoes in the patch that the sweet potatoes don't like.  I love raised beds, so much easier to maintain and with vining plants it keeps them contained, well for the most part.  


Here's our zucchini and squash patch below.  They are not allowed in my main garden due to the bugs they draw in.  They also grow better over here where they can soak up the dew off the grass.
Last year the squash bugs destroyed my tomatoes.  And since we don't use chemicals on the garden we couldn't do anything about it but cry.  I've been researching DIY organic mixtures for bugs and fungus, but the reviews aren't all that great.  It's easier to plant smart.  Did you know certain plants don't get along well together?


Here's another experiment,  gone bad.    This is a lesson learned about the internet.  Not everything you read on the internet is true.  The soil mixture was all wrong for garlic.  Our garlic did much better with nothing fancy about the soil.   We'll be amending it at the end of the season.


 And the last stop on our tour is  hybrid tomatoes, and green peppers.  Mr. Podunk likes big juicy tomatoes up by the house so he can pick'em and eat'em right off the vine.


Well that's what keeps me from sewing in the warmer months.  But I'm all caught up on weeding and canning...for now.  So I'm headed to the Studio!  Whoohoo!  Mr. Podunk can eat leftovers tonight. 

~ Lea Anne ~


Monday, June 22, 2015

Chasing my tail

It's a sweet Monday Morning again, can you believe it?  The days are just whizzing by me as I chase my tail trying to keep up with all that needs to be done. I thought there would be time to work a quicky quilt into my schedule.  So much for thinking, huh?
This is how it looks this morning.  Hopefully by this evening I can work in some sewing time but I'm not holding my breathe.


While babysitting dad last week I thought there would be time to at least write the pattern for the quilt.  Well heck no.   This is what I accomplished.


The garden is taking up what little time I have at home.  And then there's the wild Black Raspberries that are in abundance this year.  Between me and Ross we've picked about 4 gallon. So this week I've been in the kitchen.  I froze about 3 gallon, canned 18 jars of Raspberry jam and baked one huge cobbler for Mr. Podunk's birthday today.  And lets not forget the beets.  Nine jars of plain ole beets, 6 spiced pickled beets, and 14 jars of beet jelly. 


We also attended a wedding this weekend. Dad can't drive yet so Mr. Podunk and I chauffeured them to the happy event.  The rest of the pictures are courtesy of my sweet cousin Stephanie and her adorable daughter Carrianne. (below).  Her phone camera abilities are much better than mine.  Thanks Steph!


 This was a true Podunk kinda wedding...in a bar.  To tell you the truth I loved it.  Everyone did, it was so relaxed and laid back.   My Aunt May and her fiance Matt of 20+ years were finally wed.  This was planned long before dad's surgery.  The little bald guy on the right is my dad.    Poor dad overdid himself, we left right after this picture was taken.


Congratulations to the happy couple!


Link ups this week.  Hop on over for inspiration.  You never know what quilty goodness you'll find.

Design Wall Monday@PatchworkTimes

MondayMakers@Hugabitquilts

MainCrushMonday@Cookingupquilts


~ Lea Anne ~

Thursday, June 18, 2015

Throwback Thursday

Every year Mr. Podunk takes a couple of fishing trips back to his home state of PA.  On his way back last week he stopped by his sisters.  She loaded up his truck with 3 bolts of decor fabric, 1 large garbage bag of fabric and this box full. His sister's not a quilter.  They were given to her by a friend who's mom had recently passed.  She knew just the gal that would appreciate them...ME!  Most of it was things I would never use, so they were donated to the Goodwill.


Free fabric is always fun to receive, but the old quilting books and magazines are the best!   Most of them were dated from the early 70's.  But I saw a few things that looked really familiar.


It makes me wonder how a quilter can put a copyright on a pattern.  We seem to be copying what has already been done several times and several ways.


And the hexie craze we see today...well it looks like someone else thought of that also.


Funny how the more things change the more they stay the same.


At last something original.  I had to really look at the picture below, I thought it was a rock.  Can't say that I've ever seen anything like it before, have you?  I know that all of you are just dying to make one for yourself.  So just leave a comment and I'll send you a copy of the pattern....wink wink.


The one thing that you won't find in the older books and magazines is quick quilting tricks such as making HST's from 2 squares. It all templates and graph paper drawings that show you how to draw your own.   

The best thing in my box of goodies was the quilters notes and templates.  It's a shame that in her passing the family found these useless.  While reading through the papers I found a name on a receipt, I'm assuming it was her name.  So as I continued  reading  I tried to put a face to the name and wondered if she too was obsessed with quilting or just a crafty woman that enjoyed sewing.  Seems kinda silly to feel a connection to a woman I've never met, but I did.  So I'll be adding these to my vintage sewing collection...priceless.


~ Lea Anne ~