Pages

Friday, December 11, 2020

Stockings and Gingerbread

 Whoa!  It's been awhile since my last blog post, so I thought I would share what I've been up to over the last few weeks(months).  How about we keep this short, sweet and to the point. CHRISTMAS!  A little of this and a little of that.  And a lot time spent writing, editing and testing.

This is my latest pattern Gingerbread Man Twist.  Designed as a somewhat scrappy quilt.  The quilt and pillow can be made using 8 FQ's and 4 F8.  Of course you'll need some yardage for the background, borders, backing and binding.   Available in both immediate download PDF and the traditional Mailed pattern.  The pattern includes instructions for the quilt and the pillow.  It's a little late in the year to start a quilt for Christmas unless you are planning for next year!   Well I know there's a few of you out there that could make both of these in time for this Christmas.  But for most of us we are at the point of finishing up what we already had planned for the year or we're looking for a quick little project.  The pillow would be perfect for an afternoon project.  It finishes at 20" x 20" and uses a quick method of making the pinwheels.  I also included 2 different cutting directions for them.  One is for the quilter who like to trim up Hst's and the other is for those who don't.  

The full sized applique Gingerbread Man is also included in the pattern, along with different ideas and instructions for embellishments such as ricrac, lace, and those fancy machine stitches we hardly ever use.  I used 2 different stitches on my pillow and then a hand French knot for the eyes.  On my quilt I used a cotton lacey trim and buttons(shown below).  On both the pillow and quilt I used the same machine blanket stitch to secure them to the quilt block.


I can't wait to share this and my other new pattern Stockings with my grandkids.   We have a tradition in our family of reading Twas the Night Before Christmas while cuddled up together on the couch or bed. 


The Stockings quilt is great scrap buster.  I pulled fabrics from my scrap stash to make both the pillow and quilt.  


If you are not a scrappy quilt or bright quilts  kind of person, both of these patterns work well in any color pallet or with yardage.


The Stockings quilt is available in a instant PDF Download or Traditional Mailed pattern.

All of my Mailed patterns from this point forward will printed as Booklets. 
If this video works you will see the new booklet style with no sound.  If it doesn't work you can watch the same video on the Etsy listings for these 2 quilt patterns.  Stockings pattern video Here and Gingerbread Man Twist Here.


Sneak peak at my next pattern.


Thanks for stopping by my little spot in Podunk.   See you in a few!


Thursday, August 20, 2020

~ Next To Be Quilted ~ Bumpkin Pumpkins ~

Do you ever make a quilt top that you love and it becomes a UFO because you can't decide on the quilting?  It happens to me way too often.  That's why I have, at last count, 30 quilt tops waiting to be quilted.  They are tucked away with backing and binding waiting on me to make a decision.  So it's time to just get them finished.  No time like the present, right? So two days ago I pulled out the one I felt was the most important.  My Bumpkin Pumpkins quilt is one of  my published quilt patterns available in my Etsy pattern shop.  I absolutely love this bright and cheery fall quilt.  But I'm still drawing a blank as to what quilting design would look best.  So....it's still hanging just like this on the frame.  Maybe I should just put it on the frame and fly by the seat of my pants.   Sounds like a good plan.   If I'm still drawing a blank later this afternoon that's exactly what's going to happen.

There's plenty of white space for willy nilly background fills.  That sounds doable and easy.  I could give this whirly looking block a little movement with some free motion quilting.  And maybe those pumpkins would look cute with different quilted faces on each?  Hmm...I might be onto something.


And the Flying geese need a little help to fly south for the winter.  My first thought is to do simple free motion arcs from corner to corner but I do that on so many of my quilts.  Perhaps a little more quilting motif brainstorming is needed.


The multiple border is the part that is really giving me troubles.  I'm drawing a TOTAL blank.  I could quilt them separately or together.  Overthinking might be the biggest problem!


My go to quilting design is feathers, feathers and more feathers.  But would feathers work on a Autumn/Halloween-ish quilt?  Well phooey, looks like it's off to Google and Pinterest for a little more quilting inspiration.


Hope to see you soon with some quilting in this monster.  


Wednesday, August 19, 2020

~ Dutch Delight Finished ~

 Every once in awhile a quilt comes along and I'm immediately swept off my feet.  Dutch Delight by Jill Finley is one of those quilts.  From the first time I laid eyes on her I knew I would make it as soon as I could get my hands on the pattern.  


She was introduced at the Spring Quilt Market this year.  Jill and her husband designed one of the cutest booths for market that won a award.  You can see her booth with all the quilts designed for her new Conservatory fabric on her website by clicking here.


It would have been nice to use her new line of fabric but I'm trying really hard to SIMPLY(my word of the year).  Simply means more than keeping thing simple.  It also means to use what I have if possible.  So I dug into the stash looking to recreate her color pallet as best I could.  You can see my fabric pull on a previous blog post by clicking here.

Since this quilt design had a fairly small amount of applique I decided to do turned edge applique instead of my go-to method of raw edge applique.  It would be nice to have the time(or the want to) to hand stitch the applique in place.  But honestly I don't like handwork.  So invisible machine applique is the next best thing.  It takes a quarter of the time and looks pretty close to the "real" thing.  Using Mono-Poly thread by Superior Threads is my secret to faking hand applique.  If you would like to see how I make my invisible machine applique click here.

Even with this speedy method I needed to take a break about halfway through stitching it into place.  Breaking one of my number one rules in the studio by bringing in my coffee.  The only rules in my studio are No Drinks, No food, No Pets.  Of course I was the only one home at the time so no one else knew but me and now you.   Shh...Don't tell Mr. Podunk, I run him out of here when her brings in a drink.

This quilt finishes at 64 x 64, a nice size throw quilt that is sure to be used often.  So I wanted to keep the quilting fairly light for a nice cuddly quilt.  I also wanted it to quilt quickly.  So I used the quilt piecing as my guide.  What does that mean?  It means very little marking, I just line up my quilt rulers with the seams or intersections (the orange dots below) of the piecing.  I did mark the long crosshatching (red arrow) because I felt it would be quicker to have them marked than to mess up and need to pick out stitches.


The binding is my favorite part of the quilting process.  It's so exciting to be on the home stretch to a completed quilt.  With this quilt I did what some call "a true quarter inch binding".  What this really means is it's a tiny binding that finishes 1/4" on the front and about 3/8" on the back, just enough to cover the stitches from stitching the binding down on the front of the quilt.  Most bindings are cut between 2" wide and 2.5" wide , the most common being 2.25" wide. (I rarely cut at 2.25).  For this binding I cut  1.5" wide strips.  Yep that's tiny, but it really isn't any harder than the larger widths.  Why would a quilter do this.  Various reasons I suppose.  I did it because this quilt doesn't have a border, so if the binding is too wide on the front it will cut off my points on the piecing.  And I like for my binding to be about the same size on the front and back of the quilt.  I made a chart for me to reference the different finished widths of binding.  You can find the free printable chart on a previous blog post by clicking here.  

She's so pretty.  I can't wait to get her washed and tossed over the back of my rocking chair.  The simplicity of this quilt is swoon worthy.  It was quick and easy, but so satisfying.  If you would like to make this quilt you can find it on Jill's website.  PDF pattern here.   And the mailed pattern here.  You can also find her Conservatory  line of fabric on her website.  Or buy them together as a kit here.  She has several of her quilt patterns kitted up and ready to ship.  Even if you don't want this quilt you should go check out her other quilts. She's an amazing designer with such a creative eye for applique.

Pulling from my stash was fun.  It gave me a chance to use some older fabrics that haven't seen the light of day in years.  Like this backing fabric, it's from the 1990's or at least that what I was told.  The blue on the label is another oldie fabric.  I'm not sure how old but I know it's over 10 yrs old because I purchased it 10 yrs ago at a local quilt show in a scrappy grab bag .


Tuesday, August 18, 2020

~ Hunkering Down Quilt Finished ~ Free Pattern ~

 Every quilt has a story tell, some more interesting than others.  Until I started publishing patterns most of my quilts were made out of emotions.  It could be something as simple as a new baby in the family or as complicated as a terminal illness.  Honestly I like the quilts constructed with emotions much better.  They not only are made with love but they become more precious to me and the receiver due to the emotion that went into the design and every stitch.  


My Hunkering Down Quilt falls under quilts made from emotion only because of what is going on across the globe.  The real story behind this quilt is far more simple and happy.  But before we get into the quilt story lets take a look at the finished quilt.  Below is a closeup of the quilting.  With so much white space I had to quilt it to death.  It just wouldn't have looked as nice with something simple or an all over design.


The backing is pieced with the same yellow and white used on the front of the quilt.   A simple label was also made from the same fabrics and stitched to the quilt back before quilting.  This is my new favorite way of adding a label.  The simple design is quick and so is hand writing the information on the label.  And in order to remove this label a person would need to damage the rest of the quilt.  I like knowing my beauties will always have a little bit of history attached to them for future generations.


But a word of warning before you sew your label onto the backing.  Check your spelling, several times.  I read this a blue million times.  I even sent my best quilting buddy a picture of it so she could look it over for errors.  We both overlooked the misspelled Pademic Pandemic.   Oh well, nothing is perfect and it adds just a little more history to the quilt.


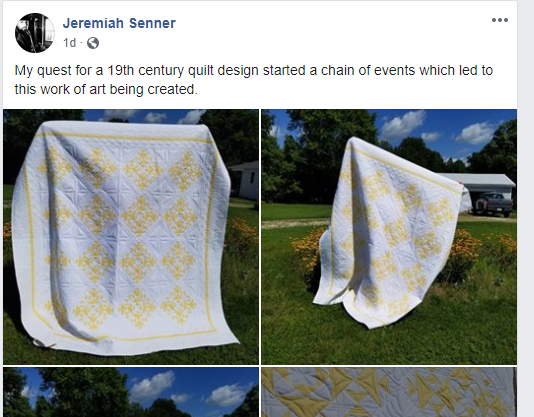
Speaking of history lets get back to the history this quilt on Podunk Pretties.  It's simple really.  Someone on Facebook was looking for the pattern for this quilt block.  She only shared a cropped image of the block.   I searched high and low looking for a quilt pattern or block. 


 No luck.  So I decided to draft it up in EQ8 and write a tutorial so this nice lady could make the quilt.  I had no intentions of making the quilt myself.  My single block made for the tutorial was going to be made into a pillow for my bed.  Well I fell in love with the block and the fabrics and YADA YADA YADA we have a quilt called Hunkering Down.  You can find the Hunkering Down Block tutorial here.


The story continues....Yesterday I shared my Hunkering down quilt on Facebook and Instagram.  A man shared my post on Facebook.  A man I didn't know, had never heard of, I found this odd so I had to check out his FB page.  His FB looked pretty normal, nothing suspicious....Like I know what I'm looking for....HAHA!  An internet detective I am not!    
 Look at his title for my quilt post.  HMMM....who is this fella and how is he connected to MY quilt.  Yes I'm stressing because I felt like he was saying this was his quilt.  And for that Jeremiah I owe you an apology, I'm Sorry. 


He will be the recipient of the quilt made by the  Nina Woodgate,  who posted the picture wanting help finding the pattern many weeks ago.
The great thing about yesterday's interaction with Jeremiah is he shared where the original quilt can be found.  My excitement immediately turned to worry of copyright infringement.  But as before there was no need to worry.  I'm not infringing on anyone's pattern.  Thank goodness.


So here she is in all her glory the original quilt called Summer Winds.  Summer Winds is the name of a quilt block pattern but not this one.  It was the quilt block they thought looked the closest to this one.   But I have the book they used as a reference and it is not the same block.  If you would like to see the entire article and quilt history, you can find it by clicking here.  


Shew!  we can finally get to the measurements for finishing your quilt. This is basic information.  Some math will be required on your part.  WARNING  Yardage calculations are done by the EQ8 program.  I rounded up the estimates to the nearest whole number.  The calculations are for the entire quilt top, blocks, borders, yellow binding.as shown in the image below.  If you want a white binding like my quilt add 1 more yard to the white.  Backing is separate and calculated using 42" wide fabric.  It is also calculated with overage for longarm quilting.  If you scroll down you will see the entire back of my quilt to give you an idea on how to piece your backing.  Mine is 2 colors because I ran out of yellow.

There are some uncommon cuts in the borders.  You can round these up or down to suit you.  I prefer exact measurements but it's your quilt do as you like.


White Fabric  7 yds.

A    (9) 12.5" squares
B    (3) 18 3/16" squares,  make two diagonal cuts from corner to corner on each(your cutting an X on           the square.
C    (2) 9 5/16" squares, cut from corner to corner ONE TIME
D    (2) 3.5" x 68 3/8"
E    (2) 3.5" x 74 3/8"
H    (2) 6.5" x 76 3/8"
I     (2) 6.5" x 89 3/8"

Yellow Fabric   3 yds.

F   (2) 1.5" x 74 3/8"
G   (2) 1.5" x 76 3/8"
 
Backing   8 1/2 yds.


Happy Stitching! 


Friday, July 17, 2020

~ Dutch Delight Quilt and Other Stuff ~

 Hello Happy Quilters!  Just thought I would pop in for a little update on the happenings in the Podunk Studio.  Lets start with my most recent new project.  It is an impulse project.  I've been admiring this quilt since seeing at quilt market.  The name of the quilt pattern is Dutch Delight by Jill Finley.  The simple design with pops of color won me over immediately.  Jill's quilt patterns almost always have a little bit of applique.  I love the way she can take a simple design and give life.   So as soon as the pattern was released I had to have it.  The temptation to buy the kit or a fat quarter bundle of her new Conservatory fabric was overwhelming.  So I told myself I could only buy the kit IF I couldn't pull the enough fabric from my stash.  As you can see I had no problem finding just the right amount blues and low volume prints, darn. I had my heart set on a new bundle of lovely prints.  You can find the pattern HERE you choose digital or traditional mailed. The quilt kits HERE.   And her new fabric line Conservatory HERE.
   

Below is Jill's finished quilt.  Simply adorable!  The pops of color in the applique is what really sold me on this pattern.  For the last three days Jill has shared video tutorials for this quilt on her Facebook and Instagram.  Hop over and check them out to see just how easy it is to construct this cute little quilt.  By the way there's a giveaway.


She used a layer cake for her quilt.  So the first thing I need to do was cut my fabrics into ten inch squares.


The hourglass blocks were a breeze to make.  I had them done in no time flat.  That's hillbilly talk or about 4 hours start to finish (trimmed).


Most of my quilts I use the raw edge method of applique.  But for this little quilt I decided to do prepared edge applique or turned edge.  That just means I turn under the edges of the applique before attaching them to the quilt top.  I was going to make a video about how to do this but life happens and didn't have time.  No worries.  Jill makes hers the same way I do.  Here's a video she made a few years ago about prepared edge applique.  Click here.


In the evenings I like to relax with a little bit of hand work.  No I'll not be hand appliqueing the Dutch Delight.  It will be done using Invisible machine applique.  If you've never seen this method you can read more about it here on my blog.  Right now I'm hand stitching the binding on my Hunkering down quilt. Quilt block tutorial and free PDF can be found HERE.  The plan was to binge on Netflix and get this done in one day.  I just don't feel like sitting all day and watching TV because I'm so excited about the Dutch Delight quilt.


The other project I'm working on is the Erin Russek's Home Again Free BOM.  You can see my blocks HERE.  And you can find the Free patterns HERE and finishing instructions HERE.  I still need to make the last three blocks and stitch down those plus 5 more.  Slowly but surely.  But there's no hurry.  This one is going to be over the top gorgeous when completed.  


In between the quilty happenings is this big ole box of peaches.  25 pounds of peaches.  We ordered them in advance from the Peach Truck and then picked them up on the scheduled day they are in our area.  I'm not a fan of peaches but my hubby says they are the best peaches he's ever ate.  You might still be able to get them in your area.  If your interested just follow the directions on their website.


See you all in a few days!  Here's an update on my girl Khaleesi.  She brings so much joy into our home.  I can't believe how much she has changed over the last year and a half.  There's no joy like a dog joy.  It's amazing what a little love and time can do for a rescue dog.