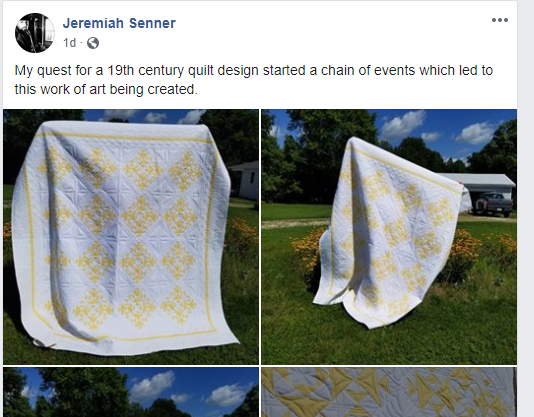
Every quilt has a story tell, some more interesting than others. Until I started publishing patterns most of my quilts were made out of emotions. It could be something as simple as a new baby in the family or as complicated as a terminal illness. Honestly I like the quilts constructed with emotions much better. They not only are made with love but they become more precious to me and the receiver due to the emotion that went into the design and every stitch.
My Hunkering Down Quilt falls under quilts made from emotion only because of what is going on across the globe. The real story behind this quilt is far more simple and happy. But before we get into the quilt story lets take a look at the finished quilt. Below is a closeup of the quilting. With so much white space I had to quilt it to death. It just wouldn't have looked as nice with something simple or an all over design.
The backing is pieced with the same yellow and white used on the front of the quilt. A simple label was also made from the same fabrics and stitched to the quilt back before quilting. This is my new favorite way of adding a label. The simple design is quick and so is hand writing the information on the label. And in order to remove this label a person would need to damage the rest of the quilt. I like knowing my beauties will always have a little bit of history attached to them for future generations.
But a word of warning before you sew your label onto the backing. Check your spelling, several times. I read this a blue million times. I even sent my best quilting buddy a picture of it so she could look it over for errors. We both overlooked the misspelled Pademic Pandemic. Oh well, nothing is perfect and it adds just a little more history to the quilt.
Speaking of history lets get back to the history this quilt on Podunk Pretties. It's simple really. Someone on Facebook was looking for the pattern for this quilt block. She only shared a cropped image of the block. I searched high and low looking for a quilt pattern or block.
No luck. So I decided to draft it up in EQ8 and write a tutorial so this nice lady could make the quilt. I had no intentions of making the quilt myself. My single block made for the tutorial was going to be made into a pillow for my bed. Well I fell in love with the block and the fabrics and YADA YADA YADA we have a quilt called Hunkering Down. You can find the
Hunkering Down Block tutorial here.
The story continues....Yesterday I shared my Hunkering down quilt on Facebook and Instagram. A man shared my post on Facebook. A man I didn't know, had never heard of, I found this odd so I had to check out his FB page. His FB looked pretty normal, nothing suspicious....Like I know what I'm looking for....HAHA! An internet detective I am not!
Look at his title for my quilt post. HMMM....who is this fella and how is he connected to MY quilt. Yes I'm stressing because I felt like he was saying this was his quilt. And for that Jeremiah I owe you an apology, I'm Sorry.
He will be the recipient of the quilt made by the Nina Woodgate, who posted the picture wanting help finding the pattern many weeks ago.
The great thing about yesterday's interaction with Jeremiah is he shared where the original quilt can be found. My excitement immediately turned to worry of copyright infringement. But as before there was no need to worry. I'm not infringing on anyone's pattern. Thank goodness.
So here she is in all her glory the original quilt called Summer Winds. Summer Winds is the name of a quilt block pattern but not this one. It was the quilt block they thought looked the closest to this one. But I have the book they used as a reference and it is not the same block. If you would like to see the entire article and quilt history, you can find it by
clicking here.

Shew! we can finally get to the measurements for finishing your quilt. This is basic information. Some math will be required on your part. WARNING Yardage calculations are done by the EQ8 program. I rounded up the estimates to the nearest whole number. The calculations are for the entire quilt top, blocks, borders, yellow binding.as shown in the image below. If you want a white binding like my quilt add 1 more yard to the white. Backing is separate and calculated using 42" wide fabric. It is also calculated with overage for longarm quilting. If you scroll down you will see the entire back of my quilt to give you an idea on how to piece your backing. Mine is 2 colors because I ran out of yellow.
There are some uncommon cuts in the borders. You can round these up or down to suit you. I prefer exact measurements but it's your quilt do as you like.
White Fabric 7 yds.
A (9) 12.5" squares
B (3) 18 3/16" squares, make two diagonal cuts from corner to corner on each(your cutting an X on the square.
C (2) 9 5/16" squares, cut from corner to corner ONE TIME
D (2) 3.5" x 68 3/8"
E (2) 3.5" x 74 3/8"
H (2) 6.5" x 76 3/8"
I (2) 6.5" x 89 3/8"
Yellow Fabric 3 yds.
F (2) 1.5" x 74 3/8"
G (2) 1.5" x 76 3/8"
Backing 8 1/2 yds.
Happy Stitching!
Pin It


