Pages

Friday, July 31, 2015

Boonie Blooms final tutorial


The pattern for the Boonie Blooms quilt can be downloaded or printed from here
Boonie Blooms Free Pattern.  I'm only doing  tutorials for the bloom block.  The rest of the pattern is in the free printable pattern.  You can find the other tutorials about this pattern here and here.

Today we'll be making the top unit of the Boonie Bloom Block.  It's your basic snowball block with a touch of applique.  I'll be making mine using fusible raw edge, but there's plenty of fabric in these charms to make them turned edge applique.


You will need 
(25) blue, pink and purple charms from the Moda Chloe's Closet 30's Playtime charm pack or 25 of your own assorted 5" prints. 
(8) of the yellow prints from the charm pack.  
(100) 1.5" background squares(yellow)
And fusible webbing(Heat n Bond lite)
And the templates found in the printable pattern

On each of the (100) 1.5" background(yellow) squares draw a diagonal line used for stitching. 


I chose to center a piece of tape with my needle on my sewing machine table as a guide instead of drawing a line.  Either way is fine and the results are the same.
Just stitch corner to corner.


Stitch on the line, clip 1/4" away from line and press seams open.  You girls know the dance!  It's the stitch, clip and flip!  This goes super fast, you won't believe how quickly this block comes together.
If your making the Boonie Blooms quilt you'll need to do this to all of (25) assorted prints.


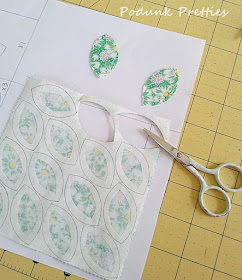
Grab those yellow prints for the center of your Blooms.  You'll need to trace the circle template to your fusible webbing 25 times.  I've windowed my circles before fusing to the fabric by cutting out the centers of the circles.  This  makes the applique softer, but you can skip this step if you don't mind a little stiffer applique.  When cutting the outside of the circle make sure you cut about 1/8" to 1/4" away from your drawn line.  Then fuse to your fabric per the instructions for your fusible webbing.


Now just cut out your circles on the line.  For those of you that save every little piece of fabric there's going to be some leftovers! 


Here's the proper way to place your circles into the center of the block.  Remove  the paper backing from your circles and finger press as shown below.


Press your block in half both ways, now  line up the pressing marks and press per the instructions on your fusible.  Okay let me tell you, I'm not one to live by the rules so... I didn't do this or all 25, only this one for instruction sake.  I eyeballed mine without any pressing marks.  The choice is yours, are feeling wild and free!
TIP of the day!  After pressing from the front to fuse the applique, turn over the block and press from the back also, it helps adhere the fusible to the fabric and you are less likely to get fraying when stitching and washing.


My thread of choice for invisible machine applique is Mono Poly from Superior Threads.  I can't say enough about this thread.  It does exactly what it says it does and more.  It won't melt in the dryer and I've done a test with my hot vintage iron on cotton setting for 10-15 seconds and it didn't melt.  Of course all irons are different, you might want to test with your iron before going hog wild.  


 Using a very tiny blanket stitch around the center.


Okay grab those stem units(tutorial here) and finger press both units in half as shown below. 


Line up the pressing marks, pin it, stitch it


Press open that final seam...awe so cute!  


This entire quilt could be made in a day.  It's so simple.


So there you have it!  If you have a question or find and error in my instructions or pattern feel free to leave a comment or email me.  And as always if you make one of my patterns I love pictures!


~ Lea Anne ~

Thursday, July 30, 2015

Throwback Thursday

This is a first for me, two post in one day.  It's not something I like to do but  since I just learned of a new link up...why not write two posts.  The new link up is called Throwback Thursdays.  Yep its just that easy, share some of your first quilts.  Unfortunately I don't have pictures of the first quilt made in high school or the small wall hangings made in my 20's.  But I do have this, my first bed sized quilt.  There was no pattern.  Just sewing together scraps until I had a piece big enough to cut into a square.


The fabrics were leftovers from halloween costumes, curtains, and various home decor sewing projects.  As you can see there was very little quilting.  Boy have I come a long way, now they get quilted to death!   This quilt was the beginning of my obsession.  My kids fought over who could sleep with it, and they wore it out quick.   There's a lot of memories in this old quilt for my kids.  I wanted the memories to last and not be torn apart by over usage.  So offered to make each of the kids any quilt they wanted so this  one could be put away.  Over the next few weeks I'll share with you on Thursdays the quilts they chose.  In the meantime how about hopping over to Krista Quilts to link up your first quilts!  It'll be fun to the changes over the years.


Twinkle 2 Quilt Along by Zany Quilter


Just wanted to pop in this morning and tell you about a new quilt along that  started this week.  So there's plenty of time to join in the fun for the


Vic will be pushing this one along pretty quick(I love quick quilts) you can find the schedule for the quilt along here.   The picture below is the one that caught my eye.  How cute is that!  Love the different shades of gray with the bright colors.


   Vic has the fabric requirements for several different sizes of quilts.  She is also going to show how to cut some of  the pieces from various pre-cuts.  Here's a snippet from her 

"For the star tips and four patch units you will need one jelly roll strip (2.5" x WOF), OR one layer cake square (10" x 10"), OR two strips cut from a fat quarter, OR a bunch of scraps.  This is the perfect time to dig around for pre-cut leftovers!!  During the cutting post I will show how to cut your pieces from each of these different types of scraps..."

Sounds like fun right?!  I've a new grandchild coming in October, this will make the perfect quilt for our new little bundle of joy.  I'm picking out my fabrics today, and will share my progress starting next week.
Oh I almost forgot to mention the best part
So hop on over and join in the fun. 

~ Lea Anne ~ 

Monday, July 27, 2015

Is it finished?

Well... I'm not quite sure if this one is a completed top.  The  quilt "experts" back in the day would say a quilt needs a border to make it stop.  Funny how these rules get ingrained in our brains.  Now my sensible side is telling me that a colorful binding would stop the quilt and give it the border I feel it needs. 


I'd really like to get this one done so I'm leaning towards quilting as is and slapping on a binding. 


Unfortunately I  made some cutting errors on the quilt top above so I decided to use up the miscut pieces.  I cut to many of the prints and cut the white squares to small.  Yeah it was one of those days where you think your head is in the game, so you multi-task only to realize your just making a mess of everything you touch.  Luckily the mistakes made a cute little quilt top.


The scallop borders is just too cute.  I might need to use this idea on a larger quilt someday.


There were a few more miscuts left over, so I started playing around with another idea for a border....now what do I want in the center?


Linking up with these inspirational blogs today!


 ~ Lea Anne ~

Thursday, July 16, 2015

What a Week

This week has been full of canning and freezing produce from the garden.  I've not been able to get in quilting time for two days.  Well I did manage to do some cutting of fabric, only to realize that I had cut them all the wrong size.  140 squares that were a half inch too small.  DRATS!  What kick in the quilty mojo.  So when this unexpected package arrived in the mail it was just what I needed to recharge my mojo.  Thanks again to Kris for the sweetest fabrics.


With all the cooking and canning caught up, now I can do some catching up in the Studio.   Last night I cut right amount of squares at just the right size.  It's time to put the pedal to the metal and do some speed piecing!  YIPPEE!    These little vintage cuties will stitch up quite nice with a little vintage 50's and 60's malt shop oldies playing in the Studio.  Right now Earth Angel is playing.  How many of you are fans of the Oldies?  Do you have a favorite blast from the past?  I'd  love to hear what gets you up and doing the Mash Potato or Peppermint Twist!


~ Lea Anne ~

Monday, July 13, 2015

Boonie Blooms Part 2- Making the stems unit

 Let's just jump right in and get started.  This tutorial will focus on the stem portion of the Boonie Blooms quilt block.
   The complete quilt top instructions can be found in the free printable pattern here.


To complete this unit you will need the following.  For this quilt I used a Moda 30's Playtime By Chloe's Closet Charm Pack. 
(9) green 5" charms
(50) 2.5" x 5" yellow background
(3) 5" fusible webbing(heat n bond lite)
(1) 2.5" x 5" fusible webbing(heat n bond lite)

The charm pack has 9 green charms.  5 charms of like print will be used for the stems and the remaining 4 are used for the leaves.  From the 5 like charms cut each into (5) 1" x  5" 


Stitch a 2.5" x 5" yellow background to both sides of all the green stem pieces.


Press seams open


The template sheet shown here is not the same as the one you'll print.  I modified it after the pictures.  To make the leaves you'll need the remaining 4 green charms and the fusible webbing.


Trace the leaves templates to the non shiny side of your fusible webbing.  You'll need (3) of the 5" and (1) of the 2.5" x 5".


This step is personal preference.  I window my fusible applique by cutting out the centers of the templates.  You can skip this step if you don't mind a little extra stiffness to your quilt.  


Place the fusible webbing on the wrong side(back) of the 5" charm.


Press using the heat settings suggested in the instructions of the fusible webbing. 


Cut out the leaves and remove the paper backing.  You will need to let these cool off before removing the paper.


 I'm going to show you 2 different ways to position your appliqued leaves.
 The first is to use the template provided.  Place your stems unit on top of the template.  You may need a light box or window to see through your fabric.  
If you look closely you can see I the leaf outline through my fabric.


Position your leaves to match the markings on the template.


Press to adhere the templates to the fabric.  


The second method for leaf placement on the stems unit.  Is to simply fold the unit in half, press,  and line up the points on the leaves to the pressed line.


Now all that's left is to stitch down your applique with the stitch and thread of your choice.  


I used Superior Threads Mono Poly and a tiny blanket stitch.


The tutorial for the flower unit(top) will be in a few days.


~ Lea Anne ~


Linking up with Judy over at Patchworktimes for Design Wall Monday.

Saturday, July 11, 2015

Remember these?

I've been shuffling these around the studio for quite some time.  It's time to do something with them.  Either finish them or store them away in a drawer.
The block pattern is called Nostalgic Pillows By Lynn Wilder.  You can find a link to the pattern on her blog Sew'n in Wild Oaks.  Just scroll down on her blog and look to the left.

   
The little ladies are vintage images found on the internet, then printed to fabric.


Originally I'd planned on making the 9 scrappy blocks.  Now I'm thinking I'd like to finish it as quickly as possible.  You know, UFO Busting!  So the afternoon was spent rummaging through the scrap bins and cutting fabric.


The gingham is the perfect fabric for framing these little cuties.


My favorite is this one with the bright pink gingham.  


I'm linking up this post over at Quilting is more fun than housework for Oh Scrap
Hop on over to join the fun and be inspired by scrappy quilters!


And Show and Tell Tuesday@ I have to say


~ Lea Anne ~