Pages

Monday, May 30, 2016

DWM~ Plans for HST's

Morning quilty friends.  I'm still plugging along on the Flippy corners quilt.  A few more blocks were made over the long weekend.   The adorable little 5.5"  twinkling stars have been the highlight of my weekend. However I've barely made a dent in the basket of bonus HST's.  But this seems like a good stopping place.  So I started playing around with a few setting ideas for the blocks.


Using only 8 blocks is a bit of a design challenge.  I came up 10 different layouts for the blocks.  How about a peek at a few of the ideas?  The design below really makes those twinkly stars shine.  The background fabric would be linen left over from another project.


Oh but I'm a real sucker for the white background.  Simple, and the stars still shine.


Maybe a table runner ....lots of room for quilting.


Decisions, Decisions....I like them all.  Which one would you make?

~ Lea Anne ~

Sunday, May 29, 2016

Podunk Pickin's #33 Country Tea Party

I hope everyone is enjoying their weekend whether it be spending time with family or finding time for yourself.  Here in Podunk a summer holiday usually means catching up on the many chores required for country living and then taking time for yourself.  The plan was to sew the weekend away but I've not been able to step foot in the Studio since last Thursday.  Well there's still two days left in our long weekend, I'm hopeful there will be plenty of time left to have a little private quilting party.  Speaking of Party's it's Podunk Pickin Linky Partytime!  Woohoo!
Since it's impossible for me to pick just one project from last week to feature this week, I let the Random Number Generator do the hard work for me.  This week it chose #7...
....Which is Cath from Bits 'n Bobs.  Her Country Tea Party handwork is stunning! I love that she adds extra detail to make the project her own.  


Friday, May 27, 2016

Sneak Peek at Hello Spring

 TGIF!  So how many of you have a long holiday weekend planned?  Is your plan like mine?  I planned to stay in my jammies all weekend and have my own little quilting retreat.  Curse the man who even tries to step foot in my happy space.  Well the cursing has already started but I'm hopeful to get back on track ASAP.   So how about a little peak at the next free Back Porch Blooms quilt.  Mark your calendars, it will be ready to print on June 7th.  You might recognize the little heart on the flower pot.  It's a freebie quilt block over at Cluck Cluck Sews that comes in several different sizes.  We'll be using the 4" heart variation for the flower pot.


I'm super excited about this one.  The pattern was an impulse last minute project inspired by so many of you!  You gals had so many great ideas for the block.  I took your ideas and ran straight EQ7.  


In true Podunk style I had to add a little applique.  Due to time restraints I chose fusible raw edge applique.  And since I want the fabrics to shine on this project I decided to pull out my favorite thread for machine applique and quilting.  Invisifil 100wt thread is super fine, hairlike but strong.  It melts into your project adding a soft edge without over powering your applique.  But does it really melt if you iron it...NO!   It's a Polyester thread that comes in several different colors.  It's not really clear or invisible.  They call it Invisifil due to it being so fine.  I found it when looking for silk quilting thread.  This was a cheaper alternative that gives the same quality of gorgeous stitches when doing free motion quilting.  If you like quilting feathers but struggle with heavy backtracking lines this is the thread for you.  Backtracks beautifully with out a heavy build up of thread.  


I purchased several spools of this a few years ago from online shop called Soft Expressions.   Scroll down on this link and you'll find single spools for sale in various colors.

~ Lea Anne ~

Wednesday, May 25, 2016

Another Posy Quilt

Just had to pop in this morning and share another Podunk Posy quilt. When quilters make my patterns it just tickles me pink.  Isn't it just adorable!?   You can see and read more about  it over at densyendehimmel blog.


I never get tired of seeing quilts with flowers.  So springy and cheerful.  I like to thank all the ladies in the guild for using my pattern  and sharing your quilty love with me.  If I could hug each and everyone of you I would, you've made my day.


If you'd like to make a Podunk Posy quilt of your own  the free tutorials can be found in the TUTORIALS tab at the top of this blog.

~ Lea Anne ~

Tuesday, May 24, 2016

A tip for when you flip

Yesterday evening Mr. Podunk asked if I would do some "manly" sewing.  As much as I dislike doing mending and sewing hard to sew fabrics I did it with a smile.   Afterwards I felt the need to shake the man dust off of the sewing machine with a quick girly girl block.   This little cutie is 100% scraps even the white background.  You might recognize the green fabric from my latest Back Porch Blooms quilt along.  If your new to the blog and would like more information about the quilt along and free patterns you can read about it here and here.


 Most of my free patterns use the flippy corners method or as I like to called it "stitch, flip, clip".  The pictures below show the process.
1. stitch a diagonal line from corner to corner.  
2. Then stitch another line 1/2" or so away from the first line.  I just move my needle position over as far as it will go and line up the left side of the open toe foot up with the first stitched line.  
3.  Cut between the two stitch lines.
4. The part you cut off is your bonus half square triangle.
At this point I would just toss them in the basket beside my sewing machine just for  bonus HST's.   Not all flippy corners are large enough to keep.  The original size of the flippy corner must be at least 2" in order for me to take the extra step of stitching the second line.


After digging through the basket of goodies to find 8 matching HST's the fun part begins....clipping those wings!
  Using a ruler with a diagonal line makes the trimming go much faster.  Just place the line on the seam and trim two sides, turn and trim the other two sides


There's many different layout options for blocks.  Below is just a few.  A couple more good patterns would be  The ocean waves quilt block and  Tree of life quilt block.  The possibilities are endless!


I guess the old saying is true...."saved the best for last".   Hmm...looks like a sweet leaders and enders project to me, and a great little mini quilt to add to the wall.  So as you play along with the Back Porch Blooms Quilt along and Linky Party keep those extra HST's handy, there just might be a free pattern or two for using them up!


~  Lea Anne ~

Monday, May 23, 2016

More Blooming ideas

Little did I know when designing this block months ago I was sparking an internal obsession.  I just can't stop making and designing more quilts with them.  So this past weekend all of the Pam Kitty fabrics in the stash were pressed and scanned into EQ7.  Then the real party started, picking just the right fabrics...like a gal could go wrong with Pam Kitty...HA!


There's been a wonderful response to the blocks here on the blog and on Instagram.  A great big ole hug and thank you to Pam Kitty for sharing my blocks on her Instagram feed.  If your on Instagram and share your block or quilt made from this block use #backporchbloom or #backporchbloomquilt so I can find you and of course don't for get to tag me @podunkpretties.  Most of all, thank you to all of you that are sharing your inspirational blocks and  planning to play along during this quilt along.  With the responses come little hints as to what you plan to make which has inspired my quilt designing even more.  The next free pattern and linky party(June 7) is still a couple of weeks away but here's an early sneak peak.


These cute little butterflies will be part of the next project.  If you'd like to make a few of your own you can find the free tutorial here.  Now let me say this block was designed for a different quilt  and the tutorial for them sets them on point.  I left the corners off my blocks that finish at 6" in quilt.


As I mentioned before most of the fabrics you'll be seeing in this quilt along series will be Pam Kitty.  However my background and gray fabrics are not.  I use Kona White for almost all my backgrounds and the gray is from an unknown line.  


As promised here's a simple and sweet inspirational project.  I can't make all the ideas but I can share most of them with you along the way.  Some will include basic measurements for making and some will not.  It all depends on weather or not time permits.  This week your in luck...I've all kinds of time! 


  You can find the directions for the 9" x 18" Back Porch Blooms quilt block here.


Alrighty I saved the best for last.  Here's the measurements if you'd like to give this little runner a try.  It finishes at about 58" x 28".  You'll notice that not all the pieces have a measurement  on them.  For instance the final border is 
2.5" x 58.5" and marked on the top but not on the bottom.  It just made the picture look to busy to have all those numbers on there but you gals get the idea right?!


If you have any question feel free to leave a comment or email I'll answer them as soon as possible.  And as always I'm human, if you find an error in my patterns or tutorials please let me know so I can fix it ASAP.

~ Lea Anne ~

Sunday, May 22, 2016

Podunk Pickin's #32, Cinema at 7

This weeks pick inspired me to take a walk down memory lane.  To a time when things were easier.  Long before the internet and cable TV.  A time when families actually spent time together.  As much as I love the internet and our 200+ channels of non stop entertainment I still miss those days of nothing to do and nothing to watch on TV.   Sundays in my childhood home was the only day our family was all together.  During the spring and summer our Sundays were spent tending to the garden and yard work.  But in the winter it was playtime.  Most of our Sundays were spent at the Cinema watching the latest action movies.  Afterwards we'd head off to the Mall for an ice cream cone (Rocky Road for me) from Baskin Robins. Leisurely strolling around window shopping, rarely even stepping foot into the shops.  Of course the day wouldn't be complete until dad and my brother had a weekly visit to the tool department in Sears while mom and I shopped for new cloths...on the clearance racks of course.  So what does all this have to do with this weeks pick?
Well the random number generator chose #9.
Sew Yummy linked up this wonderful scrap quilt she calls "Cinema at 7".  You can find more information about it here on her blog.  What great way to use up scraps.  A smaller version of this would be nice for movie nights at home don't you think?


Thursday, May 19, 2016

New Templates for Back Porch Blooms block

I was contacted by two different quilters having issues with the templates given for the Blooms block.  So I printed them from the link I gave you and made another block.  The templates were correct.  So the only thing that could be wrong was their  PRINTER SETTINGS.  


If you've already printed the templates make sure your printer is printing to exact size, no scaling, do not shrink to fit the page.
If you don't want to take any chances I've uploaded a new templates page with a 1 inch square.  Measure this square before using the templates to cut fabric.  I should have put them on the first set of templates.  Here's the link to the new templates.
They should look like the ones below.  I'm also changing the link in the previous post.  My deepest apologies to the two quilters who wasted fabric because of my negligence. 


While I've got you all here and have your attention I might as well show you the fabric I've pulled for the next two quilts.   Oodles of Pam Kitty!  It's hard to decide which one to cut first...so much sweetness. 


~ Lea Anne ~

Tuesday, May 17, 2016

Back Porch Blooms

Before starting the tutorial for the Back Porch Blooms quilt block I wanted to share with you my first of 3 quilts planned using the block.
This first little quilt could be made in a day.  Such a sweet and simple quilt that would be great as wall hanging or as so many of you have mentioned a banner.  


Since the pattern is simple I decide to keep my quilting simple also, then dress it up a little by making the scalloped border.  


For the backing I used the same fabric as the pot because I LOVE this fabric.   Now don't look to close at the picture below or you'll see that my binding has not been stitch to the back....it's glued in place until I get time later in the week to sit down with needle and thread.


The pattern I'm sharing today is for what you see below with no scallops.  However I will provide you with the name of tools I used for making making my scallops and a link to a tutorial if you'd like to make your own using that tool.  There will also be two more links provided.  One for the templates for making the flower pot and one of the complete tutorial without templates.  I separated them because not everyone wants to print out the entire pattern just to get the templates. 


So lets started with the fabric requirements.   I let EQ7 do the math for fabric requirements and it says you'll need for the mini quilt above
1/2 of a yard for the background fabric
3/4 of a yard for the borders
The rest can be made from scraps or larger.
Before you start cutting please read carefully through all instructions first.  All seams are pressed open unless otherwise stated.  

Cutting for each block

From the background fabric
(1) 5.5 x 6 flower pot background
(4) 3" squares
(4) 2.5" squares
(10) 1.5" squares

From the green
(2) 4.5 x 3.5  leaves
(1) 1.5 x 3.5 stem

Flower pot fabrics
(1) 6.5 x 5.5 flower pot(yellow floral print)
(1) 7.5 x 1.5 pot rim(red gingham)

The Bloom
(4) 4.5 x 3 petals(red)
(4) 1.5 squares(same red as petals)

Center of Bloom
(1) 4.5 square

After collecting your fabrics print out your templates, and cut them on the dashed line.


I spray a little quilt basting glue on the back of my templates to keep them in place while cutting as shown below.  I'm also cutting from yardage instead of the
 6.5 x 5.5 in the cutting instructions.


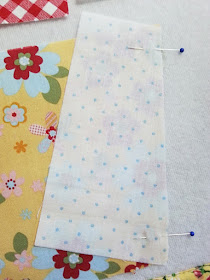
Now for the background fabric on either side of the pot you need a 6" x 5.5" background fabric.  Fold in short ends together, right sides together.


Place your smaller template face up, straight edge on the fold.  Then cut the angle edge as show below. 


Open up your cut piece and cut on the fold.


Here's how your block is laid out before sewing.  I used the stitch, clip, and flip method on the leaves and the bloom.  I don't mark my fabrics with a diagonal line I use Clearly Perfect Angles on the bed of my sewing machine to help me stitch a straight line from corner to corner without marking the fabric.  But you can also draw a diagonal line on all (4) 2.5 background fabrics and stitch on that line to get the same result.


Stitch together to two sections as show below.


In the picture below you can see how my background fabric hangs off at the bottom and a little piece of the yellow print is sticking out from the top. 


For the leaf unit place s 2.5" background fabrics with right sides down on the green 4.5 x 3.5 leaf fabric, stitch a diagonal line from corner to corner on the 2.5 background fabric.   Be careful!  Make sure your stitching them in the correct corner....don't as me how I know!  After stitching cut 1/4" away from the stitched line.


Repeat on the other leaf and continue to assemble the block as shown below in the picture.  Press the leaves unit towards the stem.  


Stitch the top leaf unit to the bottom flower pot unit.   Both the pot and the leaves unit will be pressed towards the rim(red gingham).

TADA!  We're almost done.  Grab a chocolate and admire your little pretty.


Layout your bloom block as shown below.  Start by stitching your stitch, clip and flip pieces.  Its the same as before...you got this!


Oops!  Where's my center?  Let's just pretend its there and start stitching together the rows.


Like magic my center is in place...yeehaw!  Press the top and bottom rows towards the background fabric and the center unit towards the center of the bloom.

Now just stitch your rows together and press towards the top and bottom units.


Finger press a crease in both units as shown below.   With right sides together match up the creases, pin and stitch.


Press towards the bloom unit and reward yourself with 2 more chocolates...Yeah!  Isn't she a cutie?


If you making the little quilt here's the measurements for the borders. For both the background fabric and the green border fabric add your side pieces first and then the top and bottom pieces.  


To make the scallop edge I used Easy Scallop by Darlene Zimmerman.
You can find a great tutorial with several links to other scallop binding tutorials here  Scalloped Quilt Border Tutorials by AnkasTreasures.  


This is the first of 3 free patterns using this block or portions of this block.  On June 7th  I'll host a Back Porch Blooms Linky party where you can link up your progress or better yet finished project.  When you enter the linky party you're also entered to win this giveaway along with a few more things that haven't arrived via snail mail.  On June 7th I'll also give you a sneak peek at the next free pattern using this block.  One week later on June 13 I'll announce the winner and have a date set for the next linky party.


The purpose of doing this quilt along is to inspire you to create a quilt on your own and possibly inspire others with your ideas.  I realize that not everyone is interested in drafting their own quilt patterns.  That's why I'm doing free patterns so you can still participate in the linky party and giveaway.  There will also be inspirational quilts throughout this quilt along.  Quilts I've drawn up but will not be writing tutorials or patterns for them.  However feel free to use them as inspiration or try to make them on your own.  It's all about fun and creativity.

Hope to see a bouquet of Blooms soon!

~ Lea Anne ~