The butterfly corners was the most requested of all the options given in the original post about the Podunk Posy quilt. I must admit it's my favorite option also. The first two tutorials for the Podunk Posy quilt shown below can be found
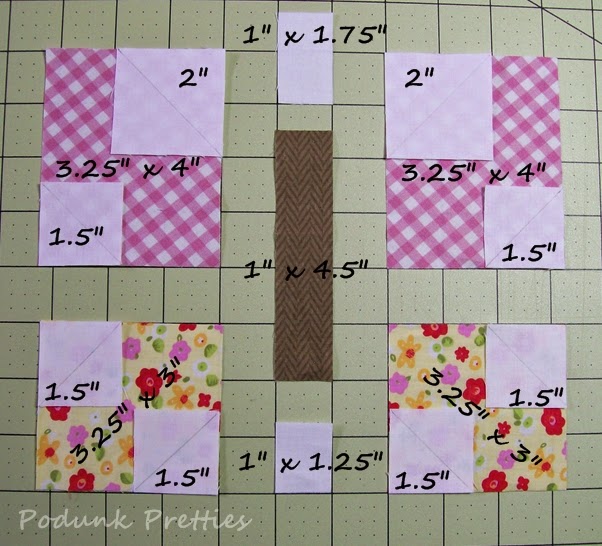
What you will need for one butterfly block
White
(2) 8.75" squares
(2) 2" squares
(6) 1.5" squares
(1) 1" x 1.75"
(1) 1" x 1.25"
Top wings (pink gingham)
(2) 3.25" x 4"
Bottom wings (yellow print)
(2) 3.25" x 3"
Body (brown)
(1) 1" x 4.5"
Mark all white squares with a diagonal stitching line. Layout your pieces as shown below.
Okay lets do the Stitch, clip, flip!
Stitch on the marked line on all squares then clip 1/4 of an inch away from the stitched line. Then flip and press all seams open.
The butterfly is slowly emerging from the cocoon, just look at her pretty wings starting to take shape! Let's help her out by stitching the top wings to the bottom wings and pressing the seams open.
Lovely! All she needs now is a sexy body to go with those gorgeous wings. Sew together the last three body pieces as shown below and press open the seams.
Oh! her wings are starting to flutter, hold on tight while you put the finishing touches on her by attaching both sets of wings and pressing seams open.
Darling you look Marvelous!!!
In order to help this girly girl take flight we need to point her in the right direction. So grab those (2) 8.75 squares.
Cut both in half diagonally.
Fold each triangle in half and make a crease in the center. Place the center triangle mark with the center of the butterfly block and stitch. I forgot to take a picture of them right sides together and pinned in place.
After stitching and pressing the seams towards the triangle clip off as shown below.
Fold the Butterfly in half to find the center of the side. I matched up the seams of the first triangles then pressed a crease at the center point.
Line up the centering crease marks, pin and stitch. Press towards triangle.
This block is a little over sized, so you'll need to trim it to 12.5".
Now just do all this three more times for your 4 corners.
As always if you find an error in my directions please feel free to leave a comment or email me so I can fix them ASAP. Thanks!
~ Lea Anne ~
Pin It


Lovely and simple idea for a Butterfly, cool!
ReplyDeleteYet another GREAT tutorial! Thanks! XO
ReplyDeleteVery good instructions well done
DeleteA fun quilt design, a sweet butterfly block and a great tutorial Lea Anne!
ReplyDeleteI love these corners!
ReplyDeleteI love this butterfly...thank you so much for giving the measurements!
ReplyDeleteThanks, Lea Anne! This is an adorable butterfly. My daughter loves butterflies, so I think I will have to make some of these for her.
ReplyDeleteVery nice tutorial....thanks for sharing!
ReplyDeleteDropping by from Let's Bee Social, this is such a pretty block and great tute - Chris :D
ReplyDeleteVery cute.
ReplyDeleteThat looks like a block I should make a bunch of. Thanks for the tut.
ReplyDeleteHugs
well done my butterfly looks amazing
ReplyDelete