This is a super simple corner option for the Podunk Posy quilt. You can see it highlighted below. There will be links to the previous quilt tutorials at the bottom of this post. To keep the tutorial for this block as straight forward as possible and less pictures I've left out in depth piecing photos. I used the no pin method when piecing the checkerboard unit of this block. If you need a refresher on how this done you can find my tutorial for the similar center blocks here.
One tip before we get started. When placing this block in your quilt make sure the upper left corner square is a print.
You'll need (4) of these blocks if you chose this corner option
What you will need for one block
From the white background fabric
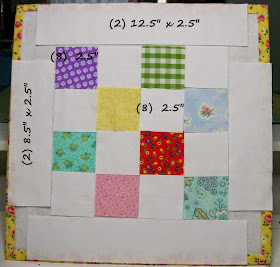
(2) 12.5" x 2.5"
(2) 8.5" x 2.5"
(8) 2.5" squares
From your scrap prints
(8) 2.5" squares
Layout your pieces as shown below
Starting from the top sew together the rows going across, and pressing to the darker fabric.
It should look like the picture below.
Now sew those rows together from top to bottom.
Press the corner seams open as shown.
Add your 8.5" x 2.5" rectangles to each side and press towards the rectangle.
Repeat the same process for the 12.5" x 2.5" rectangles.
It should measure 12.5". Now wasn't that simple? It would make a great block for using up scraps. And instead of white borders use more scraps from your stash.
If you'd like to make the Podunk Posy quilt here's a list of the Tutorials starting with my idea first.
Tomorrow I'll be posting a surprise option for the corner blocks.
Hint: Some BUNNY is going to love it!
See you tomorrow!
~Lea Anne ~


This is wonderful...LOVE it all! Thank you!
ReplyDeleteI love this quilt. I think I'll make it. Thank you for such great tutorials! XO
ReplyDelete