Hey sweet quilting friends! Let's just get right to the good stuff. Who doesn't love a newly finished quilt, so here's the sneak peek of my newest quilt pattern Dancing Pinwheels. It's bright and happy with lots of color. Sometime this week I'll let you see the entire quilt with more details.
Dancing Pinwheels is a scrappy quilt designed with the beginner quilter in mind. While attaching the binding it reminded me of cute tip to help with those 45 degree seams. Sewing the binding together with a 45 degree seam isn't necessary but it does help to reduce the bulk. As a beginner quilter I could remember to put right sides together and have a little fabric extending past the edges as shown below but I couldn't remember where to start sewing. I ripped out several seams and would often just sew them straight, end to end.
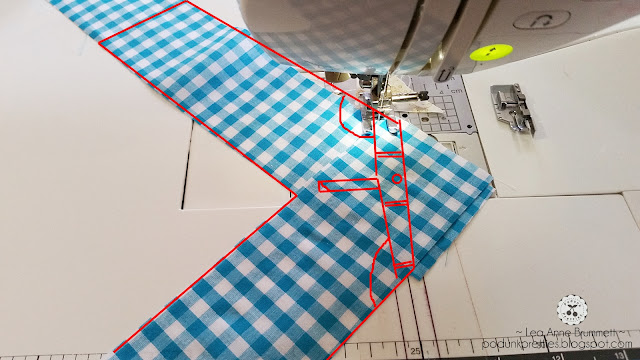
Then one day I found a handy tip. I can't remember who or where I first heard of this but it changed my bindings forever. The tip: with right sides together and layered as shown below, imagine you are sewing a waistband on a pair of pants with the legs sticking out. Then place your needle in the "V" created by the fabric overhang. Stitch from "V" to "V". That's all there is to it! A waistband! Quilters have such creative minds. Now every time I'm making bindings this image pops into my head.
To add the next strip all you need to do fold the previous strip so the right is facing up. Now you can add the next strip and use the waistband trick again.
Trim 1/4" away from the stitched line. Can you see my little waistband? In my mind I always envision me wearing the pants of the fabric of the current binding. How cute would these pants be! A sweet little spring outfit perfect for casual Easter dinner.
Pressing the seams open and trimming the little bit of fabric excess and I'm ready to attach the binding to my quilt.
Normally I would attach the binding to the front of the quilt by machine and hand stitch it to the back. But I don't have the time to sit for hours and hand stitch this one.
This binding was done 100% by machine. Sewing to the back of the quilt first and then flipping to the front and machine stitched it into place. Does anyone else love to hand sew binding? I love it for a couple of reasons. First, I just like the look of hand stitched binding. Second, it gives me a chance to watch hours of TV with no guilt.
I can't wait to show the finished quilt and the details on how you can get this new quilt pattern for FREE.
#quiltbindingtip #quiltbinding


Great explanation. I do think some brains are wired to "get it" and some are wired to need visuals. Great visual! We all learn differently!
ReplyDeleteWell I already love the gingham and polka dots! Cute trouser diagram too.
ReplyDeleteMe gusta leerte porque siempre das buenos consejos. Yo realizo la unión también en V. Y siempre coso el bies en la parte posterior a mano, el acabado es mucho más limpio. También aprovecho para ver la televisión Un saludo
ReplyDeleteWhat a wonderful tip!! It’s a visual I can always remember. Thank you!!!
ReplyDeleteThanks for the tip!! I do love to hand sew the binding, especially if it's a gift for someone special. I spend the time thinking about them and wishing them the best in the journey they're on!
ReplyDeleteSadly, I don't have time to hand sew binding on all for them.
Do you have any tips on machine sewing the binding? When I do it, the back doesn't look so good.
ReplyDeleteI know exactly what your talking about. I like for my stitches to fall on the binding on the back. Some quilters want it to fall outside the binding. I'll share some tips on machine binding the next time I'm working on a binding. It's easier to explain with pictures or videos as a reference.
DeleteGreat. Thanks
DeleteI am crazy about that tip - I always have to pin it and open it to make sure I will sew it correctly. Of course now that I will think about pant legs - WOW save a step!!! Thank you so much.
ReplyDeleteI prefer to hand bind as well for the same reasons! I've been doing that trick for awhile and I love the final look. I'm so glad to see it shared!! The one problem I have is when I reach the point where I have to attach it to the beginning piece. I know there is a secret and I'm hoping you know it ... I do it but it's a hassle ... must be a trick or technique .. Help! Thanks, as usual, for all you do and share!!
ReplyDeleteI embroidery when I watch TV so I always have an excuse to sit for hours in front of the TV! Haha! I have a TV on the wall in my sewing room. Since I'm retired I always tend to watch TV or listen to podcasts or I will start talking to Lila the chihuahua!
ReplyDeleteI have machine sewn binding, but I just don't like it. I tend to hand sew them all and since I'm home I don't mind the time it takes.