Thursday, April 30, 2015

Up with the chickens

Good Morning!  It's another beautiful day in Podunk!  I was up with the chickens this morning.  In hillbilly lingo that means before the rooster crows or before daylight.  My youngest son tells me "Mom you don't get up with the chickens, you're the one that gets up and wakes up the chickens".   No time to waste is my motto.  The good lord made daylight for a reason, and it wasn't for sleeping.  I've always been early to bed and early to rise.  Why would you want to sleep away a beautiful day?   So most days I'm up before the sunshine.


These pictures were taken yesterday evening while we were doing 
"Operation Free Range"
Which is nothing more than teaching Lobo, my German Shepherd, that our chickens aren't for his supper.  He did really well, the real test will be when we aren't watching him.  We've had a few issues with him and the neighbors dogs that like to do their dooty in our yard.   Not anymore, Lobo let them know that's unacceptable behavior.   And he doesn't really like wildlife on the property either.  That's good when it comes to coyotes and coons, but bad when it comes to Bambi and her momma.


All my indoor chores are finished and it's still to cool to go outside.  Looks like I get to spend a few hours sewing!  Yeah!  


~ Lea Anne ~
Pin It

Monday, April 27, 2015

My indoor garden

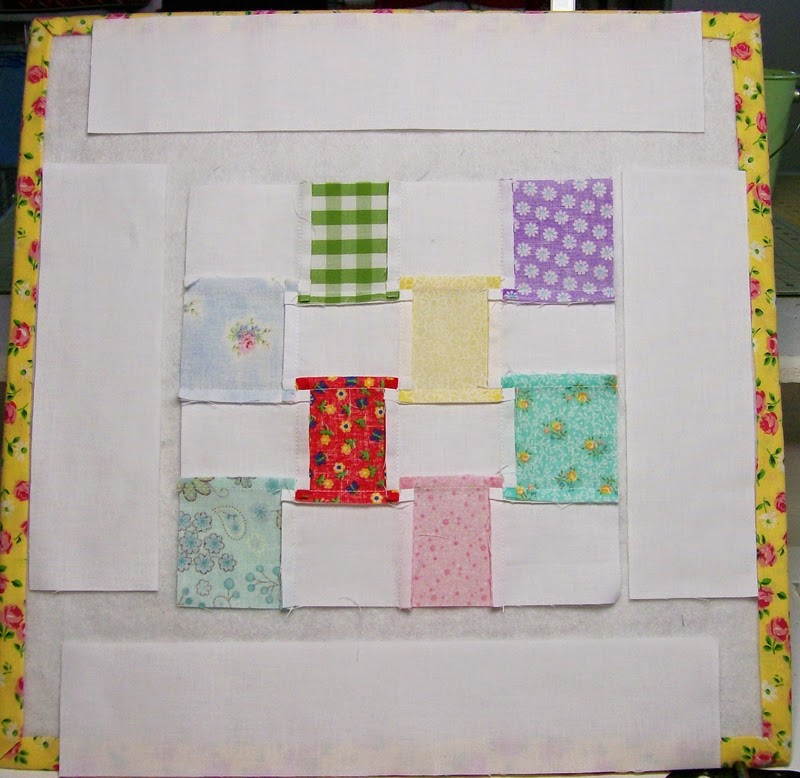
Hey quilty friends!  Top of the morning to everyone!  Did everyone work in the yard or stitch up a storm this weekend?  Me? a little of both.  I'm so excited to get this week started.  There's tons of things on the to-do list.  Mowing, weeding and planting are at the top of the list.  This time of year sewing Posy's takes a backseat to the real ones.  And just like my real flower garden these Podunk Posy are slow to bloom.  Slowly but surely I'm making progress with hopes of a Friday Flimsy.  
All 36 are ready to be squared up sometime today.


Hopefully I can squeeze in sewing a few steams and leaves this evening also.   If you'd like to make a Podunk Posy or two for your indoor quilt garden, you can find the pattern here  or in the tutorials tab at the top of this page.   I'm off to mow the grass, my favorite yard chore.  Nothing smells better than fresh cut grass...well maybe fresh baked bread.  I should email Yankee Candle company of a new scent they should market...Fresh Cut Grass.....I'd buy it!  


~ Lea Anne ~
Pin It

Friday, April 24, 2015

Podunk Posy quilt, Surprise Bunny Block Tutorial(pic heavy)


Isn't this just the sweetest little bunny?  I wish I could take credit for the design but it was designed by Sally over at TheObjectsofDesign.  She is very talented and creative blogger, that almost always puts a smile on my face with every post.  You can find her posts about the bunnies herehere and here.  As soon as I saw it I knew it would make a cute corner option for the Podunk Posy quilt.  I contact her right away and was given permission to write this tutorial.  Her yellow bunnies below are an updated version that I'll be using for this tutorial.  


This block is tiny but don't let that scare you.  You've been saving all those tiny scraps for years, now is your chance to use them!  

Before we get started lets go over a few things.  All measurements are in inches.  Reducing your stitch length on you sewing machine will help with accuracy, I used 1.8.  I also used a scant quarter inch unless stated otherwise.  Pressing...I didn't give pressing directions, I just went with the path of least resistance using finger pressing method.  And then later had to clip some seams to reduce bulk.  For the most part this will be a picture tutorial.
(sorry about the poor picture quality). 
 I've used circles and arrows to show piecing instructions and I also numbered each step.  If you have any question feel free to leave a comment.  

What you'll need for one block
4 blocks will be needed for the podunk posy quilt

Dark Pink(back leg, tail and left ear)
(1) 2.75
(2) 1.25 x 2
(3) 1.25 squares

Light pink with white polka dots
 (1) 2.75
(1) 2.75 x 2 
(6) 1.25 squares
(1) 1.25 x 2.75
(1) 4.25 x 2

White background fabric
(7) 1.25 squares
(3) 2 x 1.25
(1) 1.25 x 2.75
(1) 2 x 2.75
(1) 3.5 x 2.75
(2) 2" squares
(2) 8.75 squares

Lay out your pieces as shown below.


I've marked all the pieces below that will need to be sewn using the stitch, clip and flip method.  Stitch all of these, then clip and flip.  


Since the pieces are so small I didn't mark them.  I used the tape on the bed of the machine as my corner to corner guide.  


Now that you have all of the corners stitched, clipped and flipped, we can get hoppin' on the rest of the block.


Fold triangles in half and finger press a center mark.  Do the same on the bunny block.


Line up the pressing marks, pin and stitch.


Trim up your block to 12.5


The tutorials for the rest of the Podunk Posy quilt


~ Lea Anne ~


Pin It

Thursday, April 23, 2015

Podunk Posy Checkerboard corner Tutorial

This is a super simple corner option for the Podunk Posy quilt.  You can see it highlighted below.  There will be links to the previous quilt tutorials at the bottom of this post.  To keep the tutorial for this block as straight forward as possible and less pictures I've left out in depth piecing photos.  I used the no pin method when piecing the checkerboard unit of this block.  If you need a refresher on how this done you can find my tutorial for the similar center blocks here.


One tip before we get started.  When placing this block in your quilt make sure the upper left corner square is a print.
You'll need (4) of these blocks if you chose this corner option

What you will need for one block

From the white background fabric
(2) 12.5" x 2.5"
(2) 8.5" x 2.5"
(8) 2.5" squares

From your scrap prints
(8) 2.5" squares

Layout your pieces as shown below


Starting from the top sew together the rows going across, and pressing to the darker fabric.
It should look like the picture below.


Now sew those rows together from top to bottom. 


Press the corner seams open as shown.  


Add your 8.5" x 2.5" rectangles to each side and press towards the rectangle.


Repeat the same process for the 12.5" x 2.5" rectangles.


It should measure 12.5".  Now wasn't that simple?  It would make a great block for using up scraps.  And instead of white borders use more scraps from your stash.  


If you'd like to make the Podunk Posy quilt here's a list of the Tutorials starting with my idea first.


Tomorrow I'll be posting a surprise option for the corner blocks. 
 Hint:  Some BUNNY is going to love it!

See you tomorrow!

~Lea Anne ~


Pin It

Tuesday, April 21, 2015

I found these in my shopping bags!

Yesterday I spent the first half of the day with my mom'ma.  We started out early and raced from store to store before finishing our race at her lunch time Doctors appointment.  Somehow during our race these items ended up in my shopping bags.


The vase and the iron were thrift shop finds.  The iron was $1.25 and the vase $.99.  Yes that's no typo.  Both of them for about a dollar each!  BARGIN!  
The Farm Girl Vintage book on the other hand was full price from the Local quilt shop.  They called last week to let me know it had arrived.  To tell you the truth I totally forgot about placing the order back in December.  This book is loaded with so many cute blocks it's hard to decide where to start.  Lori has a quilt along using this book.  You can read more about it over at her blog Bee in my Bonnet.  Not sure that I'll have the time to stitch a long but I definitely be watching a long.

~ Lea Anne ~

Pin It

Monday, April 20, 2015

Design Wall Secret

Hi-diddly-O quilty friends!
 My goodness is it Monday already?  Time seems to be getting away from me these last couple of weeks.  There's so much that needs to be done in the spring and so many things I want to do besides the NEEDED things.   I love reaping the benefits of planting a garden but the actual work of the garden....eh..not so much.  I'd rather be inside sewing up some spring garden quilts!
Well it may be spring but my studio is filled with colors that are not so springy.
Shhh... it's a secret sewing project, so all I can show you is little sneak peaks of my trash can.


This is the first time that I've had a secret that can't be shared with my bloggy buddies.   And as you can tell it's definitely a color challenge.  Way out of my color comfort zone.  But I'm loving the uneasy feeling that comes along with the challenge.  Since the colors are not so girly I'm finding different ways to add a girly touch.   Those fancy stitches on my over priced sewing machine have finally come in handy.  


I've not forgotten the Podunk Posy tutorials.   I apologize for being late with last weeks tutorial.  I'm working on it today.  So I'll see you soon with another option for the corners.  You can find the past tutorials for the Podunk Posy quilt in the tutorials tab at the top of my blog.

~  Lea Anne ~
Pin It

Monday, April 13, 2015

Podunk Posy quilt, Butterfly corner block tutorial


The butterfly corners was the most requested of all the options given in the original post about the Podunk Posy quilt.  I must admit it's my favorite option also.   The first two tutorials for the Podunk Posy quilt shown below can be found


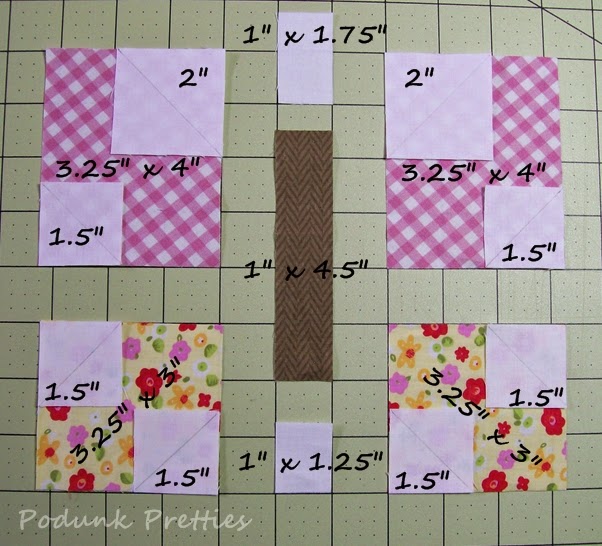
What you will need for one butterfly block

White
(2) 8.75" squares
(2) 2" squares
(6) 1.5" squares
(1) 1" x 1.75"
(1) 1" x 1.25"

Top wings (pink gingham)
(2) 3.25" x 4"

Bottom wings (yellow print)
(2) 3.25" x 3"

Body (brown)
(1) 1" x 4.5"

Mark all white squares with a diagonal stitching line.  Layout your pieces as shown below.


Okay lets do the Stitch, clip, flip!
Stitch on the marked line on all squares then clip 1/4 of an inch away from the stitched line.  Then flip and press all seams open.  


The butterfly is slowly emerging from the cocoon, just look at her pretty wings starting to take shape!  Let's help her out by stitching the top wings to the bottom wings and pressing the seams open.


Lovely!  All she needs now is a sexy body to go with those gorgeous wings.  Sew together the last three body pieces as shown below and press open the seams.


Oh! her wings are starting to flutter, hold on tight while you put the finishing touches on her by attaching both sets of wings and pressing seams open.


Darling you look Marvelous!!!


In order to help this girly girl take flight we need to point her in the right direction.  So grab those (2) 8.75 squares.


Cut both in half diagonally.


Fold each triangle in half and make a crease in the center.  Place the center triangle mark with the center of the butterfly block and stitch.  I forgot to take a picture of them right sides together and pinned in place.


After stitching and pressing the seams towards the triangle clip off as shown below.


Fold the Butterfly in half to find the center of the side.  I matched up the seams of the first triangles then pressed a crease at the center point. 


Line up the centering crease marks, pin and stitch.  Press towards triangle.


This block is a little over sized, so you'll need to trim it to 12.5".


Now just do all this three more times for your 4 corners.


As always if you find an error in my directions please feel free to leave a comment or email me so I can fix them ASAP.  Thanks!  


~ Lea Anne ~
Pin It
Related Posts Plugin for WordPress, Blogger...