Wednesday, July 31, 2024

Midweek Bumpkin Baskets Progress

 The last couple of days didn't go as planned and I'm happy it didn't.  The plan was to work on the applique border for this quilt.  


As you can see I took a different route and decided to make the star sashing instead.   My thought was "what if the planned border won't work as planned?"  It's probably best build this quilt from the center out  and not make anymore applique border pieces until I'm positive that it's going to work.


Today's plan is to add the next border of background fabric.  Then if time permits start cutting for the many HST's in the next border.  


The HST's will be made from the same fabric as the baskets. Yes, this quilt has a lot of my precious Lakehouse Drygoods fabrics.  It used to be hard for me to cut into these pieces.  Something happened, I had a shift in my thinking in the last week.  Basically I'm ready to start cutting and using any and all my fabrics.  No more saving it for special projects.  There's big plans in the weeks ahead for my stash, so stay tuned, I'm about to do something wild and outrageous....well for me its a huge step. 


This post is being shared over at Quilt Fabrications, Midweek Makers.  Hop over to be inspired!


Pin It

Monday, July 29, 2024

Bumpkin Baskets ~ The Original ~ A New Quilt Plan

 Hello Quilty Friends!  After a week of this quilt hanging on my longarm I finally found(made) the time to take a picture.  This is the quilt I thought I quilted and gifted to my daughter about nine years ago.  Last Monday I shared a peek inside my quilt designing brain while I tried to come up with a plan for a new quilt using the same basic basket block in red, white and blues.  I'm happy to finally announce I have a final quilt design!  Woohoo!


The drawing was made in EQ8.  It's a rough drawing of the blocks and arcs.  I just didn't want to take the time to make it look exactly like the real blocks.  You can see the real blocks and see more about the designing process for this quilt by clicking here.


The flower applique on the border arcs may change once the arcs are glued in place.  Using the same size flower on the border as in blocks makes for a ton of work.  The original quilt has one large flower instead of a cluster of flowers.  But it also doesn't have flowers in the basket block.  I'm wondering if a larger flower might look odd when I have small flowers in the baskets.  We'll just have to wait and see.


Now that I have a plan, last night I started doing the math for the quilt.  And wouldn't you know it, I'm short 17 arcs.  Remember this quilt was started in 2019 and it was a different plan.  


So I dug through the project bin to see if had enough scraps to make more arcs.  If not I can pull from the stash.


Hallelujah! Jackpot! I found more assembled arcs and extra wedges to make more arcs! Yeehaw!  Yes, even as I tell you this I get the same giddy feeling and do a happy dance wiggle in my chair.  


For those of you that want see how this quilt came to be from the very beginning about nine years ago I searched my blog and found two blog post.  The first one is how I came up the idea for the basket block from a vintage block.  Click here.  The vintage block and my first idea to recreate the block are both very different than the blocks in my two quilts above.

The second link is a year after it became a UFO in 2016.  Click here.


Pin It

Thursday, July 25, 2024

Sorting Quilting Books And More

 Hello Quilty Friends!  Over the last few days the stitching has come to a screeching halt as I mull over the ideas for my current project.  This seemed like a good time to go through the quilting books and maybe get an idea or two.


It's not a huge stash of books but it's not small either.  Why do I keep collecting books when I rarely make a quilt from them?  Well, they are fun to look through and you never know when I might decide to actually make one of the quilts.


An entire day was spent looking through each and every book and magazine.   Even this one, my very first quilting book given to me by my mother in law in 1995.  Up to this point I had never seen a quilting book.  All my quilts were designed by me from looking at pictures in magazines like Better Homes and Gardens as I sat in a waiting room waiting to be called for an appointment.


It was pretty common during this time for quilting books to have templates as shown below.  So I didn't use the patterns in this book either.  The rotary cutter was still pretty new to the quilting world but I had seen them on quilting shows on PBS or the Home and Garden channel.  After telling my mom about this amazing new tool, mom and dad gave me my very first rotary cutter, mat and ruler for Christmas.


A few years later(2005) I bought my first real quilting book.  With 101 quilt patterns there would be no need to ever buy another book...HAHA!  Silly me! I made one quilt in this book and went right back to the way I has learned to make quilts, drafting them myself.


In the early days of quilt drafting I would trash my "pattern" after the quilt was finished.  Since 2010 this stack of binders, folders and pads of paper is full of my designs.  Most I've made but there's a few in there that I still need to find time to make.  Not to mention the hundreds, possibly thousands in the EQ program on my computer.


After going through every book and magazine I found a few quilt patterns that caught my eye.  They were laid aside from the rest of the books to be stored in my cutting table.


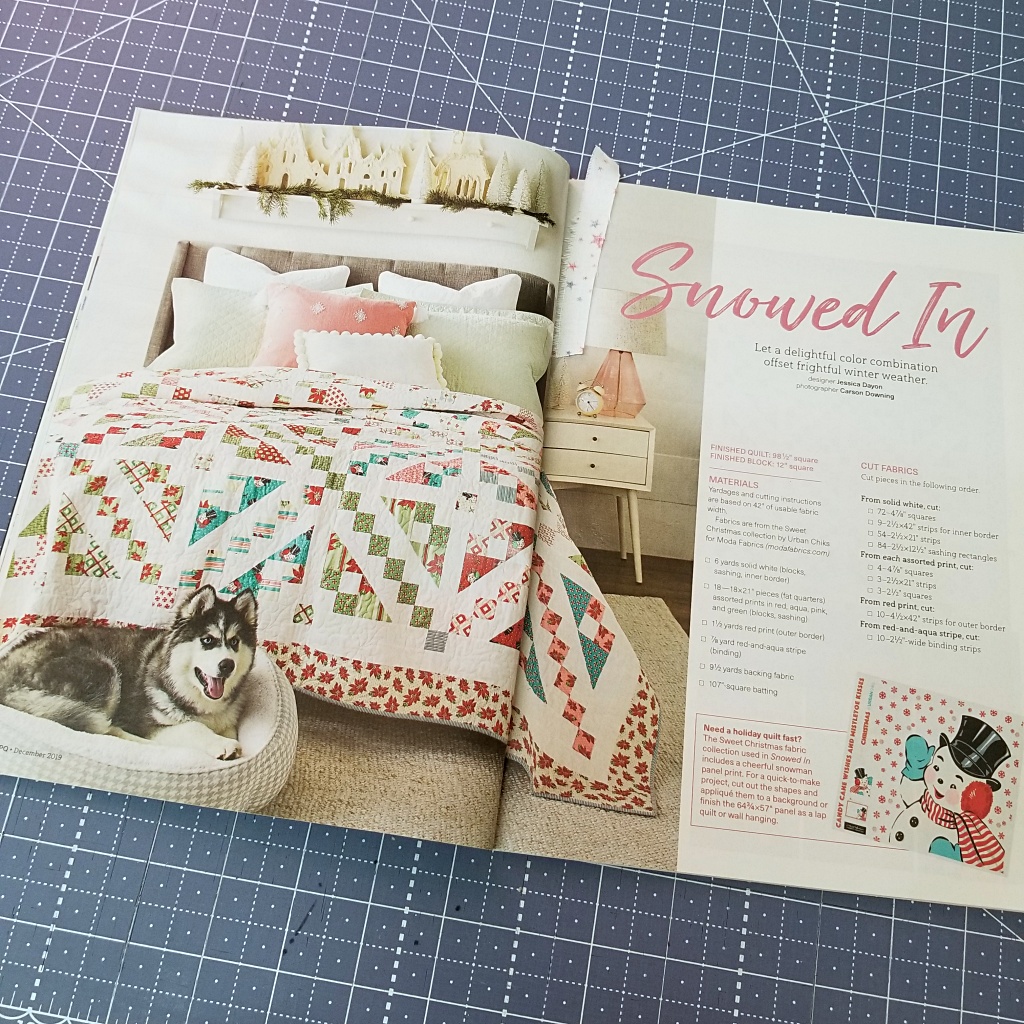
You all know me and how much I love the color red.  This one looks fairly simple and would work nicely for the summer holidays as well as Christmas.


If the quilt was bed sized it made it to the top of the list.  Smaller throw quilts are great for a quicky but being able to use them on a bed is how I'm leaning most of the time these days.  This quilt was designed using Urban Chiks fabrics.  They are still designing new lines of Christmas fabric every year.  This year their new line is called Kitty Christmas and it's adorable.  The grandkids would love it too.


This one caught my eye because of the gazillion half square triangles of which I have plenty.  About 3 or 4,000.  I've lost count.  Since they are already made, it would make for a fairly quick quilt.  If you missed my post on the leftover HST's, here's a link to the last post about them.


The next one is patriotic and you know how I love a good red, white and blue.  Imagine this in my bright red, white and blues. 


And this one would put a dent in those scrap bins. 


I bought this magazine years ago just for this pattern.  It's easy on the eye but bold at the same time.  Does that make sense? 

And I bought this issue for this pattern designed by Erin Russek from One Piece At a Time blog.  Love, love, love Erin's work.  When and if I make this, I'll enlarge it to queen sized.


Another cutie for the grandkids room.  I'm pretty sure I already have enough HST's to make the border.

Stars, stars and more stars in red!  Again, I saw this pattern and had to have it.  Making it larger enough for a queen sized bed is easy, just add a border or two.  And wouldn't you know it, I have enough fabric on hand to make it right now!  Oh this is how UFO's are made!  Stay on course Lea Anne!  No new projects, just ideas.


Fly Into Spring is an Eleanor Burns pattern.  Who doesn't love Eleanor?  She's one of the reasons why I'm here today.  By here I mean totally obsessed with quilting.  She's also the reason there's always scraps on the studio floor.  Not tossing my scraps over my shoulder is a hard habit to break.  Tell  me I'm not the only one who does this from time to time....PLEASE!


In 30+ year of quilting I've never made a log cabin quilt.  I've made a few blocks for a border, but never an entire quilt.  It has some HST's and applique to give it a little WOW.  I think it would be super cute in my happy bright fabrics, don't you?


Well looky here, another star.  Now to find the right fabrics.  I think I'm going to try to make it exactly like this one.  Normally I don't care for the color purple but it makes this quilt shine.  


This is a bucket list quilt.  If I started making the applique today maybe I'd have all of them made in a few years....HAHA!  A gorgeous simple design with a lot of pieces.  This is another I would try to make exactly as shown.


It's fun to dream about the quilts that may someday be but for now they are are just a dream and stored away in a basket under my cutting table.  It's easy access for when and if I take a notion to start something new.


Right now there's weeds to be pulled and more veggies to harvest.  This week I made some dill relish.


And  some cucumber bread which taste pretty much like zucchini bread.  Cucumbers have a little more flavor than zucchini and that flavor shines through just a bit if you omit the cloves in this recipe like I did because I thought it would be too much.  Next time I put them in to see if it hides the cucumber taste.  Mr. Podunk said it was good with the hint of cucumber.


Yesterday I harvested tomatoes and made salsa.  Before stepping foot in the Studio today there's zucchini's to process.  I can't decided if I should make zucchini bread to freeze or cut up the zucchini and freeze them to be used in stir fry.  Of course the quilting side of me says cut them, freeze them and quilt!  Hmmm......


Pin It

Monday, July 22, 2024

A Small Peek Inside My Quilt Designing

Hi Quilty Friends!  The good news is all the quilt block applique has been stitched in place on all the blocks. YAH!   


The not so good news for me is it took forever because I kept playing around with sashing and border ideas.  Fabric was pulled from the scrap bins, auditioned and rejected many times.  Sometimes I didn't even bother to take down the previous fabric as shown by the green arrow below.  So many photos were taken of the ideas.  Way too many to share.  You're getting just a few highlights of my crazy brain.  Getting to deep in this crazy mind of mine is overwhelming and might crash my blog.


What if this and what if that has been the theme over the last few weeks.  Have you noticed in these pictures that the applique isn't on the blocks?  Yes, the craziness started almost as soon as the UFO came out of storage and on the wall.


The original plan for the quilt border is on the left.  I've made a smaller version of this quilt way back in 2014 or 15.  Well, I made a quilt top.  I thought it had been quilted it and given to my daughter.  After digging through my blog and not finding a finished quilt, I dug through my UFO quilt tops and found it hiding there.  More on that quilt at a later date.


For now the what if game continues for border ideas along with many Google and Pinterest searches looking for ideas.  This is my process, always has been.  Not only do I do this here on the design wall but it also spills over to the EQ program.  33 different quilt designs for this quilt!  Some have only slight changes but they are all different in some way.  And none of them suit my fancy.  Below is after a shopping trip last week.  I found a great deal on some slightly different gingham.  Only two of the ginghams are shown here.  I bought four.  Two full bolts and two "give me what's left on the bolt".  Got to love Joann's sales.  $2 a yard!!


Anyway back the quilt and my crazy process.  Don't get me wrong, I'm not complaining.  Just sharing what goes on behind the scenes and in my quilt designing.  Last night I decided to clear off most of the mess on the design wall, sleep on it and start fresh today.


Pin It

Monday, July 15, 2024

Working Through The Uh-Oh's

Hi quilty friends!  The applique is ready to go!  Whoohoo!  I love the look of applique on a quilt but the process of making it is tedious.  One of these days I'm going to do a timed test to see if raw edge is really quicker than turned edge.


Uh-oh...When I designed this quilt block I didn't add the flower and star to the applique template sheet.  No worries, I'll use the one finished block as my template.


The finished block was taped to the light box and then this happened.  Uh-oh...The original block applique is a different size.  All of my pretty freshly cut posy applique are too small.


Uh-oh...All the shiny little stars are too big.  How did this happen?  Who knows.   There's only one thing I can do about this situation.


Use them anyway.  The block on the left is the original block, the one on the right is the one with the wrong sized pieces.  Sure, it's noticeable, but would you have noticed if I hadn't told you.  Especially if it were in the finished quilt.  I guess we'll find out when the quilt is finished and I share it with someone who doesn't know about the issue.  That's right I'm pressing forward with the quilt.  It's just a quilt and no quilt is perfect.  I've yet to find one, even at quilt shows.  I can find a flaw in every prize winning quilt.


The basket handles were turned edge applique and were stitched in place with Mono-Poly invisible thread.  This raw edge applique will be stitched with the same thread.  The auto threader on my sewing machine does not like this thread so I have to manually thread the needle. Uh-Oh...Even when wearing my glasses it's hard to do. I can barely see the thread or the needle hole.  Somedays are worse the others. I could see the thread and needle hole just fine the other day but now I can't.
 

Thankfully my brain isn't as bad as my eyes and I remembered someone sharing this tip years ago.  They said to lay the tip of the thread on a piece of paper.  Trust me it's there, I can feel it but I can't see it.  Can you?


Next, use a black marker to paint the tip of the thread.  As you can see it took a bit of scribbling before I could see the thread.


Magic!   I can now see it well enough to thread my sewing machine needle.


Well, there's one more trick to share.  See the white behind the needle?  That is white electrical tape taped to the foot.  White behind the needle makes the eye easier to see.  That's another tip I heard somewhere.  My machine used to have white on this area but over time it has discolored and worn off.  Painting it white would have worked but the tape was a quick fix.  Someday I'll repaint it...when I run out of white electrical tape, HAHA!


Pin It
Related Posts Plugin for WordPress, Blogger...