Showing posts with label Cherry on top picnic quilt tutorial. Show all posts

Sunday, June 8, 2025

Cherry On Top Revisited

 In the last few weeks, I've had some emails inquiring about my Cherry On Top Quilt.  I designed and made this quilt way back in 2013.  The tutorials for it can still be found on my blog.

Before linking to the tutorials, I feel I should mention they were made in 2013 and are not the best quality, I did the best I could at the time.  So I updated them just a bit this weekend. Still not the best quality tutorial but I think they are much better and easier to understand.

  If you make this quilt I would love to see it and share them with my followers!  You can send pictures to my email podunkpretties.gmail.com 

The cherry block tutorial and links for the rest of the quilt can be found by clicking here.


Pin It

Wednesday, March 27, 2019

~ Jane's Cherry on Top Picnic Quilt ~

 Nothing makes my heart go pitter-pat quite like when someone sends me pictures of quilts they have made using my patterns.  Whether it's a free pattern here on the blog or one of my purchased quilt patterns the feeling is the same.  To know that others love my patterns enough to make them fills my heart with so much joy.  Yesterday I was feeling a little overwhelmed with the daily grind when I was contacted by Jane.  She had some questions about my newest quilt pattern Stars and Stripes Forever and then it happened, just what I needed on a stressful day.  She shared some photos of her Cherry on Top quilt.  


Oh what a beauty!  So much love and attention to detail with every hand quilted stitch. 


Can you see the hand quilted cherry?!  Too cute!


Jane found the perfect cherry backing fabric.  


I thought I had every cherry fabric ever made.  Guess I missed this one!  Me and Google will be spending some time together looking for this darling print.


The label was the cherry on top. I love the quote, how sweet is that?!  Margie is one lucky lady to have a cousin who loves her so much.


After seeing these pictures I was recharged and ready to tackle the rest of the day with a little pep in my step.  If you like to make one of these sweet little quilts you can find the link to the tutorial by clicking the image below.   And don't forget to send pictures to my email, podunkpretties@gmail.com.  I love seeing you creations with my tutorials.


#cherryontoppicnicquilt #cherryontopquilt #cherryquiltpattern #cherryquilt #podunkpretties


Pin It

Monday, October 14, 2013

Finishing Cherry on top

Due to caring for gramps full time, I don't have time to write a step-by-step mitered borders tutorial for this quilt.  So, below shows how wide I cut my strips for each of the borders.   I mitered my borders but you could add yours without miters.  Or you could google how to miter multiple quilt borders.  The border yardage was included in the previous post with the entire quilt top yardage.

 EQ calls for 7 yds of backing fabric.  However, I always buy more because I quilt using a longarm. 


Pin It

Friday, August 30, 2013

Cherry Block two update

Thanks to Annelies for checking my pattern.  A mistake was found in the Cherry block.  Thankfully it's an easy fix.  The pattern called for (60) 2.5" squares, this should read (60) 2" squares.  I've made the adjustment to the pattern on the tutorials tab.  Sorry for any problems this might have caused, I'm just thankful that it was to big instead of too small!  

While I'm here...sneak peak at what I'm working on today.  The borders are on, just adding some finishing touches to the flimsy.

Lea
Pin It

Tuesday, August 20, 2013

Block 2, Cherry Block


This tutorial was updated on 6/8/25.
  
So, let's get started

Cutting instructions for all the Cherry Blocks

White fabric
 (120) 1.5" squares
(15) 1.5" x 5"
(60) 2" squares
(30) 2.5"x 3.5"
(30) 3.5" squares
(30) 3" squares
(30) 1.5" x 10.5"
(30) 1.5" x 12.5"

Red fabric
(30) 5" squares for cherries (I used 2 different reds, 15 each)

Brown fabric
(30) 3.5" squares

Green fabric
(30) 5.5" x 3"

Below is what you'll need for one block.


Here's how I lay out one block on my design board for piecing one block at a time.

 
First let's sew all the corners on the cherry unit.  Sew each corner by drawing a line from corner to corner of the 1.5 white squares.   Sew on the line.  Repeat on all four corners.

Trim 1/4" away from the stitched line.  The picture below shows two seams per corner.  After doing this I decided to scrap these small pieces so there's no need for you to sew the second line unless you're more adventuresome than I!


Press the seams open.


Okay lets make the leaves using the same cut away corner method, draw a line from corner to corner, then stich on the line, trim 1/4" away from stitched line.  Make sure you have placed the white squares in the proper corners!  I didn't save the little cut off bits.

 Press seams open.


Laer the brown 3.5 square and the white 3.5 square right sides together and sew from corner to corner.  Then make that second stitch 1/2" away from the first line if you would like to save them as bonus half square triangles. 

  
 Cut between the seams and save the larger section. Press the seams open on the larger section.  That's the one we'll use for this quilt.


 Layer a 3" square on top of the brown HST, lining up two edges of the white square with the brown side of the HST.

  
 Again, stitch from corner to corner and then make a second stitch line 1/2" away from the first stitch line if you want a bonus HST.  Cut in between the two seams, toss the extra piece aside and press the seams open.


 TADA! We have cherry stems! I know there's tons of waste, but really these cherries are worth it, right?

Now to sew the two stem units together. Matching up the brown seams and pinning ensures accuracy of the seams.

  
Press the seam open, then stitch a white 2.5 x 3.5 to each side and press.


  We're on the home stretch!  
Sew the white 1.5 x 5 to one cherry unit.


 Press towards the white.


Stitch the second cherry on to the white 1.5 strip and press towards the white.

  
Alrighty, lets speed through the next few steps. 

  Line up and pin the center of the stem unit with the center of the leaves unit.  Pin on the ends and sew together the units. 

Press a crease in the center of the cherry unit, line up and pin the crease with the center of the stem unit, pin on each end and sew. 


Press the top of the stem unit to the leaves and then press the bottom of the stem unit to the cherries.

Stitch the white 1.5 x 10 strips to the right and the left of the block.  Press out towards the white.

Finally stitch a white 1.5 x 12.5 strip to the top and bottom and press oiut towards the white.  YEAH!  We have one oh so sweet finished cherry block!    

It should measure 12.5" square.  Trim if needed.  

  You can find the directions for the alternating chain block here and the yardage requirements for the entire quilt.  The borders measurements can be found here .  And my finished quilt is posted here.


If you make this quilt I'd love to see pictures and share them here on the blog!  My email is podunkpretties@gmail.com


Pin It

Tuesday, August 13, 2013

Tutorial Tuesday

UPDATED ON 6/8/25


The Chain Block for...


Finally, as promised, see pinky swearing works!  Cherry on Top Picnic quilt Tutorial.  
Let's start with the yardage.  I pieced most of this quilt with scraps, even my whites were from backing scraps, so the yardage is an EQ7 estimate.  The reason why this could be a tad off is because the Cherry block drafted in EQ isn't the same block that was drafted on paper.   Buying a little extra fabric is always a good rule of thumb.  
  
EQ's estimated yardage for the entire quilt top.


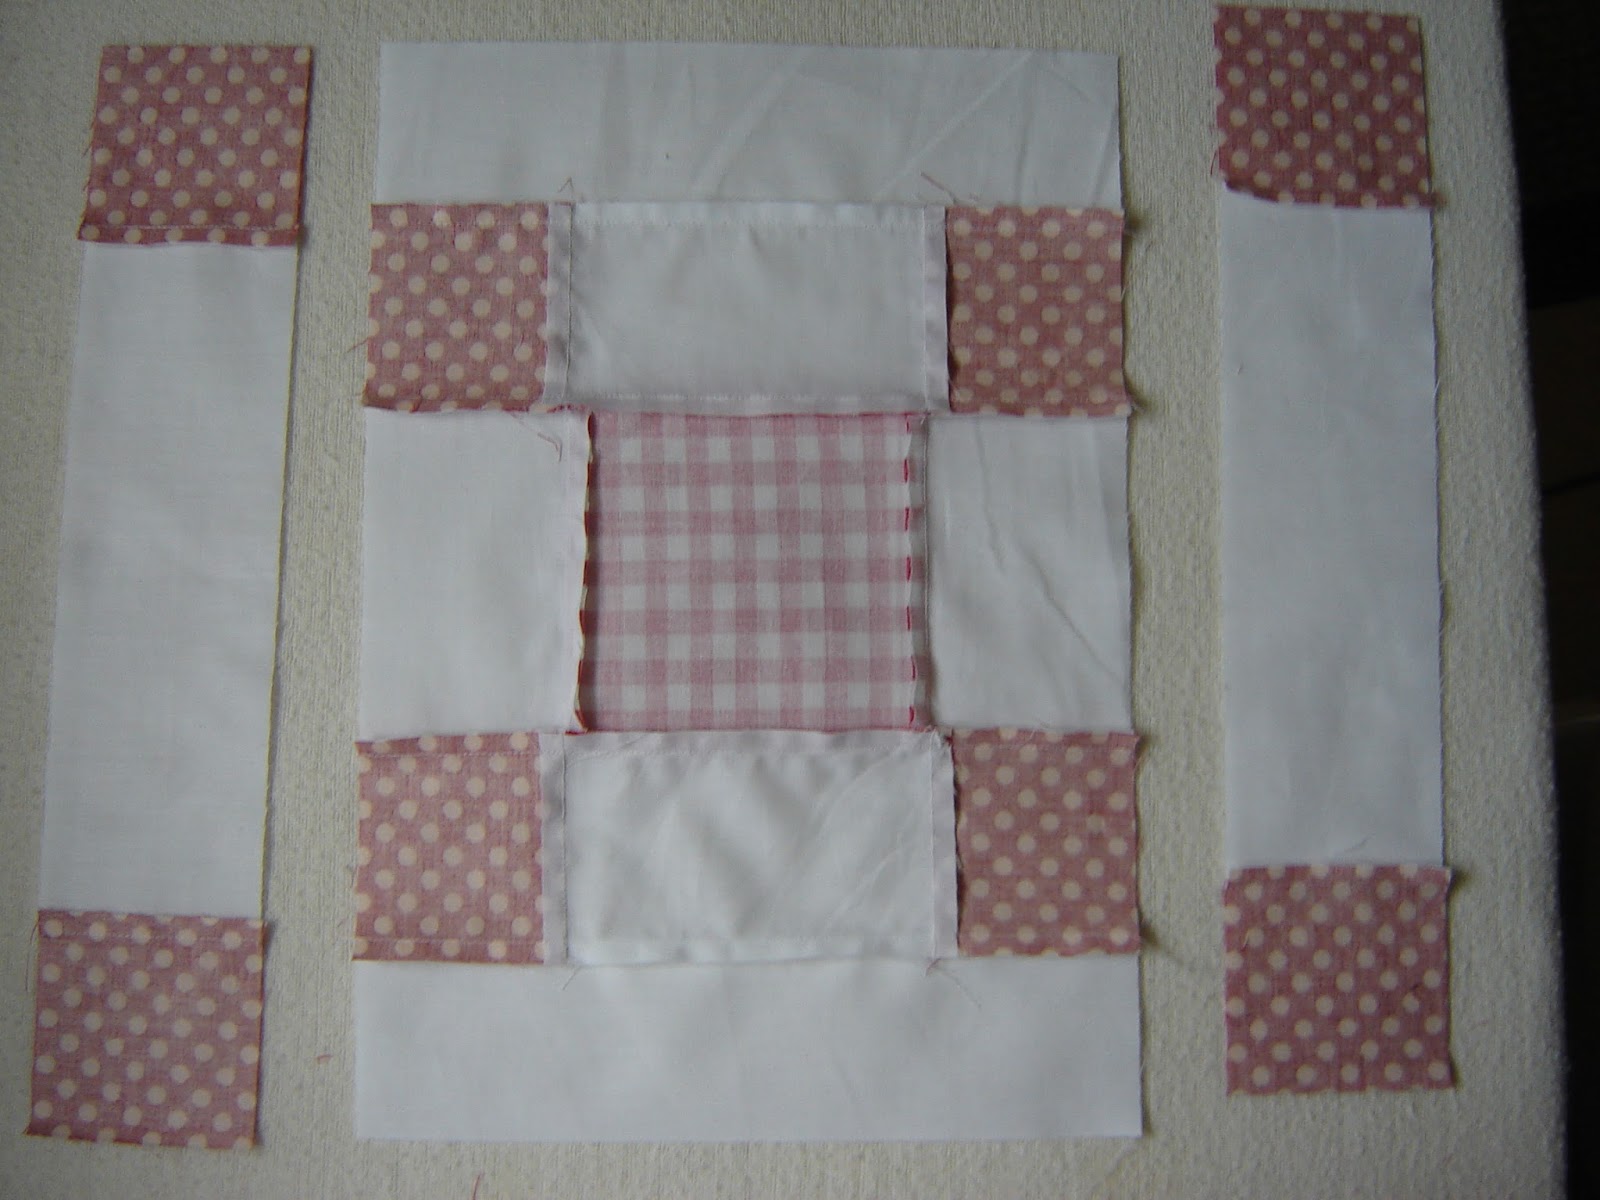
This is a basic 12" finished (12.5 unfinished) chain block.  


            White fabric                               Red with white dots                 Red Gingham
             (60) 2.5 x 8.5                                    (120) 2.5 x 2.5                       (15) 4.5 x 4.5
             (60) 2.5 x 4.5 

 After cutting set aside 30 of the 2.5 x 8.5 pieces. Then lay out the rest as shown below. It simple piecing so I won't show pictures of each steep.  Just sew together the unit as shown below.  Press all seams towards the red fabric.


 The image below shows the back of the units so you can see the pressing.  Grab those 30 pieces we set aside.  We'll be sewing them to the top and bottom of the middle unit. Press to the white 8.2 x 2.5.


Okay, let's get this middle section knocked out, sew the white 8.5 x 2.5 to the top and bottom units as shown below. Then go ahead and sew the top section to the middle section, and then sew the bottom section to the middle.


You should have the middle section finished.  We're looking good!  Almost there... I love a super simple block!


Now that the middle section is assembled let's press to the center of the block.  Okay, go ahead and add those side units.


 Pressing those last seams out.


 TADA!  super simple, super-fast, and super cute! 


I've left the harder block for last.  But really, it's not hard at all, it just not this easy.  Hopefully it'll be posted next Tuesday.  I'm not going to pinky swear.  You see my 90 yr old gramps is a little under the weather and need 24/7 care.  The family is pitching in and taking shifts with his care.  So...should I get the call you gals will get pushed to the back of the line.  You know I love y'all but really it's the only reason I'd push you!  Thanks for your understanding.
So how about a peak at the EQ drawing gone bad.

Here's the real block drawing that we'll be making next week.


Pin It
Related Posts Plugin for WordPress, Blogger...