
There's two things that we quilters never have enough of, time and fabric. I'm always looking for ways to have more of both. The decision earlier in the week to save time making HST's was an impulse decision. After having time to think it through it became clear to me that I was making excuses to not stick with my plan. The plan: Make the Good Fortune Mystery quilt as scrappy as I can using as many fabrics from my scrap bin as possible. In order to do stay with the plan I need to find a way to make quick HST's from smaller pieces. No one says that all the HST's need to be assemble using same technique for each one. The suggested technique in the pattern of cutting from strips is great if I have strips to use. The Magic 8 technique is a perfectly good plan for larger pieces of fabric. But what about those scrap pieces of fabric that neither strips or Magic 8 will accommodate?

Most of you have made two HST's at a time by drawing a line from corner to corner on one piece of fabric. Then it's layered with another piece and stitch 1/4" way from both sides of the line. The draw back to that method is drawing all the lines, it so time consuming. How about we don't draw them! Yes no lines! Lets do it! First we need to know how big the squares need to be to finished at the correct size. Well by the magic of math and computer software I've drawn up a little printable for us to use. It's free for you to print and add to your tips and tricks pile of goodies. I'll be putting mine in a 3 ring binder so I left plenty of room on the edge for punching holes. Click here to download, save or print. Another time saver is having the HST's finish at the correct size. Trimming down oodles of HST's is not time friendly. Because of this the measurements are not the common 1/4, 1/2 or 3/4 used in most quilt patterns. No biggie! I added a little ruler to the print out to help keep us cutting accurately. I've also included basic instructions for drawing the line, but we aren't going to need that line.

We will also need something with straight lines to place on the bed of your sewing machine. Both of the guides below are perfectly acceptable if you have them and can make them work. I however have them and don't use them. My sewing machine bed is not flat enough for either of these. I've tried every trick suggested and still my fabric gets hung up at the arrows shown below.

So if you don't have the above items I'm gonna show you a quick easy and cheap way to make one. It's not as pretty and doesn't have all those lines on it that you don't need, but it works!
You will need
1. clear packing tape
2. a pen or sharp tip marker
3. a rotary cutter
4. a ruler
5. a quarter inch presser foot

Here's my quarter inch foot. You don't have to have this type of foot but you do need be able to adjust your machine so there is a 1/4" from the needle to the edge of the foot.

Let's make this, fast and easy, I promise. Place a piece of the clear tape on your cutting mat. Line it up as best you can with the lines on the mat. How long? Go longer than needed you can always cut down to size later. Tape is so cheap, toss a few inches in the trash is no big deal. Draw a line close to ends. This is your stop sign so you don't accidentally draw on your cutting mat.

Next we are going to draw a long line down the middle of the tape. Use the lines on the mat for reference. I tried to draw my line exactly on top of the one on the mat. To do that the ruler had to be set off to the side of the line on the mat.

It should look like this.

Draw two more lines 1/4" away from the previous line. One on each side.

That's it! Now we just need to protect those lines by layering another piece of tape on top of the one on the cutting mat.

Carefully remove the tape from the mat and it's ready to place on the bed of the machine. Years go before I bought my new sewing machine I would draw these line right on the bed of my machine. It was amazing how quickly the lines would get worn away by the fabric.

But using the tape makes them last a long time. How long? The one you see on the bed of my sewing machine has been there so long I can't remember just how long its been. I'm not going to replace it today. So what you need to do is set up your machine for sewing a 1/4" seam. Remember we will be using the edge of the foot as the guide. If you need to move the needle do it before you put the tape on the bed of your machine. MY MACHINE IN THE PICTURE IS NOT SET UP CORRECTLY. WRONG PRESSER FOOT. BUT MY LINES ARE CORRECT. Once you are set up to sew then line up the middle line on the tape with your needle. Get it as close to the needle as you can without covering the feed dogs. I used a mini razor knife to cut the tap around the bobbin door.

See it comes right out! I replace the bobbin and away I go! Now when I need to get in there and clean out lint, I carefully peel the tape back just enough to remove the gray cover.

Okay we're ready to sew! Use the chart to cut the needed size fabric. Notice I'm not using my Good Fortune fabrics? This is a test run, so I'm using scraps that were laying on the cutting table. I've cut for a 3 inch unfinished HST's.

I changed my presser foot and I'm ready. Line up the top corner point with the edge of the presser foot. Line up the opposite corner with the line on the far right. Take one or two stitches, stop and never look at the needle again. You want to watch the bottom corner as the machine feeds the fabric through making sure the tip of the corner stays on the line..
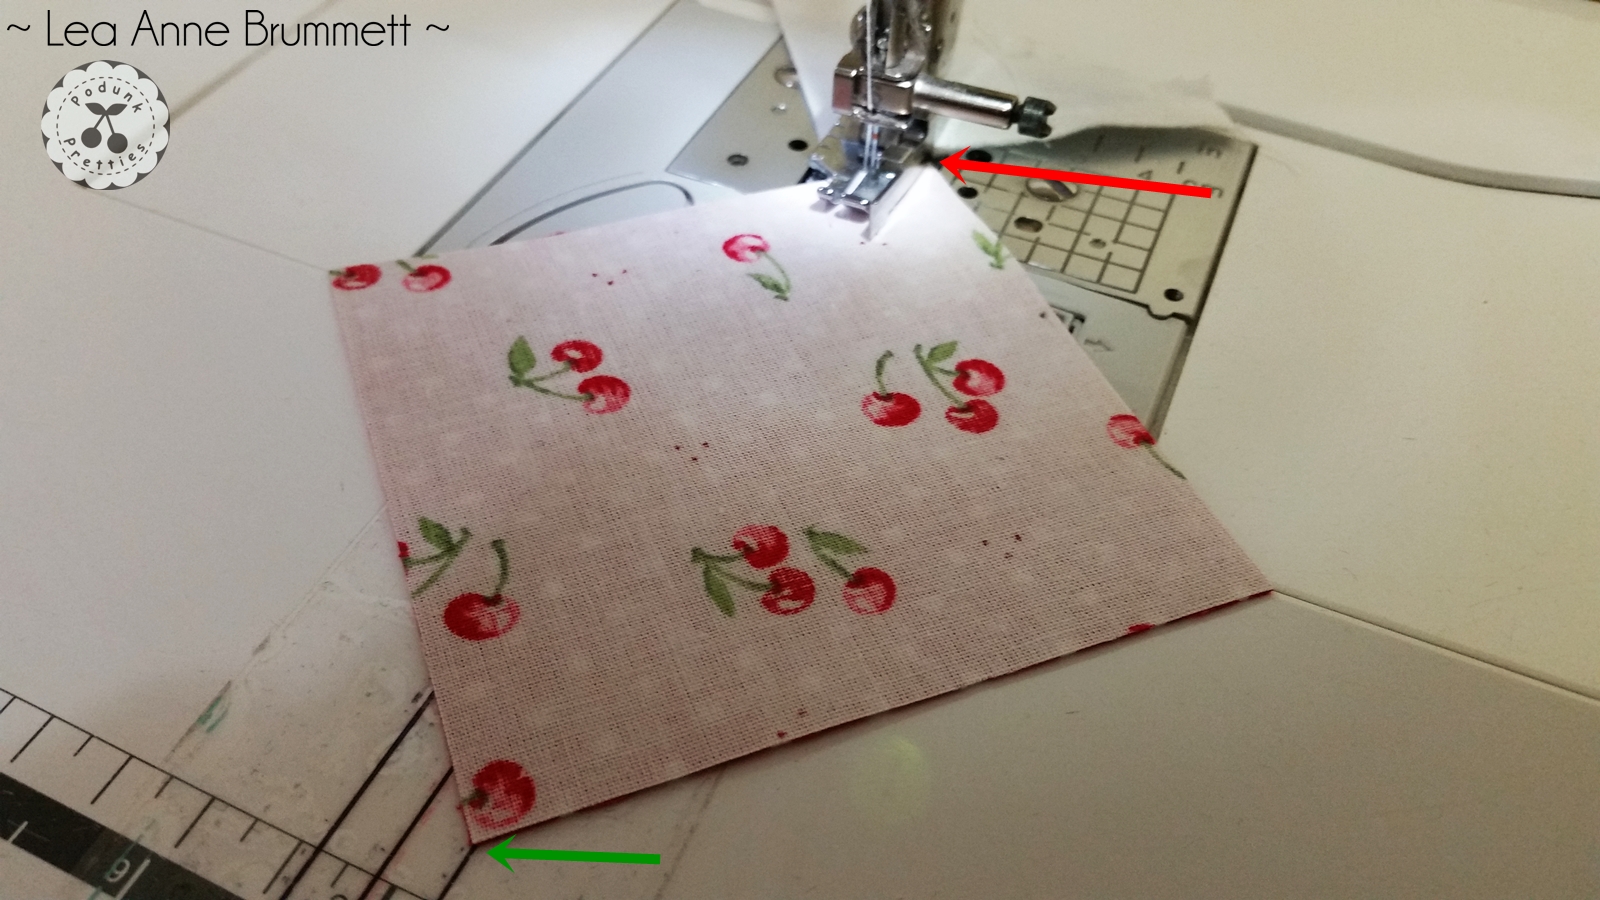
You can chain piece as many as you need before turning them all around and sewing the other side. Remember to line up one corner with the edge of your foot and the other corner with the line. One or two stitches stop and watch the bottom corner only. The machine will take care of the rest.

There should be 1/2" between the two lines.

Now cut right down the middle.

Press and trim away those little wings! Tada! No marking! So much time is saved using this method and I can use more of my scraps in my quilt. Now let me really give you a time saver tip. The Magic 8 HST's can be made using this same method if your sewing machine bed will accommodate the squares of fabric on point as well as the taped lines.

This post has been linked to the following. Hop on over to see creative bloggers strutting their stuff!


