
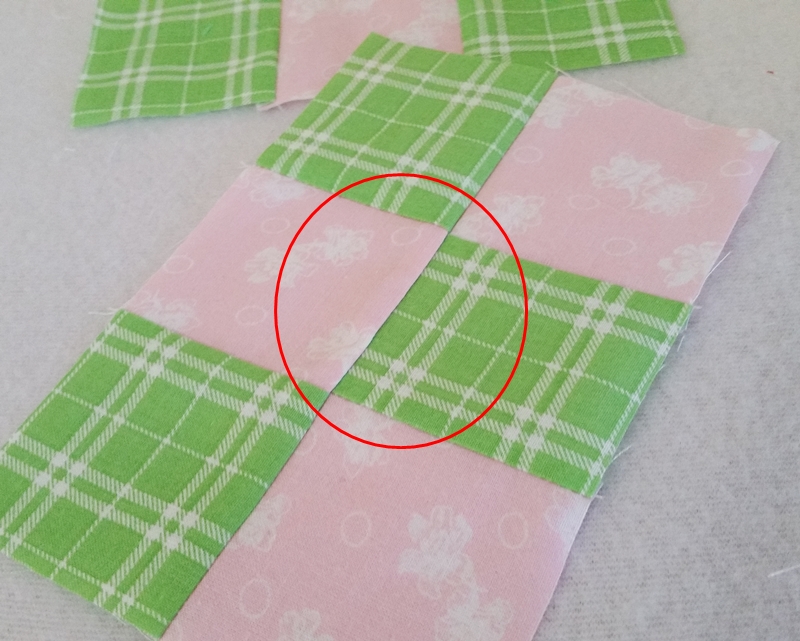
Happy Monday quilting friends! Everyone have your special glasses ready for the Eclipse later today? I'm not sure I'll be viewing the big event, we'll just see how the day progresses. So in the spirit of making something disappear I thought I would share with you a little tip on how to make a common piecing mistake disappear. It happens all to often in quilting for whatever reason...improper cutting, poor seam allowance, shrinking or stretching of fabric. Whatever the cause, what can we do about it. The picture below shows the quilt block with the not so perfect patchwork. The pink fabric on top is either to big or the green on the bottom to small. Whichever it is when sewing this it could cause a pleat. I could remove the bad pieces but sometimes we don't have that options or simply (in my case) don't want to. So lets hide it!

Back in the day we called this technique "Baggie Bottoms". Sewing with the fullness(baggie) to the bottom. This allows the feed dogs to take up, ease in the slack like magic. It's not a full proof method but it works more often than not. When making simple blocks like the nine patch I make one adjustment to my sewing. Adjusting the machine to sew a smaller width seam allowance for the rest of the block. Changing it back to my normal 1/4" after the block is complete. On my new machine the adjustment can be made by moving the needle. If you have an older machine you may need to adjust your seam guide as smidgen. It really doesn't matter if the perfect scant, just as long as it's smaller. With a more complicated block I'd leave the seam allowance as is.

Pinning is also very important, this keeps those nicely matched seams. I have super fine pins <--(I use these, on sale right now, under $4 for 100 pins)just for this. They are thinner and easier for the machine to hop over.

Stitching over pins is not recommended and I don't always do it, the first and last pin holding this block were not stitched over. Only the middle two pins, shown below. There's been a handful of times when the needle hit the pin bending it, but no damage to my needle, machine or fabric due to the super fine pins. If your uncomfortable stitching over pins you can use a small dab of washable school glue where the pin would be place. To dry the glue quickly press with a warm iron. Okay that being said....a couple of stitches after the first pin give the fabric a little tug towards you and keep stitching..slowly... until you stitch over the second pin. This will help flatten the excess fabric on the bottom.

See no harm no fowl! Everything went smoothly. Release the fabric and sew as normal.

Flip the block over and check for pleats. It's normal to see a little wave in the fabric but we're gonna fix that later.

Don't iron it just yet, finger press open. You can barely see the excess fabric from the front.

More wavy fabric, but no pleats...It's a success.

Okay lets deal with the waviness in the patchwork. We're going to need to break another quilting rule. Rules were meant to be broken and it happens more than you think in quilting, we'll discuss that later. But for now lets IRON the block. No pressing here, IRON it, start in the middle and push towards the outside edges. I do this in all 4 directions. Yes we're stretching it...its okay... breathe...no one will know you broke the rules. I don't use steam for fear of shrinking the block but I've read that others do use it so, the option is yours.

The wave is almost invisible and after its quilted know one will know. If you look closely my block is bowing like an hourglass. The bow is caused by the smaller piece of fabric, adjusted seam allowance and the ironing to stretch the block...its a good thing!

Just give her a little trim.

It looks great, right?

But we all know this block has it flaws. As a reminder I make a tiny mark in the seam allowance on each side, this will remind me when piecing the quilt that this block may not line up perfectly with other blocks without a little extra pinning. Now here's the disclaimer. Of course you wouldn't want to do this if the patch is more than a 1/4" short. If more than one piece in your block is to small you might consider replacing them. You also wouldn't want to stretch every block in a quilt. Try to use the stretched block in middle of the quilt not on the edge. If you have more than one block that has needed this adjustment, scatter them about the quilt in different rows. Funny, there's rules to breaking the rules!...HAHA!

Some quilters say they never hide mistakes and only take out the offensive piece, or at least that is their claim. Really I don't see how you can avoid a little hiding. They are tips and tricks of the trade, exceptions to the rules. And they are ACCEPTABLE practices. Passed down from generation to generation.
So remember when I said that hiding is done more often than you think. Well here's the truth. Quilt show quilts more often than not have been stretched to make them hang completely straight, Surprised? It's called blocking a quilt. You can read about it here. It's a common practice and is expected and accepted.
Ever make a quilt block and it comes out a little to small? Well it can be fixed without taking it apart, you can stretch it, and its done more often than you think by some very popular quilters. Take a look here at whats called blocking a quilt block.
Hope you found some useful tips today. Thanks for stopping by my little spot in Podunk!
~ Lea Anne ~

great tip and also the blocking of a block that is a little smaller I have that problem sometimes! Was surprised at FOQ show that some of the quilts hung so badly such a shame they did not block them too
ReplyDeleteThanks for a great tutorial. I fudge a bit here and there, thankfully it usually works out.
ReplyDeleteI absolutely adore the Ball canning block. It is so lively and festive. It makes me smile.
ReplyDelete