Friday, January 31, 2020

~ Nifty Notions #2 ~ Clover Fork Pins ~

This week for Nifty Notions #2 I'll be sharing my review of the Clover Fork Pins.  Nifty Notions is not necessarily notions I love but notions I'm reviewing.  Most will be new notions, bought or gifted, some will be pulled from my modest stash of quilting notions.  No matter how they are acquired my review will be honest.  They will be measured by price, ease of use and if they make my quilting easier.  I love that you value my opinion but it's one persons opinion of a product.  Please take the time to use the Google search for more reviews before making the decision on whether or not to add them to your notions stash. 


The Clover Fork Pins were part of a subscription quilting box.  Subscription boxes are tons of fun if you like surprises and don't mind getting fabric and notions you may not like or need.  I cancelled my subscription for those reasons.  I would rather purchase things I really want and need. 

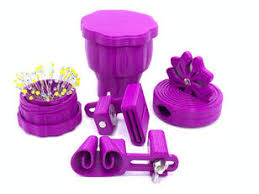
The Clover Fork Pins came in a pretty little blue plastic box.  35 pins per box.  A few months ago I saw a very popular quilter(fabric designer) promoting these pins.  So I was really excited when I found these in my subscription box.


To perform my pin test I pulled a few scraps to make (2) sample 4 patches.  The first 4 patch will have the seams pressed to the side and the other one with the seams pressed open as suggested by the popular quilter mentioned above.


As always, I'm finger pressing. 


The fork pins are a much thicker than the super fine glass head pins I normally use.  The extra bulky pins are a little harder to pierce the fabric.  They also distort the fabrics.  


The bulky pins and distorted fabric caused no issues with sewing.  I decided to get a little wild and crazy by sewing over the pins.  My machine hopped right over the pin with no issues.  The seams match perfectly on the front.


Block 2.


Seams finger pressed open.


Pinned and distorted once again.


For some reason I could not sew over the seam.  This is where the machine came to an abrupt halt.


And this is the result of the sudden stop.  It's not uncommon for this to happen occasionally when I'm piecing on my Brother, so I'm not going to blame the pins.


Once again perfectly aligned seams.


But I can get the perfect seams with the glass head super fine pins.


Here's my thoughts.

1.Cost  
35 pins for about $8 is a little high 

2. Ease of Use   
They were not easy to push through the fabric. 

3. Efficiency  
Nope they didn't improve anything.  It was actually harder to use than my normal pins.


So to be honest I may never use these again. But I'll keep them just encase I find a good use for them.


Just a little reminder that you can still gt 20% off you entire purchase at The Purple Hobbies website using the code PodunkPrettiesJan20  
Offer ends February 29, 2020.   Make sure when adding the code to your shopping cart that you click APPLY.  You can see my review of the BladeSaver Thread cutter here.  And the Third hand Binding Folder Clip here.


50% OFF Sweet Sixteen PDF pattern
Sale ends 2-15-2020


Pin It

Thursday, January 30, 2020

Webbing Quilt Blocks, How Speed Piece Quilt Blocks with NO Pinning


That's right you can make almost any quilt block with almost no pinning.  Pinning each seam is the best way to get perfectly aligned seams.  But pinning requires a considerable amount of time.  So here's  little hack to help save time.  If you are one of those quilters who likes seams pressed open it takes a little more time but I believe it's still quicker than pinning.  Since I'm not a die hard open seam presser and because this is a simple quilt block, this tutorial is for the old fashion method of pressing the seams to the dark.  If you are like me and are very visual when it comes to learning I made a video of this method and have attached it to the bottom of this blog post.  So feel free to scroll down to the bottom.


The first thing to do is assemble the first column with the second, right sides together.


When feeding them through your sewing machine make sure you only take ONE stitch off of the end of the fabric. This is where the magic happens, so go slowly in order to make sure you only take one stitch off the fabric.  I'm using an open toe foot for your visibility.  


Then you will push the next set patches right up against the needle then stitch just as you did previously.  Only one stitch off the fabric.  Repeat this process until you have all of the first two rows assembled.


Once your first two columns are assemble remove them from under the presser foot and cut the thread from the needle but DO NOT cut them apart.  You'll want to leave them in the order you fed them into the machine.  Just slide them carefully to the left of your machine and press the seams to the darker fabric.  I always finger press when assembling quilt blocks.  Normally I heavily starch my fabrics.  However these have not been starched at all and they finger pressed very well much to my surprise.


Okay now that they are pressed we will continue to assemble the block in the same manner.


Here's what it looks like after my third column is added.


Just keep adding columns and pressing to the dark.  You'll end up with something that looks like this.  The rows are webbed together by one tiny magical little stitch.  


To assemble the rows turn the block to the right.  Flip the row on the far right on top of the next row.


If you're like me and have a pinning obsession, you'll want to place a pin in the top and one in the bottom.


The rest of the seams are already nested together for you.  No pinning needed!  YAH!


Assemble the rest of the rows in the same manner, finger pressing as you go.  If you want your seams pressed open you will need to clip each joining thread AFTER stitching the rows together, then press your seams open.  It sounds like it takes a lot of time but it's really quick and easy to slide your scissors along the seam to clip the threads.


Click on the video below for a speedy little tutorial.


Just a little reminder that you can still gt 20% off you entire purchase at The Purple Hobbies website using the code PodunkPrettiesJan20  
Offer ends February 29, 2020.   Make sure when adding the code to your shopping cart that you click APPLY.  You can see my review of the BladeSaver Thread cutter here.  And the Third hand Binding Folder Clip here.


50% OFF Sweet Sixteen PDF pattern

Expires 2-15-2020


#quiltvideotutorial #quiltingtips #webbingaquiltblock

Pin It

Monday, January 27, 2020

~ Blue and Yellow UFO ~

Most of this weekend was spent working around the house catching up on much needed housework.  At the end of the day I would sneak out to the Studio, clean up a little and get in a few minutes of stitching before collapsing on the couch exhausted.  The wall hanging below was one of the things needing cleaning.  The picture is from a previous post because this gal is soaking in a washtub of color catchers and detergent.  It's one of my favorite wall hangings. The applique was designed by Erin Russek of the One Piece at a Time blog and is called Miss Kelly.  The pattern can be found here. I designed the border using a technique I learned from a fellow quilter that can be found in the book  Just around the Corner by Kari Carr.  It's no longer in print but you might be able to find it used by doing a google search.  Cleaning this girl jogged my memory of a quilt I started back in 2018 that has been waiting to be finished.


So why not pull it out and do a little stitching.  Oh how I love blue and yellow!  Seriously, who doesn't?  The quilt is going to be super simple squares.  I may add a simple applique border, it all depends on how I feel as I get closer to the end of construction.  You can read more about this quilt and the design plan here and here.


 I think I might have over cut for this one.  If there are enough squares leftover I can make a couple of matching pillow shams.


This is where I'm at this morning. Two blocks made and in need of pressing.  And one more ready to be assembled.  After this block I'm done with this project for the day.  I'll be moving onto my current projects.


I'd like to get this one completed (I've said this before,several times).  Maybe if I keep it out and in my way I'll be more likely to do a block or two at the end of everyday until complete.


Well it's always good to have a plan.  So today I plan to....

1.  Sew the binding to the back of Christmas quilt
2.  Load a quilt on the frame for a blog hop later this month
3.  Work on my gingerbread man applique quilt

...But first I need to have a little play time with Khaleesi after she finishes cleaning out this empty jar of peanut butter.


Just a little reminder that you can still gt 20% off you entire purchase at The Purple Hobbies website using the code PodunkPrettiesJan20  
Offer ends February 29, 2020.   Make sure when adding the code to your shopping cart that you click APPLY.  You can see my review of the BladeSaver Thread cutter here.  And the Third hand Binding Folder Clip here.


50% OFF Sweet Sixteen PDF pattern
expires 2-15-2020


Pin It

Friday, January 24, 2020

~ Nifty Notions ~ Wool Pressing Mat -vs- Homemade Pressing Mat ~

Pressing fabric in the quilting world has started many debates over the years.  Press the seams to the side or open?  Steam or no steam? Starch or no starch?  Now we have a new topic of Wool mat or ironing board?  So when I received a small wool pressing mat in a monthly subscription box I was excited to finally see what all the rage debate was about.


But before reviewing the wool pressing mat I want to tell you about the new idea for my blog.  As you all know I've never been much of a gadget person.  But this year instead of spending tons of money on fabric that I really don't need I'm going to put that money towards new notions or new to me notions and review them here on my blog.  Not all the notions will be purchased by me some may be sent to me to review.  Free to me does not mean telling you a product is wonderful because it was free.  The product either makes my quilting process easier or it doesn't.  All of my product reviews will be labeled under Nifty Notions in the sidebar of this blog.  I may even at some point include a product review video along with the blog post.  If there is a new or old product you've been curious about and would like for me to review let me know by leaving a comment on any blog post or send me an email at podunkpretties@gmail.com


Okay, Let's get started!  Today I'm testing the Gypsy Quilter Felted Wool Pressing Mat.  This is a small mat measuring 5.5" x 9".  Since it so small it's only good for pressing smaller units or very tiny blocks.
For years I've used a homemade ironing station along with a smaller homemade pressing board for blocks and applique.  The truth be told I rarely use an iron on my fabric after it has been starched and cut.  The heavy starching allows me to finger press everything until the quilt top is complete.  Once I have a quilt top finished it is then pressed with an hot iron without steam.


Both my large and small pressing boards are made the same.  A piece of plywood wrapped in cotton batting.  Then wrapped in aluminum foil and topped with a cotton fabric.   When the cotton fabric starts to look yukky I just add another layer of fabric on top.  Every so often, about 4 or 5 layers of fabric, I'll remove the multiple layers of cotton fabric and start the process all over again.


For this test I'll be pressing HST's that will become pinwheels.  Each seam will be pressed for 5 seconds without steam and with no pressure on the iron. Which means my hand will be removed for the 5 seconds.  I almost never use steam when pressing blocks so I thought it only fair to stay consistent.  Over the years I've learned that steam and over pressing can cause some major issues, so I just don't do it.  I realize some of you always use steam and that's okay.  There are no set rules or quilt police here, I'm just telling you what works best for me.  And to be fair I've used a wool pressing mat before with my quilting friend Judy.  She received one of the larger wool mats for Christmas 2018.  We used steam.  What a mistake!  It smells like a wet barn.😦  For those of you that have never been to the livestock barns at the fair, a wet barn smells like old wet grass and manure.  Yep, no steam is best when using a wool mat.  Well unless you like the smell of a barn.  I've heard from other quilters that the steamy wet barn stink fades over time.


And here we go.  Sewing and pressing 5 seconds each.


They are both coming together nicely.  I'm more worried about whether or not my pinwheel centers will line up correctly.👀


Yah! Perfect centers!  I love pinwheels, so classic and cute.


Everything is looking good back here as well.


Now is the moment of truth.  Does the wool pressed block(on the left) lay flatter?


Lets take a closer look.  Well what do you think?


Now a  little closer.  Well, I can honestly say I don't think the wool pressing mat makes any difference.  I'm sure someone is thinking I should have used steam but again I almost never use steam.  If you decided to use a wool mat and use steam, make sure you cover the mat with fabric.  A hot iron with steam will scorch the wool and leave a residue on your iron. 


I like my homemade pressing boards better.  They aren't stinky, they don't require extra caution to use and the best part is if I scorch it I can recover them or wash the fabric cover.  Now if you really want a wool mat but have been putting it off due to cost, there's an cheaper option.  In several Facebook groups I've read quilters are buying wool saddle pads at a fraction of the cost.  My concern would be the wool might not be as clean and smell a little more.  YUK!  So there's my 2 cents on the wool pressing mat craze.  Hope you found this helpful or at least entertaining.  See you next Friday for another Nifty Notions!


 #woolpressingmat #woolpressingmatreview #niftynotions


Just a little reminder that you can still gt 20% off you entire purchase at The Purple Hobbies website using the code PodunkPrettiesJan20  
Offer ends February 29, 2020.   Make sure when adding the code to your shopping cart that you click APPLY.  You can see my review of the BladeSaver Thread cutter here.  And the Third hand Binding Folder Clip here.


50% OFF Sweet Sixteen PDF pattern
sale ends 2-15-2020


Pin It
Related Posts Plugin for WordPress, Blogger...