Wednesday, June 24, 2020

~ Stitching Sunshine Blog Hop ~

Hello Quilting Friends!  Today is my day in the Stitching Sunshine Blog Hop hosted by Carla over at Creatin' in the Sticks.  


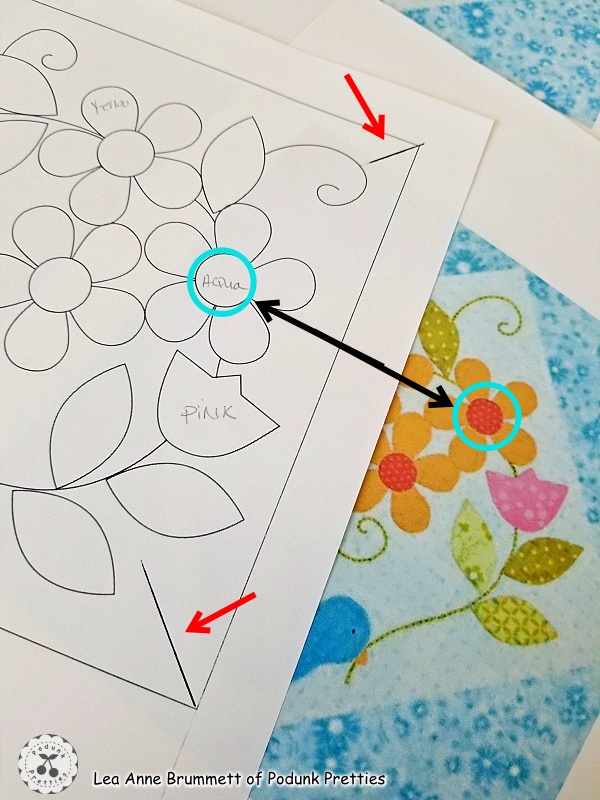
When I saw the sign ups for this blog I knew I had to join in because I was already making something yellow. My project is a quilt called Hunkering Down. This quilt block is free printable PDF here on my blog.  You can find the post with the link to the PDF by CLICKING HERE.  


Unfortunately, my quilt isn't finished due to my decision to quilt it to death.  The quilting has a lot of ruler work mixed in with some free motion feathers.   Since my Bailey Home Quilter has a 15" throat I can only quilt half of a block at a time.  This really slows down the quilting due to all of the starting, stopping and clipping threads.   


But....OH MY GOODNESS is it worth the extra effort.  I can't wait to see this big ole girl on a bed.  Yes she's a little on the large side, finishing at 90" x 90". 


The buttery yellow Andover fabric is perfect for my blue and yellow shabby chic spare bedroom.


Below is an Electric Quilt drawing of the quilt since I can't show you the whole real quilt.  I played around with several ideas for setting these blocks.  You can see them on a previous blog post HERE.


Well that's it for me but make sure you hop over to the other bloggers participating in this blog hop.  This is one creative group of bloggers.

Monday, June 22nd


Tuesday, June 23rd


Wednesday, June 24th

Podunk Pretties you are here

Thursday, June 25th


Pin It

Tuesday, June 23, 2020

~ Home Again BOM ~ Block 13 ~ And a Little Khaleesi Update ~

Howdy Quilting friends!  I'm super excited to be working on the last 4 blocks of the Home Again BOM by Erin Russek.  Hopefully I can have them all complete by the time she releases the setting instructions.  You can find all the FREE blocks in one convenient spot on Erin's blog by clicking HEREClick here to see the rest of my blocks.  I'm also excited to have my Hunkering Down quilt almost finished.  It's the yellow quilt in the background of my block 13 below.


This last couple of weeks have been super busy.  Summertime is full of chores needing to be done.  The gardening and yard work seem to never be done.  As soon as you think your caught up, it's time to start all over and do it again.  But I guess we have to look at it as good exercise but like many of you I'd rather be quilting.  And then there's my sweet girl Khaleesi.  She's still a pup and loves to play.  


Let me tell you, there is no ignoring her.  She will let you know when it's time to eat, play and go for a walk.  Her internal clock is impressively accurate.  There's no sleeping in when you have a barking alarm clock with no snooze button.  And that same alarm goes off if you forget any of the many rituals she has throughout the day such as feeding time, play time and heaven forbid if Mr. Podunk comes home late.  She becomes a nervous wreck pacing the floors until he arrives.


So as I write this quick post this morning she is by my side whining and yipping letting me know it's time to go outside for a walk.  I guess I better get moving!


Pin It

Monday, June 22, 2020

~ Father's Day 2020 ~

This years Father's Day celebrations was very low key.  No big family gathering with a buffet of yummy home cooked foods.  It was just me and dad doing our best to social distance.  Since dad is the oldest in the family he gets to call the shots.  As we all know the older you are the more likely you are to catch this crazy bug that has had us all hunkering down.  He felt it would best to stay as far away from the 40 and under family members.   We normally have the family gatherings at dads  house because he has a kitchen big enough to hold all of us.  Even without the virus issue right now it would not have been a good time for a family gathering.  He's having new garage/workshop built.  And when the contractors are ready to work you let them work.    


The new garage will be a place where he can restore his old truck that he has had since I was about 9 or 10 and my brothers old car.  The plan for this garage started about 15 years ago.  Seems like a long time to wait for a garage doesn't it?  But every time he would start the ball rolling on the construction something would pop up and delay the start of construction.  So finally his dream garage is being built.


I forgot to take pictures of his old truck and car that will be the first to be restored inside this garage.  So I dug through my old pictures and found a picture from Easter 2019.  As you can see dad loves cars.  He can't stop playing with my nephew's Vet long enough to take the picture.   My nephew loves car's as much if not more than my dad.   


I stole this picture from my nephew's Facebook page.  This is where he works.  The boy has been working on cars since he was just a little kid.  It's a family thing.  My brother also restored old cars.  He had so many cars in his lifetime we couldn't count them all.  He had at least 2 new to him cars a year from the time he was 16 yrs old.  


The garage was originally a retirement plan for my dad and brother.  Sadly my brother was killed in a car accident in 2007 four months after this picture was taken.  It was devastating to the entire family and community.  The funeral director said it was the largest funeral he had every had.  My brother was very well known and loved by so many in our community.
   

All in all yesterday was a good day.  I made dad some homemade low carb, no sugar vanilla ice cream.  We spent the afternoon talking and telling stories of the good ole days.  Then we started planning for a family cookout in July, that is if the bug situation keeps improving.  By early evening I was back home and ready to head into the Studio for some much needed quilting time.  But first I needed to check emails and social media.  My niece posted this picture on her Instagram.  It's my brother his wife and my niece when she was a few weeks old.  The caption stated how much she missed her dad.  I lost it, yes I cried like a baby.  I'm not sure why.  He's been gone for 13 years but it felt like just yesterday.  Maybe it's the menopause hormones. We won't even start that discussion...UGG.


Then a crazier thing happened.  Here is the second picture in her post.  Her and her step dad.  He's a great guy and treats my niece and nephew like his own children.  The little signs  gave me a chuckle as I cried.  Good grief!  What an emotional mess.  I really need some quilting time therapy.


Pin It

Friday, June 19, 2020

~ Home Again BOM ~ Alternating Block Colors? ~

Hello Quilting Friends!  The last couple of days have been spent rummaging through the fabric stash looking for the perfect fabric to compliment the Home Again BOM applique blocks.  So I pulled a few pastels and pinned them to the design wall so I could stare at them for hours on end while cocking my head from side to side.  When I tired of standing in one place I decided maybe I needed to look at them from a different angle.  Maybe if I sat for a bit it would help me make my final decision.  Then I realized I might be standing or sitting to close them.  Standing outside the Studio and staring produced the same results, I wasn't happy with these colors.  It was time to get away from the design wall and studio for awhile and let these brew around in my mind for a bit while I did some household chores.  Each time I passed the Studio I would stop briefly and once again stare at the wall.  Nope! Those fabrics still don't trip my trigger.  I should be making the last 4 blocks but I'm not one to fight my process.  Flying by the seat of my pants is how I work best.


It's time to take this to the next level.  One by one each block was removed from the design wall so I could take an overhead picture of them.


Each block ended up looking like the image below.  


Using a photo editing software (PhotoScape) each block image was cropped and edited.


 I then imported all of the block images into EQ8 so I can draft the Home Again quilt and add my blocks.  


Here's Erin Russek's final layout.  Simple and easy to draw in EQ8. 


Let the playing begin!  My white blocks show up a little gray.  Oh well, taking the time to edit them again just didn't sound like much fun.


 After a few minutes of color play the design play started.  Yes my friends I can't follow a pattern.  I'm notorious for tweaking patterns to my own liking.  It's not something I plan to do it just happens.  And you never know I might stay with the original plan.
Only time will tell but for now....
...maybe it needs more borders, maybe some applique could be added to the borders?


You know red is always eye catching.  LOVE MY RED!


But what if we tone down the red just a little bit.  Oh I like!  But what if....and then ideas start flowing.


 I think I have a plan...Maybe. I'm still playing with my plan but here's a look at the fabrics I'm playing with right now.  Hopefully by the time I finish the last 4 corner blocks I will have made a decision on both fabrics and design.  What do you think?  Do you a favorite from the quilt images above?  Or maybe a totally different color option idea?  What do you think about an appliqued border? Leave me a comment below with your ideas and thoughts, I love hearing other ideas!


  If you haven't downloaded all the free blocks for the Home Again quilt there's still time.  They can be found at One Piece at a Time HERE.  To find all the FREE blocks just scroll and click on older posts at the bottom.  You can also do a search in the side bar search box of her blog.  The large center block is not free but it is very reasonably priced since all the other blocks are free.  It can be purchased here.  


Pin It

Wednesday, June 17, 2020

~ Home Again Progress and Tips ~

Hi Quilty Friends!  Today I'm taking a little break from quilting the Hunkering Down quilt to play a little game of catch up on the Home Again quilt by Erin Russek.


I'm 3 blocks behind but due to my lack of attention to detail I will need to redo/fix two of the blocks on the wall.  Color placement is an important part of any quilt.   It helps to visually balance or distract depending on the effect you're after.  Block design can also be a balancing effect.  Notice the symmetry in the blocks of this quilt.  Block placement is key in this pretty girl.  Since I'm not following Erin's color pallet it was easy for me mess things up.  Oh well, such is the life of a crafter.  We make mistakes from time to time.  I could leave it as is but with this much work going into a quilt I want it to be as perfect as possible.  The problem is I put the wrong colors in the blocks below.  Visually right now it looks right but the blocks are in the wrong spots just so I can see the color in the right place.  However there is a slight design difference that also adds balance.  Today I'll remove and replace the offending applique pieces.


To aid in the construction of my last few blocks I've taken a few extra precautionary steps.  First was to print a few images from Erin's blog. The image below shows all the blocks in the correct places. 


I've pinned it to my design wall for easy reference.


 Next was to print Erin's last three block images.  I didn't do this with the previous blocks.  Since my attention to detail seems to be a little off right now I thought it might be worth a little printer ink to have the images right there beside me on the last four..  


Next I've labeled the pattern with the proper colors from my pallet.  I also added a diagonal to the applique template sheet for lining up my fabric.  This was done out of pure habit.  Erin's pattern is centered perfectly on the paper.  The fabric background square is 8.5" and they have all fit perfectly without needing the centering marks.  Just line up the fabric with the edge of the paper and start adding applique.  I haven't needed to use my light box for these either.


 Another precaution I'm taking (just encase my brain decides to take trip into la-la-land) is labeling my circles on the fusible with the correct color.  The center for the large flower is a little bigger than the other 4 flower centers.  It would be easy to attach it to the wrong color.  Hopefully taking these extra steps will make these last few blocks go together properly.


I know some of you may already use these methods as a standard when making applique.  In my earlier blocks my thought was to just get them done quickly and move onto something else.  Lesson learned!  It's quicker to do it right the first time.

All of these small blocks are FREE on Erin's blog.  Click here to go to her most recent post.  Do a search in the sidebar of her blog for Home Again or just keep scrolling and clicking older post to find all the blocks.


Pin It

Tuesday, June 16, 2020

~ Sneak Peek ~ Quilting the Hunkering Down Quilt ~

Hello Quilting Buddies!  Just thought I would pop in for a sneak peek of my Hunkering Down quilt as its being quilted.  Custom quilting on my set up is tricky business.  I own a very low end midarm machine called a Bailey Home Quilter 15.  The 15 means she has a 15 inch throat, that's not much quilting space in the frame quilting world.  So quilting large blocks or spaces can be tricky but doable with a lot of rolling back and forth.  She is equipped with a stitch regulator but it's first generation or as I call it an old school regulator which makes it a little more difficult to maintain uniform length stitches.  Again, it's doable once you get the hang of how it works.  The quilting on this quilt is a mix of free motion and ruler work.  The feathers, circles and ovals are free motion.  The arcs, straight lines and crosshatching is ruler work.  Yes, she is quilted to death.  With so much open space for quilting I just couldn't help myself.  Over the last couple of years I've greatly reduced the amount of quilting on my quilts but every once in a while a gal just needs to take a quilt over the top and quilt it to death.


Deciding the quilting design can sometimes be the death of a quilt, at least for my quilts.  I've about 30 quilt tops in need of quilting because when they were finished I couldn't decide on the quilting.  With my quilt top storage full I must quilt quilt tops as they are finished or make room for more quilt top storage.  The more quilt tops in storage the less room for new fabric and I don't want that to happen!....HAHA!  So I spent many hours looking for quilting ideas and drawing out my ideas.  I'd like to give credit to the owner of the image below but there was no information provided.  Anyway...As soon as I saw it I knew it was perfect for my quilt.  Feathers combined with crosshatching, it just doesn't get much better than that!


Finding the perfect border design was much easier than deciding on the block quilting.  
Hours were spent doodling on my quilt top with the plexi-glass and dry erase marker.  Until I finally said this is good enough, just QUILT IT.


Oh but I wasn't finished designing.  There's still the matter of the blank alternating block.  The first idea was to do a very traditional feathered wreath with cross hatching to match the border.  But since the throat on the quilter is 15 inches and the 12 inch on point blocks are 17 inches long it would require some super tricky quilting maneuvers.  Nope, I need a plan that is easy to break down into 2 quilting areas.   After a few hours I finally came up with a quilting plan that will compliment the border and can easily be broken into 2 or more quilting areas.


Pulling together all the quilting can be quite tricky.  Sometimes I get it right and sometimes I don't.   To late to make changes now!  See you in a few days with the finish!


Pin It
Related Posts Plugin for WordPress, Blogger...