Tuesday, December 31, 2019

~ Change of Plans ~

It was full steam ahead in my marathon quilting day and then it happened.  CRACK!  Okay it didn't make a sound but I noticed when using my ruler foot against a ruler that my quarter inch seam was inaccurate.  After close inspection I saw the problem, it's broken!  How in the heck did this happen again!?  I tried to super glue it (again) but with no luck.  All I can do is order a new one.  This time I've order a metal one instead of plastic.  Well all I can do is wait.  Even with Amazon Prime it will not get here until Friday.  So I'm moving on to the next project.  


Last week I was asked by a follower if I could share  my process for raw edge applique.  Yes, I can!  Since I'll be participating in the Home Again Free Block of the Month designed by Erin Russek I'll use it as my teaching piece.  A couple of weeks ago I purchased, download and taped together the large center block for this quilt.   By the way it is not necessary to purchase the large center block to participate in the BOM.  There will be 16 other blocks.  Erin will give setting instructions for several different quilt top finishes.  You can get all the details by clicking here.  


I love how Erin has included a Applique Placement Sheet and Applique template sheets.


Since I'll be doing raw edge applique, I'll need to trace the shapes on to Heat N Bond Lite.  One of my tricks for tracing is this circles drafting template.  They are under $5 and can be purchased at craft stores and office supply stores.  It makes tracing circles a breeze.  Look how perfectly one of the circles fits around the center of the flower.


Not only does it match the circles perfectly but it can also be used to trace some of the arcs in the applique such as the flower scallops.  


I'll be making this quilt in my favorite pallet of happy and bright.  The plan is to use as much of  the fabric scraps in this basket as I can without dipping into my yardage stash.  After much debating with me, myself and I about the background fabric I ordered what I think is going to be perfect.  It should be here in a few days.  


So in order to make the applique tutorial I promised I'm going to make a small test block using some of the shapes from the Home Again Center block.  Below is my pull for the background fabric.  Which one would you use? 


#appliqueaddicts 
#homeagainbom
#freebom 
#freequiltbom
Pin It

Monday, December 30, 2019

~ Frankenstein Batting ~

Please tell me I'm not the only one with a HUGE stash of scrap batting.  The amount I've saved is almost shameful.  I keep telling myself I'll use it for the next quilt or for charity quilts. Well yesterday was the day to start using it because I forgot to buy batting when I went into town a couple of days ago.  The drive into town is 20 minutes.  Then there would be the actual shopping time and as we all know once your in the store the hunter gatherer kicks in and before you know it an hour has passed.  So I decided to save time and money by piecing together some scraps.


Layering the scraps of batting over the quilt top on the wall makes it easy to see when I'll have enough for this quilt.


Looks like these are going to need a lot of trimming.


Yah! Three pieces of batting is all I'll need to piece together.  That's pretty good.  I've made some in the past with up to 10 pieces.  It's tricky but doable.  I'm curious if quilters have a limit to how many pieces of scrap batting is to many for one quilt.  Do you have a limit?


All of the batting scraps I chose have one factory cut edge.  The factory edge will not need to be trimmed, thank goodness.


Now I remember why I avoid piecing polyester batting, it's not easy.  


It will also dull a brand new rotary cutting blade.  This rotary cutting blade was due for a change anyway.  


Cutting the three pieces took about 30 minutes.  This time includes the smoothing and folding.  It would be much easier if it were cotton batting.  But as you all know I'm allergic to cotton batting. 


If it were cotton I could use the batting tape to quickly iron the pieces together.  A hot iron and polyester don't play well together so these will need to be sewn together.  Years ago I used to do this by hand to avoid the having a small seam in the batting.  Time and age has taught me I really don't care what's inside the quilt that no one one can see.    My machine is set the longest and widest zigzag available and it's pedal to the metal!  


It can be a little tricky because once you butt the two pieces of batting together it's hard to see where one stops and the other starts.   So I try to keep a small gap in between the two.  This gap is quickly pulled together by the zigzag stitch.


The seam is very visible but once in the quilt who will know besides you and me.  I'm not telling anyone are you?


Just to be on the safe side the Frankenstein batting is placed back on top of my quilt top.  Looks like I'm ready to start my marathon quilting.  I'm going to do my best to get this quilted in one day.  Wish me luck! 


#piecingquiltbatting
#quiltingtip
#christmasjoyquilt

Pin It

Sunday, December 29, 2019

~ Fussy Sewing? ~

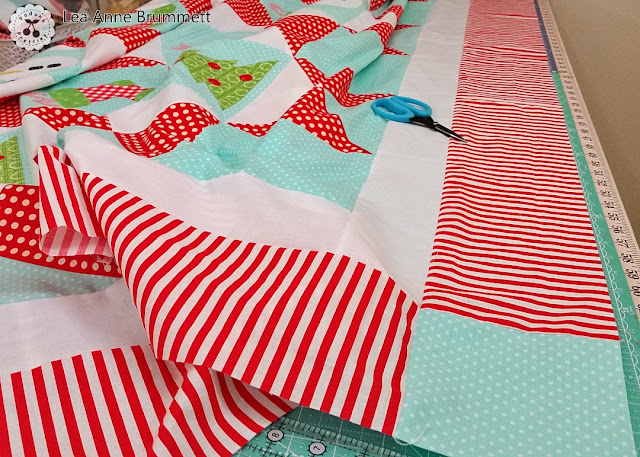
Is there a such thing as fussy sewing?  What I'm calling fussing sewing is carefully matching the print on fabric so you can't see the seam when sewn.  After planning several different border options for this quilt I decided to go with the one I felt would be the quickest to make.  While it was the quickest option, I still needed to pay close attention when sewing together the WOF strips for cutting the borders.  I wanted it to look seamless. All the stripes need to be same width.


To do this the fabric was layered right sides together.  Then I shifted the top fabric so the first white stripe lined up exactly with a red stripe on the bottom fabric.  After I stitch these together I will trim off the selvage.


Next I carefully pinned it in place.   This required a little effort.  After putting in each pin I would lift up the top fabric to see if the lines on the fabric were lined up properly.


Using the lines on the fabric as my stitch line .


This is how it looks before pressing and trimming.


Can you find the seam?


TADA!  Here it is!  Pressing the seam open helped hide the seam.


 Now to get this girl on the frame.  I chose another polka dot for the backing.  As you can see I was not so picky about the seam.  I'm sure matching up all those dots could be done but not in my quilty world!  That's knocking at the door of an obsessive disorder....😄HAHA!  Quilting is my therapy not the reason I need therapy. 


#quiltborders
#fussysewing
#thermoweb
#heatnbondlite
#christmasjoyquilt

Pin It
Saturday, December 28, 2019

~ Quilt Border Options ~

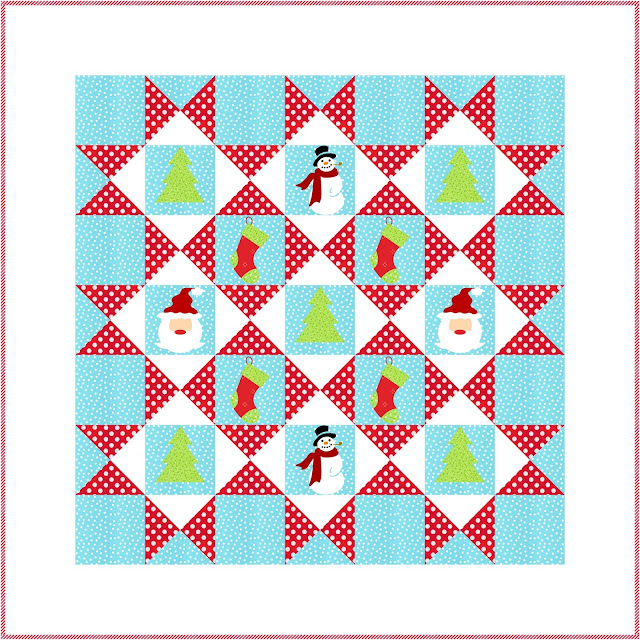
 This may not surprise most of you when I say this....I changed the pattern.  Just a tiny bit, a few minor changes.  There was absolutely noting wrong with the pattern other than I wanted it a little larger.  So with the help of EQ8 I started playing with options.  Before showing you my changes I want to give credit the designer of this super cute quilt.  Carol Swift from Just Let Me Quilt designed this Christmas Joy quilt for ThermoWeb.  It's a FREE pattern that you can find by clicking here.


Instead of trying to recreate Carol's applique blocks I used what was already in EQ8.  Here's the first quilt I came up with as I set the blocks into place.  It's still too small but I like the look of the extra hourglass blocks around the outer edge of the quilt.  Making them in three colors instead of 2, then setting a plain block in between.


Now to find a border.  My first thought was to do a simple border with a fun bright binding to finish it off.  I like it but let's see what else I can do with a few clicks of my mouse.


This one was interesting but still doesn't WOW me.


I have to say this one I LOVE but it would require ordering more aqua gingham for the border.  I have some but I already have a plan for it in my next quilt.


At last I think this will be the one!  I might even add a little more applique to the corners. 


Carols quilt finishes at 50" x 58".  My quilt finishes at 72" x 72".  The yellow square on my quilt shows the original blocks without the sashing in Carols quilt.  Another change was every other row of hourglass blocks I turned.  In Carols quilt they are all the same direction.


Now to find the perfect red stripe.  I used a small red stripe for the candy canes in the stocking blocks.  The plan was to use the same red stripe for the border.  However it just didn't look right. So I dug deep into my stash and found this wider stripe...I love it!  I think it's going to be perfect.  What do you think?  The small stripe or the large? OH!  you know.... I could omit the applique in the corners and do a mitered border.  What do you think?  Should I ?  I'll need to think this over as I run some errands this morning.  I can't wait to get home and start adding the borders.


#christmasjoyquilt 
#freequiltpattern
#christmasquilt
#thermoweb
#heatnbondlite


Pin It

Friday, December 27, 2019

~ Get Squared Ruler Review ~

Many quilters love to make quilt blocks larger than needed then square them up.  I'm not a big fan of this technique.  To me it wastes valuable time.  In my mind it's better to take the time to learn why your blocks are not finishing at the correct size. Three things happen before a block is complete. If your blocks are not finishing at the right size then something is wrong in one or all of these three things.  
Thing 1- Cutting fabrics 
Thing 2- Piecing fabrics
Thing 3- Pressing fabrics
For the most part I believe I have mastered all three Things.  As with anything in life there are exceptions and gray areas.  The Hourglass block is the exception to my never square up rule.  I almost always make this unit larger then square it up.  Can I make this unit without squaring it up?  Who knows, I never tried.  Isn't that strange?  Well that's a challenge for another day when time is plentiful.  Right now I need to find a fast and accurate way to square up (24) 8.5" Hourglass blocks.  These are the alternating block in the Christmas Joy quilt, you can read more about it here.


Thirty years of quilting and I don't own an 8.5" square up ruler.  I could use a larger ruler but I've found it's a little tricky with the 45 degree angles.  So I decided to use the freezer paper method.  If you don't know how to do this here's a tutorial by The Crafty quilter.  It's a different block but the idea is the same.  It's also very time consuming.  I'm a woman on a mission with a self imposed deadline and wouldn't you know it I need to run some errands.  While I'm in town I'll make a quick trip to Joann's for a 8.5" square up ruler.


Joann's had about 5 different 8.5" rulers.  The June Tailor Get Squared was the only one with an X.  I'm not a big fan of this brand and I don't fussy cut very often but it has the X needed for perfect squaring up.  And if I'm going to buy a new gadget it's nice when it can do more than one job.  Joann's is also having a sale as always.  Do they ever NOT have coupons or sales?  So this ruler was about $7 with my coupon, that's a pretty good deal I think.  


Since I own a few June Tailor rulers I know the first thing I need to do is add some gripping power.  These rulers are buffed to the highest shine and are slicker than a wet noodle.  So I grab my handy dandy Nexcare tape to fix the slippery backside.


This is also a great time to use a rotating cutting mat.  If you don't have a rotating mat a smaller cutting mat works just just fine.  I bought mine on impulse without thinking things through.  It really is one of the silliest overpriced gadgets I own.  Seriously how hard is it to turn a small mat?  But if you love yours I'm not judging.  I can almost bet someone out there is thinking I could have used the X on this mat.  Yes I could have but the ruler seemed quicker and easier. 


 One down and 20 more blocks to go.  Do I like this ruler?  Yes, it was worth the $7.  I've no buyers remorse.   It saved time and has more than one use. The only real dislike is the slick backside, but it was easy to fix.  Maybe later in the year I'll try my hand at a fussy cutting quilt.  You just never know when and what will inspired your next creative adventure.


#squaringupquiltblocks 
#hourglassquiltblock
#christmasjoyquilt
#christmasquilt
#junetaylorruler
#getsquredruler
#freequiltpattern


Pin It
Related Posts Plugin for WordPress, Blogger...