Sunday, February 28, 2016

Design Wall Daisies

Top of the morning quilty friends!  Hope you each had a wonderful weekend filled full of whatever makes you giggle.   I didn't get to stick to my weekend plan of quilting on the frame.  As soon as I touched my quilting machine ...she broke.  Oh well what can you do but whine to Mr. Podunk, ask him to fix it and move on.  This was the perfect opportunity to work on a UFO.  There's plenty to choose from in various stages of completion.  But the one below caught my eye.
A cute little stack of 50 or more mini dresdens.


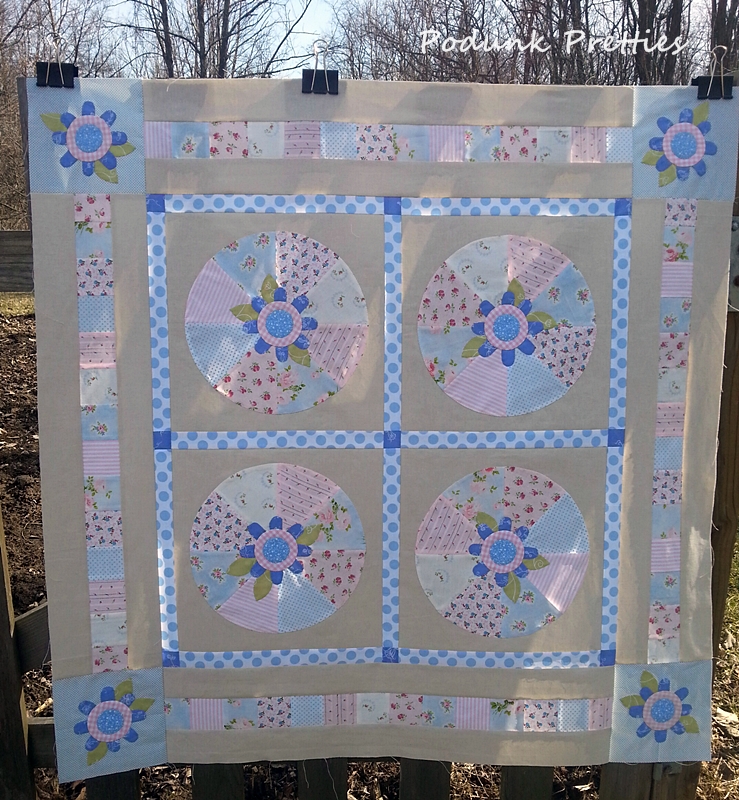
If you've been hanging around my blog for awhile you probably remember my Daisy quilt.  Not sure why this one became a UFO because I LOVE IT.  It might have been the applique.  Due to the little dresdens being randomly placed on the quilt top over seams it's a little bit of a pain to machine stitch them to the quilt.   It was a even trickier to glue baste them in place as the quilt hung on the wall.


 All basted and ready to stitch.


 Awe now look at that, so springy and cute.  Why did I ever stop working on this?


~ Lea Anne ~
Pin It

Podunk Pickins #22

This week has flown by and I've accomplished very little in the Studio.  It's been one of those weeks that I seem to just run around chasing my tail and never really doing anything that's worth sharing on the blog.  
So now comes the issue of how will I chose one person to feature for Podunk Pickin's.  To be fair I decided to let the Random Number Generator do the work.  

It chose Kath@HillsideHouse.  She shared an amazing project designed by Erin Russek called Mimi Bloomers.  Hop on over to Kath's blog to see her outstanding handwork.  After doing a little research I found that all the  monthly blocks are still available for free download on Erin blog, click here.  However the center block needs to be purchased here.


Pin It

Wednesday, February 24, 2016

Secret revealed! Happy Garden Wheel Quilt Pattern

Here it is, isn't she a cutie?  I must say that I absolutely love this pattern.   It's not very often that I make a quilt designed by someone else, but when I saw this adorable pattern designed by Beverly I knew it was a must make.


Beverly and her daughter Gina have teamed up, and are creating some really cute ideas.  Most of you might remember Beverly's old blog and online store, 44th Street Fabrics.  She recently moved and renamed her blog Blossom and Bev.  Her daughter Gina also has a blog, Dishy Art,  I can't imagine how much fun it must be to work as a mother daughter quilting team.  This is their first quilt pattern as a team it's called "Happy Garden Wheel".    Beverly worked her colorful magic on the quilt designed by Gina.  You can find the pattern here on Craftsy.  This is a fast and  easy to follow  pattern with gorgeous photo instructions.


I've been following Beverly's blog for years.  Her sense of color and fabrics are amazing.  She loves bright and happy quilts...just like me.  Well you gals know me, and you know I can't stick with a pattern exactly, so I had to make mine different.  Why not start with working out of my color comfort zone.  The Shabby Chic style really appeals to my girly side, so that's what I was shooting for with these fabrics.  I've notice a lot of linens on a few quilting blogs lately so why not add that to the mix as my background fabric.  As you can see below I even threw in a couple fabrics that are not 100% cotton.  All pre-washed of course.


I also chose to use a different applique method than suggested in the pattern.  No reason other than personal preference.  All of my applique was made using freezer paper and invisible machine applique with Superior Threads Mono-Poly thread.  The pattern calls for raw edge and fusible interfacing.  


Now it's time to decide how to quilt it.  Oh that's going to take a few hours of doing the quilt stare.   This little cutie deserves something extra special, don't you think?


 ~ Lea Anne ~

Pin It

Monday, February 22, 2016

Secret Sewing project and a few fabric tips

Just wanted to pop in and give my quilty buddies a sneak peak at what I've been working on over the weekend.  It was top secret until yesterday.  Well I'm having so much fun keeping it a big secret... I'll keep the secret a little longer, until it's 100% complete.  Since the pattern is a secret let's talk a little about the fabrics in this adorable little quilt.


As you all know I'm no fabric snob.  Any fabric that I can stitch, can and will make it into a quilt.  We all love the designer line of fabrics but in my humble opinion adding "other" fabrics to the mix can extend your stash and give you a one of a kind quilt.  Here's a list of the fabrics used in the quilt above.  A couple  in the list below are not shown in the picture due to the secret not being revealed.
  •  pink and white stripe -baby bed sheet thrift shop purchase
  • white with blue dots- vintage swiss dots from my moms stash, they're fuzzy dots!
  • pink and white gingham- linen baby bed dust ruffle, thrift shop purchase
  • the flower petals- A.E. Nathan fabric-bought at Wal-mart about 10 yrs ago
  • the blue floral print at the top of picture and pink floral at bottom of picture are also Wal-mart prints from way back when.
  • the blue print in the center of the flower applique is a Joann's fabric.
  • the green leaves is a from Jam's and Jellies by Jill Finley, Henry Glass Fabrics
  • Fabrics that you can't see...another print from Jam's and Jellies 
  • and the background will be a linen purchased at Joann's fabrics this past weekend using my 60% off coupon....WOOHOO!
The big secret for using a mishmash of fabrics is WASHING before using.  Yes even those precuts,  jelly rolls included.  Using pinking shears I pink the edges of yardage and the precuts I do nothing.  By all means DON'T throw them in the washing machine.  Soak them in sink or bucket of warm soapy water for about an hour then gently swoosh them around by hand to get out any sizing.  NEVER wring out the fabric.  Drain the sink and repeat the process, rinsing out the soap.  To remove the excess water, fold the larger pieces of wet fabric and press between two towels.  Smaller pieces such as charms don't need to be folded.   After removing out the excess water I spray the fabrics with starch.  The starch  helps hold the fabric together in the dryer.  But before they go in the dryer they hang on a wooden drying rack until almost dry.  Turning on the dryer and getting it nice and hot before tossing in your fabric is a good idea.   Then put fabric in a laundry bag and toss in  the dryer for about 10 minutes, this will shrink the fabric.  You should have very little fraying.
After the fabric is dry, let the pressing begin!  Pressing not ironing, no steam.  If you have a stubborn crease, spritz the fabric lightly with water because they already have starch.  Unless you want it really stiff then by all means starch it.  This may seem time consuming but really it's not that bad and the results are worth every minute.  The quilt below was made with a jelly roll, layer cake, and yardage.  All preshrunk using this method.


~ Lea Anne ~

Pin It

Sunday, February 21, 2016

Podunk Pickin's #21

Good Morning quilty buds!  Let's get right to this week Pick.  
Carole from My Carolina Home added her Scrap Dance Tango Mystery to the Podunk Pickin's linky party last week.


Tons of fun going on over at My Carolina Home, linky party and a prize!  Hop on over to get all the details, there's still time to join in the fun.


Now let me say Podunk Pickin's has gone through some changes due to my moms illness.  The hopes is to someday get back to finding sponsors and prizes but for now this is the best I can do.  Some weeks I may post and some weeks I may not.  It all just depends on how my week goes.  As you all know mom has cancer.  Her dependence on my assistance dictates my sewing and blogging.  Thanks for hanging in there with me during her fight. 

Okay enough of that sad stuff lets get to the fun stuff.  Link up what you've been stitching up over the last week.  Of course I love to see freebies, tutorials old or new.  Really it's all about strutting your stuff, inspiring others and meeting new friends.  As long its sewing or quilting related.  Don't forget to visit some of the other links and share the quilty love, we all like visitors and comments.


Pin It

Monday, February 15, 2016

Change is good

 Earlier in the month I said I wasn't going to change anything about Connie's "Main" quilt.  Ehhh....what can I say...I'm fickle.  As you can see below I changed the white flowers to blue.  This applique was originally on a brown background fabric that looked like chocolate milk....ewwww...yuk.  When I switched to the lighter background my little flowers wilted away into the background.  Connie would have love it, even with the wilted flowers, but this only took about an hour to fix.

BEFORE....................................AND....................................AFTER
All that's left is to stitch the lettering in place.  The baskets and wreath applique were made using freezer paper and turning the edges under before glue basting them to the quilt.   Invisible machine applique using Superior Threads Mono-Poly thread made this process much quicker.  The lettering is raw edge using Heat -n- Bond Lite.  Normally I wouldn't use two different types of applique on one quilt but with my rush to get these quilts finished it's a must.  My thoughts on adding more applique were just that...thoughts.  I'm ready to call this one done.  One more afternoon of sewing and she'll be ready for the "Quilt it" pile.


The wreath was designed special for Connie.  But I'm thinking I might eventually make a wall hanging or design entire quilt around this one center block.  It's the little blue birds that keep drawing me in.  Even with the hard to work with shirt fabrics they are just adorable.


A quick note about yesterdays First Kiss Quilt tutorial.  If you read it early in the day and saved the PDF you'll need to go back and do it again.  I realized after publishing that some of my measurements were wrong.  It's fixed on the blog and in the PDF.  Thanks for you patience and understanding.  

~  Lea Anne ~
Pin It

Friday, February 12, 2016

#2 Quilt top finish, Connie's Quilts

Shake it, Shake it!  Yes mam' that's my happy dance.  Tickled pink doesn't even begin to describe how I feel this morning after getting the final borders on this quilt.  All the fabrics except the blue inner border are men's shirts.


 Stealing a few minutes here and there to get this one together quickly really paid off.  I've always said with each quilt I learn something new.  This quilt was no exception.  The lesson was ...cut BIG pieces.  The bigger pieces made the quilt go together quickly and it actually makes it look less busy.  Now I've heard Bonnie Hunter say "If you think a fabric is ugly you just haven't cut it small enough."  Not true in this case.  Cutting smaller only  makes these uglier and very busy to the eye.  Don't get me wrong, I love Bonnie and her quilts, but her rule of thumb didn't work out on this one.


 The little pups were so much fun to put together.  


 As I stitched them down I sang an old song...."How much is that doggie in the window?  The one with the waggily tail?" 


I'm still humming it this morning as I race around preparing for an afternoon of more applique. 


Here's whats left of Connie's husbands shirts and fabric she wanted worked into the quilts.  Not sure I can make 3 more quilts from them but I'm going to give it my best shot.  The goal is 6 quilts, lightly quilted by March 1, that's Connie's Birthday.  In order to meet my goal I'm planning on taking my sewing machine along with me while I care for mom.  Being away from home for about 12 hrs a day, 4-5 days a week doesn't leave much time for sewing after doing the cooking and cleaning.  


 Today's plan is to start stitching down the applique for the "Main" quilt.  


If you missed my previous posts, the quilt below is Connie's quilt (the main quilt, with her origami shirt blocks).  All the other quilts made from the shirts are for her 4 children and a grand daughter that she's raising.


Wish me luck, cheer me on and if you live near by, get over here and bring your sewing machine and chocolate!  ....LOL!

~ Lea Anne ~
Pin It

Monday, February 8, 2016

Puppy Bow

 Happy Monday morning!  My little puppy quilt is almost complete.  Instead of sharing my quilt top progress today I decided to share how I made the bows for this cute little free Westie quilt block.


My original plan was to hand draw the bow and make applique templates.  Well doesn't that sound like a lot of work?!  Why not just sew a real bow to the block?  Sounds soooo much easier.  


Now remember the fabrics in these blocks are all old shirts.  So I can't tell you how long to cut your pieces, but I can tell you how long to sub cut them.  You'll need one strip that is 1.5" wide by at least 5" long.  And one piece that is cut 1" wide and at least 1.75" long.  On the 1.5" piece, press a quarter inch seam on both long sides.  On the 1" wide piece press the long edges towards the center.  Stitch down both sides of the 1.5" strip after turning the edges.  Sub cut the 1.5" strip into 5" lengths.  Cut the 1" inch wide piece into 1.75" lengths.  This might make more sense if you look at the pictures below.


Okay now that everything is pressed, stitched and cut let's add a few drops of applique glue(washable school glue works too!)  I use these handy close pins to hold them while they dry.  Now would be a good time to have a chocolate and pet some pretty fabrics in the stash.


Or in my case look for my camera tripod....it's still lost.  So lets improvise...cloths pins for fingers.  A picture is a 1,000 words so I'm going let the next group of pictures speak for themselves.


The only reason the pin is in the first picture below is because I needed my hands to take the picture.  You gals understand that you can add the glue without pinning.  Again I used cloths pins to hold it tight.  Or you could use your iron on Medium heat to set the glue.  I let mine dry with cloths pins while I caught up on some wifely chores.


Now that they're dry we can attach them to the cute little puppy using a medium heat setting.
Since the red shirt fabric was kinda thick I also pressed from the backside just to make sure it was good and dry.


It's really hard to see my invisible stitching....hence the name INVISIBLE.   The red dashed line below shows where I stitched.  I wanted the bow to maintain as much "fluffy" as it could and still be secure.


Here's the finished block.   I put the scissors and pencil in the bow just to show where I didn't stitch.


Hope this answered your questions Britney. 


~ Lea Anne ~
Pin It

Saturday, February 6, 2016

Podunk Pickin's # 19 ~Sew DOG-gone cute~

Did ya'll know I'm a dog lover?  Yes ma'am! And these blocks make me sit pretty and beg for more.    I'm that crazy lady you bump into at the pet shop that asks if she can pet your dog, then 20 minutes later your wishing you had said "NO"  Why?  Because I must pet every dog, love on it, and ask a slew of question about your little fur baby.  I've never met a pooch that didn't make me baby talk until it's owner is totally annoyed.   


Normally a quilt in these dark colors would turn me off,  and quickly become a UFO.  Not this one.  It's so doggone cute!   You can find the template for the FREE dog applique here.    Two free templates are provided.  One large dog and one small.  I'm using the large one for my blocks.   Of course if you need a larger size I'm sure you gals are tech savvy and can figure out to enlarge them.  The bows are my creation and not part of the freebie.  The addition of the little bows took this block over the top.  They  are made with a little stitching and some applique glue, then glued to the 9.5" block and stitched in place.


It's hard to believe that each block is 100% shirt fabrics, even the background.


Here's the quilt layout plan below.  I know it's off balance but it's crunch time.  I'm working with what she gave me ...and at a very fast pace.  It's about memories not perfection.  


Okay that's my Podunk freebie Pick of the week.  You'll want to make sure you come back next Sunday for a new free quilt block design, designed by little ole me.  Here's a hint...You're going to "LOVE" it.


Pin It

More about the shirts pattern

These little shirts are a hot topic in my email box.  It happens everytime I post pictures of them.  There's been many request for a tutorial.  Well girls, I would if I could.  This is a published pattern.  It's called "Aloha Shirts" By Beyond the Reef.  


It's been a few years since Connie purchased the pattern at a LQS....So...
After a little searching I found the pattern at Aloha Quilt shop, click here to go straight to the pattern. The little buttons were purchased at Joann's a few years ago but I'm sure they still have them. 


Just how big are these blocks? Well they are 9 inches before setting them on point.  My blocks finish at 12 inches.   Now I'd like to tell you they were super easy.  But we had to use the folding instructions for each and every block.  Maybe it was because we were talking and quilting, maybe it's because we're dense.  Whatever the reason I'd definitely make these again even though I found them a bit complicated.


Our quilt is still on the wall collecting dust while I piece the easier quilt patterns from Connie's husbands shirts.


See you tomorrow when I'll resume Podunk Pickin's and hopefully another quilt finished quilt top.

~ Lea Anne ~

Pin It

Friday, February 5, 2016

A Flimsy Friday

The decision was made to make the easier of the many quilts first.  If you have no clue what I'm talking about you can read about it here in my previous post.  I've been stealing 5 or 10 minutes, here and there over the last couple of weeks.  It finishes at about 74 x 86.  


After a lot of digging through old picture files I found this hilarious photo of Connie when she first starting making the shirt blocks for the quilt in the previous post.


The next quilt is already in the works.  Being that my time is so crunched and limited I'm opting for easy, and using someone else's pattern.  You can find the Scottie/Westie dog pattern here.  


The cute little doggies are coming along quite quickly. My plan is to use the red shirt fabric below for little red bow dog collars.  Awe...hopefully it will be as cute in real life as my minds eye says it is.


Thanks for stopping by and cheering me on during my quilt crunch month. See you in a few days with another flimsy!  Wish me luck!
  
 ~ Lea Anne ~


Pin It
Related Posts Plugin for WordPress, Blogger...