Saturday, January 28, 2012

Oh my goodness, oh my stars!

I've been wanting to do an online quilt a long and boy did I pick a doosey.  I'm lovin it, but many these little blocks are quite a chore. Not sure how many we will be making in all but so far I've made 10 of these 4 1/2" blocks.  You can find the quilt a long here OH MY STARS , I can't wait to see this quilt finished.


This is one of my favorite fabric lines, Dots and Daisies!  Wouldn't you just love to go running through a field of daisies?!  One of my happy places is a field of daisies, butterflies....just heaven to me. 
Pin It

Thursday, January 26, 2012

The Love Birds

Just finished this today and I'm in love with it and I'm wanting to keep it for my own.  Momma will never know, I could get her a gift certificate for Bob Evans.  


You can find the pattern and lots of other wonderful things over here at Erin Russeks blog...   http://erinrussek.typepad.com/one-piece-at-a-time/  ,  I spend so much time on her site!  LOVE IT!  Very educational for those wanting to learn hand applique.  Pin It

Tuesday, January 24, 2012

The quilt I purchased


Margaret amazes me!  She's over 80!  I've been following her on youtube for about 3 years.
Pin It

Monday, January 23, 2012

Help me choose

How's this for progress.  I'm slowly falling in love with this and not sure if I'll be able to give it to momma.  She'll never know....LOL  So how it about ya'll, which one?  I'm thinking of doing a reverse applique border with piping or bias border. Any suggestions would be great!  You all can be so creative.


Oops # 1 is the one you can't see.

   Pin It

Sunday, January 22, 2012

STEP 4 AND SOMETHING ELSE

While you girls were feverishly working I was eating!  Gotta fuel up for the next step. 
Bacon sandwich! YUMMY!  


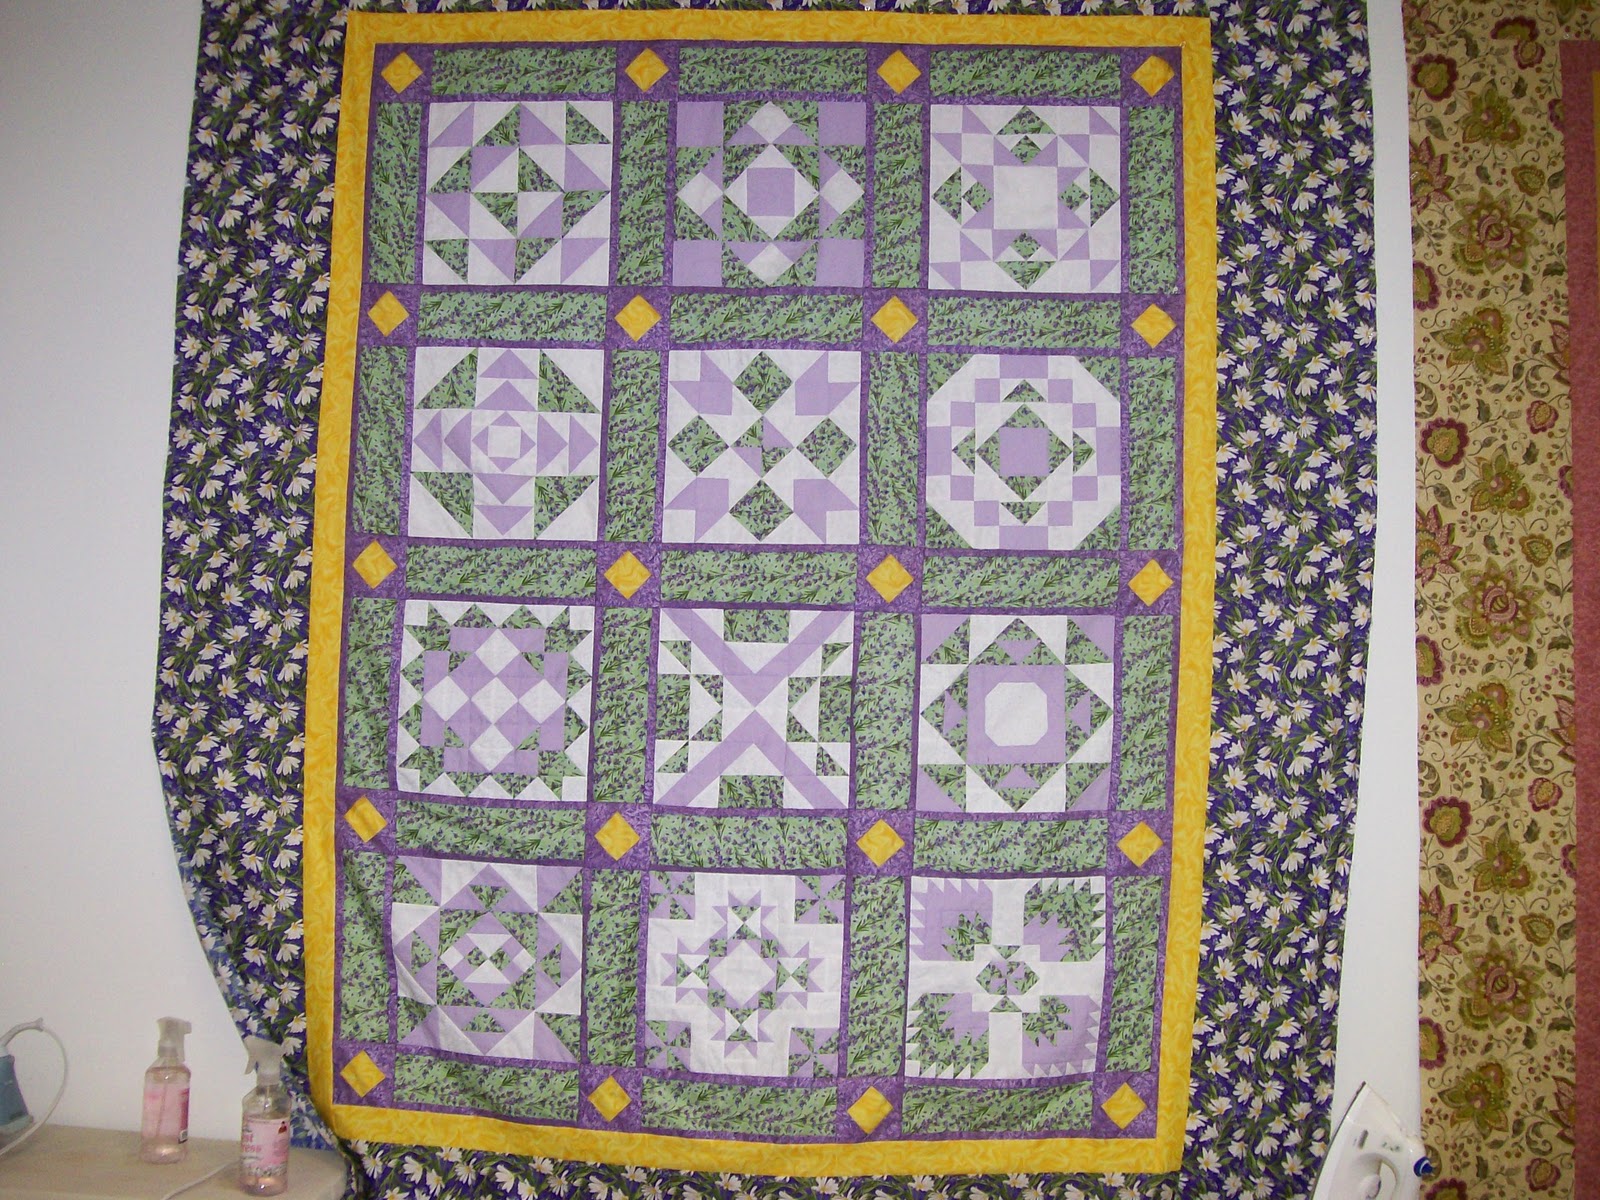
Whats behind that sandwich?  I'll show you if you promise not to tell.  I've been working on this for my momma for her birthday.  It'll be a wall hanging.  Her b-day is in one week, so I gotta work quick.  Whatcha think?
 
Okay enough playing around, we're losing time.  Gonna speed things up.  Catch all those flying geese and pin'em  up and sew like so....Theres some bulky seams here just do the best you can.  PINNING IS A MUST.   I had some trouble getting these things past the presser foot at the seams, you may need to help them along when you get to the seams. 

Add caption
TADA!  WE'RE ALMOST THERE.  CONNIE YOU STOP HERE, WE WILL WORK ON YOURS WEDNESDAY.

 You should have something that looks simular to this. 


Let get'em together.....remember to pin those intersection and run right over those pins, whats the worst thing that can happen?!


Should look like this

now lets do this

Now that you have it together turn the whole block to look like this
And we have a block!  Mine has been squared up to 12 1/2.  Dont worry about squaring up yours, we'll do it the next time we're together, Ive got a ruler that makes it so much easier. 

AND YOU THOUGHT YOU COULDN'T DO IT!  

Wanna know what the next months block looks like?  Its the second one down on the left.  Lots of flying geese.  This one should be much easier.  But would you look at the bottom two on the right!  YIKES!  You girls should be pros by then!  LOL  T


Pin It

STEP THREE

I'm sorry girls but yep theres more cutting!  These are your light color.


And with your dark pieces measuring  2 7/8


Now grab those little squares that are 1 7/8 , you should have this many pieces
Now get the 1 7/8 piece squares and the light triangles and do this to all
Using the pieces we just made you need to add the other light triangle like in the picture below, do this with all 4 units. 


Okay we're gonna add more to this little cutie, its important to make sure you have a flag at the top I've put an arrow pointing on step one of this picture.   Do this to all four.


ARE WE THERE YET!   


Almost girls hang in there. 
We're on the home stretch with these little boogers.  Watch for your flag again waving at you, 
VERY IMPORTANT. 
Shew we did it!  Time for a break!!!!! Pin It

STEP TWO

Now you need to find your medium fabric that is 5 1/4 and your light squares that are 2 7/8.  Lay them out like this and draw a diaginal line like this and pin them after you draw the line.  Now sew them using the line as your guide for the edge of your presser foot. 


It should look like this when you finish sewing   
cut on the line you drew

Press open, Looks like little hearts!


add another 2 7/8 square draw a line and pin, sew on either side of the line
looks like this
Cut on the line and press open


Dont let your geese fly away!  Press open and cut the little flags sticking out.  These should measure 4 1/2 by 2 1/2, good time to figure out that geese ruler!
Pin It

Helping Connie and Peggy with the block of the month at our LQS

Here you go girls!  STEP ONE

Lay out your pieces that you sewed together last week like this.  The blue pen is pointed at a gap, where the triangle doesnt come to the edge.  Make sure yours are like these.  Take the section on the right and flip it over on top of the one on the left, just like you were closing a book and looking at the back of the book.  Now sew on the seam that the orange thingy is pointing to.  Do this for all 4 blocks, they should measure 4 1/2 square when finished.  Lay these aside for now.  They should look like this


Pin It

Saturday, January 21, 2012

What cheapy!


You get what you pay for?  $50 iron I hated, it shut off on me every 20 minutes, and the light house beacon flashing light never shut off even when I turned the iron to off.  So while I was shopping at the local Cheap is me shop the other day, this little $10 iron caught my eye.  Love it!  Heats up twice as fast and never shuts off!   And I'm not sending out a beacon for the local ships coming in over 800 miles away.  So yes you do get what you pay for, if you want to signal ships  buy the expensive iron, if you want to sew for the day, EL CHEAPO!
Pin It

Friday, January 20, 2012

She's coming together

And not very gracefully either.  I've stitched and unstitched and thought about laying it aside for awhile.  That blue border just didn't want to be, too big, too little, geesh where does my brain go.  Something so simple, oh well shes on her way now.  All that's left is the wavy border that I'm carefully planning and plotting and measuring and remeasuring. 

Here's another one that I've been working on.  I started it last year about this time and quickly tired of all the issues of my Lemoyne stars.  So I recently ran across them while wading through my UFO's.  And back in the box she is for now, yes I had more issues.  Are you seeing a pattern here?  Issues with everything I touch lately. 


 And the girls, aren't they loud!  Love'em!  Making a wall hanging and starting over was my first thought after I finished the block, but now they have grown on me and I'm ready for the next one.  You can find the free pattern at this blog  http://erinrussek.typepad.com/one-piece-at-a-time/ its a free pattern until the end of the month.  She's also started on her new block of the month.  Hop on over and take a look, she also has lots of good information on hand applique.  Thanks Erin! Pin It

Tuesday, January 10, 2012

Half Square Triangle BOM

I've never done BOM's before, but this year so far I'm doing 3!  One of them I'm actually making 2 of each block.  Why you ask, because I'm also teaching a couple of friends how to put it together.  So I make a test block before each lesson.  And then I found this really easy one here  http://incolororder.blogspot.com/2012/01/hst-block-of-month-january.html  , and it helps to reduce the stash, which is another objective.  Here's my block.   Took me less than an hour to put this beauty together.  Hop on over and take a look and join the fun!  I'm also just starting The My Tweets BOM.  When I get my first block done I'll post. 


And this is my practice block for my other BOM.  Its from our LQS.  Not sure I'm liking the color placement on this....humm....what do you think?  Should I remake with the white and lavender switched?  Pin It

Progress is slow

Yep very slow, this pieces are so tiny.  I've not done much applique and boy did I pick a doosy!

 Talk about pain, pressing the bud cups around the template is very tricky.  My fingers get a bit hot!  Can't wait till it all comes together.  I'll be using the fabric line Summer Breeze by Moda for the border fabrics.  The vines leaves and rose buds are from my scrap bin.  The colors blend well with the Moda fabric.  A few of my scraps will be added to the the Summer Breeze in order to make it "Flow". Pin It

Monday, January 9, 2012

200 times smaller!

This design is from A book called Appliqued Quilts by Craftworld books.  Its called 65 Roses.  However I'm only using 50 or so roses.  I changed the design and shrunk it by 200%.  What was I thinking!  Loving how its coming together.  I also thought I would put a plug in for Roxannes Basting Glue, I love this stuff, it has become a staple in my studio.  Pin It
Related Posts Plugin for WordPress, Blogger...