Tuesday, January 29, 2013

Pillow fight!

My husband likes the "man look" in the house.  You know what I'm talking about, deer and fish decor.  So I've tried to accommodate him for the last 3 yrs that we've lived in the same house.  (divorcee's, I gave up my home in town to live in manville, he lived alone for 12 yrs, I lived alone for 5 years) But quite frankly I feel the need for more..lets say softness around the house.  Little by little the man decor is finding its way to the back of the closet and garage.  He laughed when I showed him the pillow saying "See this is how it starts!  One pillow and then before you know it there's pillows all over the house!"    Of course he was just giving me a hard time.  So without further ado the first of many girl pillows!

And the cute little flower detail.

Even though the blues are a little different, I think they'll still go nice little with my Summer Romance quilt.
Shhh...don't tell Ross but while he's at work today I'm making some lace pillows...it's a UFO from 7 years ago when I first bought my embroidery machine.  Back then there was a big plan to make a dining room table cloth out of these, much cheaper to go buy one!  So for the sake of finishing UFO's they are going to make some cute little pillows.  The fabric shown isn't what I'll be using it's just so you can see the lace design.
Until next time "Quilt out of your Comfort Zone!"


Pin It

Monday, January 28, 2013

Personal Growth

It seems that personal growth really means nothing to my ego.  The deal was no more new projects until all the old were were finished, and then and only then could me and my ego start adding to the stash again.  Well I caved...It really couldn't be helped.  You see the spare bedroom needs a girls touch...And well look what I've got stitching in the studio!  100% from my scrap box!  Might add a ruffle to this pillow.
The cute little flowers up there are 3 dimensional .  You can find the tutorial over here at Lynn's blog.   (Just scroll down after you click that link. Oh you can also find a link to the Nostalgic Pillow on her blog)I was going to put some leftover rose buds in the middle, but you know how it goes...you stand back and look at it tilting your head from one side to the other.  If there's a head tilt, more than likely I'll reject an idea. These little guys didn't make the stand back test.

Now there's more to play with but no ideas are popping out, these are the scraps from the double flying geese block in the pillow block.
I spent part of the weekend working on a BOM.  Wouldn't you know it in order to finish I need to go shopping...oh darn...LOL

Until next time "Quilt out of your Comfort Zone!"
Lea
Pin It

Sunday, January 27, 2013

Playing with my new toy

Before I show you my new toy I first want to show you these insanely small applique pieces from Erin Russeks  Jingle BOM.  If your thinking of doing this BOM run to the bathroom and get your tweezers.  
 Ten minutes later and one really hot finger
30 minutes later... One cute little cardinal.... and a peek at my new toy behind my hand!

 This table has went through some changes over the years.  It originally was an 8' long piece of sub flooring with folding table legs(trash digging find)  screwed to the bottom. The sub floorings rough texture is great for holding a quilt backing if your pin basting a quilt.  Later we shortened the table due to it began to sag and was to long for the space I had to work with.  Then last year, my sweetie made a cabinet to go underneath.  Not loving the two toned wood, but not complaining, I'll paint it, who has time to paint when there's quilts to be made!  
And here's my messy work station with my new light box!  I love this!  We ordered a piece of tempered glass for safety reason.  There's vinyl covering the top, this is great for slipping patterns, templates,or instructions for a quilt under.  My cutting mat normally covers the light box.  There's a light switch inside the cabinet!  So handy!  The pressing mat is due for a new cover so don't mind the big ugly brown spot.  I tried washing it, bleaching it, and peroxide but it still looks OOGY until I can get Joanns.  I'm thinking about getting colored canvas this time to help hide the scorching and starch stains.  Anyone else done this?  My biggest fear would be the bleeding of color to my projects.  
 The light on the left is a florescent light and doesn't get very hot, the light on the right is a regular(now illegal to sell or purchase) light bulb that gets very hot.  The one on the right will be replace as soon as I go shopping.  The heat started softening my vinyl and did you know that heat will pull the ink out of a permanent marker, I didn't till last night.  I was using a fine tip, almost dried up Sharpie, if you look close you can see the big globs of ink,  Lesson learned.
Well I'm "Out of my Comfort Zone" on this project
 so until next time 
"Get out of YOURS!"
Lea


Pin It

Saturday, January 26, 2013

Nostalgic finish and Baby blues...

Days just seem to fly by.  The studio has been a flurry of loose threads.  And by that I mean I've been pickin and a grinnin!  Yep grinnin, might as well laugh about the pickin of the stitches because crying only makes you feel bad.  Ain't got time for no Baby blues over this little cutie.  So I finished Peggy's baby quilt top, now I'm quilting it, and pickin it.  Twice I've started a border, stood back and thought YUK!  I even did the preview on plastic, and still I pick.  Here's the full shot of the quilt before quilting, I decided to do a flange instead of a scallop.  Now the reason for the pickin is because I wanted to quilt a scallop, it was all down hill from there....

                                          And the lovely picked borders

Now that's not all I've done in the last week.  Finished the Nostalgic quilt, well it still needs a binding. You can find this pattern here.  Or hop over to the designers blog(Lynn Wilder) and give her some quilty love. 
 Getting good pictures indoors is almost impossible.  So I had to go outside.  Its been between 0 and 20 degrees here for a few days, not worth me going outside for pictures.  At last I caved and froze my tale off to get these.  Not the best of pictures but ITS COLD OUT THERE!
 Tried to get a shot as soon as I walked out the door...not real good...
 ...try a different angle maybe that will get the quilting...not good....
Okay I'll go out in the yard just for you here in blogland!  
Until next time "Quilt out of your Comfort Zone!"
(that might include pickin and grinnin!)
Lea
Pin It

Friday, January 18, 2013

Southern Inspiration


Every few days I check my DVR, I set things to record and forget.  Then when a hand stitching project comes along I catch up on what I've missed.  So last night there was a program about Gee's Bend.  Most of us already know about these gals but for those of you that don't you should do a google search.  Very inspiring bunch of gals.  
 Wouldn't be nice to have this kind of freedom when you quilt.  These ladies don't know the rules and quite frankly they don't care about them.  I know many quilters see these as trash worthy, dog kennel blankets, thrift store rejects or a mechanics blanket.
On the other hand some see it as art.  Many an artist has spend thousands of dollars in schooling to learn to be this creatively free.

 The ladies at Gee's Bend to me have a talent that can only come from with in.  A talent that Paducha could never understand.  However I do see that a lot of modern quilters these days try to imitate.  Improv quilting is a technique that my mind can't grasp.   To say that I'm in awe of these quilts is an understatement.  My mind always asks the silliest question of why did she do that, why that color, why that piece, why didn't she square it up...WHY, WHY, WHY?
These quilts are now selling for tens of thousands of dollars.  You can buy patterns.  Really!  People buy patterns to make wonky quilts, Amazing!

 I see a resemblance to the quilts of Siddi(shown below).  The only difference is Siddi quilts are pieced by laying one piece at a time on top of your backing and wadding then stitch down that one piece, then another, and another....where we stitch all of the pieces together and then layer it to be quilted.
So are they excellent quilters?  As the old saying goes "Beauty is in the eye of the beholder"  To me they are STUNNING!   So the next time a quilt comes out a little less than perfect remember that someday it could be in an art gallery!

Until next time "Quilt out of your Comfort Zone!"
Lea


Pin It

Tuesday, January 15, 2013

Look what I found yesterday!

There's two areas in my life that can get messy. Everyone needs a place to just "BE" .  My sewing studio and my truck is my let it "BE" spaces.  Mom says my home is  too clean.  Is that possible?  Well anyway... while digging through a cabinet yesterday a very suspicious looking bag caught my eye, and it was stuffed to the gills.  Don't remember putting anything in that bag, glad I found it I'd been looking for it(the empty bag).  It was a freebie from a quilt show last year.  Now look what was tucked inside.  My goodness, the things we forget.  Another UFO that is so close to being ready to make into a flimsy.

 One block left to hand applique, that can be done in one good movie!  And then all that's left to do is piece the alternating block which is an easy one.  Those gloves laying there also were found yesterday, they are supposed to be in the glove box in my truck, somehow they ended up in one of my hope chests...who knows how.  It's like the time the TV remote was found in the fridge...could be aliens, ghosts, gremlins, it most certainly couldn't be me!
While we're on the subject of applique here's a great tutorial for making perfect circles every time.  It's an Erin Russek tute.  

Until next time " Quilt out of your Comfort Zone!"
Lea
Pin It

Monday, January 14, 2013

Design Wall Monday

All the Posies are stitched in place and ready to be assembled into a quilt.  But this border is saying yuk-a-doody(that's a technical term).  The idea was to make this quilt without shopping for more fabric.  Peggy(the customer) is fine with how it looks.  Borders can be tricky.  They're suppose to make the quilt stop.  This one doesn't seem to stop. (...This is the quilt that never ends, it just goes on and on my friend, somebody started making it not knowing what it was, and she'll continue making it forever just because...this is the quilt that doesn't end.....)
If you remember Lambchop you understand.
Do you think if I scalloped the border it would help?  Or maybe do a Lynn Wilder trademark flange?  
 Maybe I should do a border like in these two projects?  

Guess it's time to switch projects until the inspiration comes for the border.  Well that is after I clean up all the cotton candy fabric scraps.  
Until next time "Quilt out of your Comfort Zone!"
Lea


Pin It

Sunday, January 13, 2013

Testing a new method

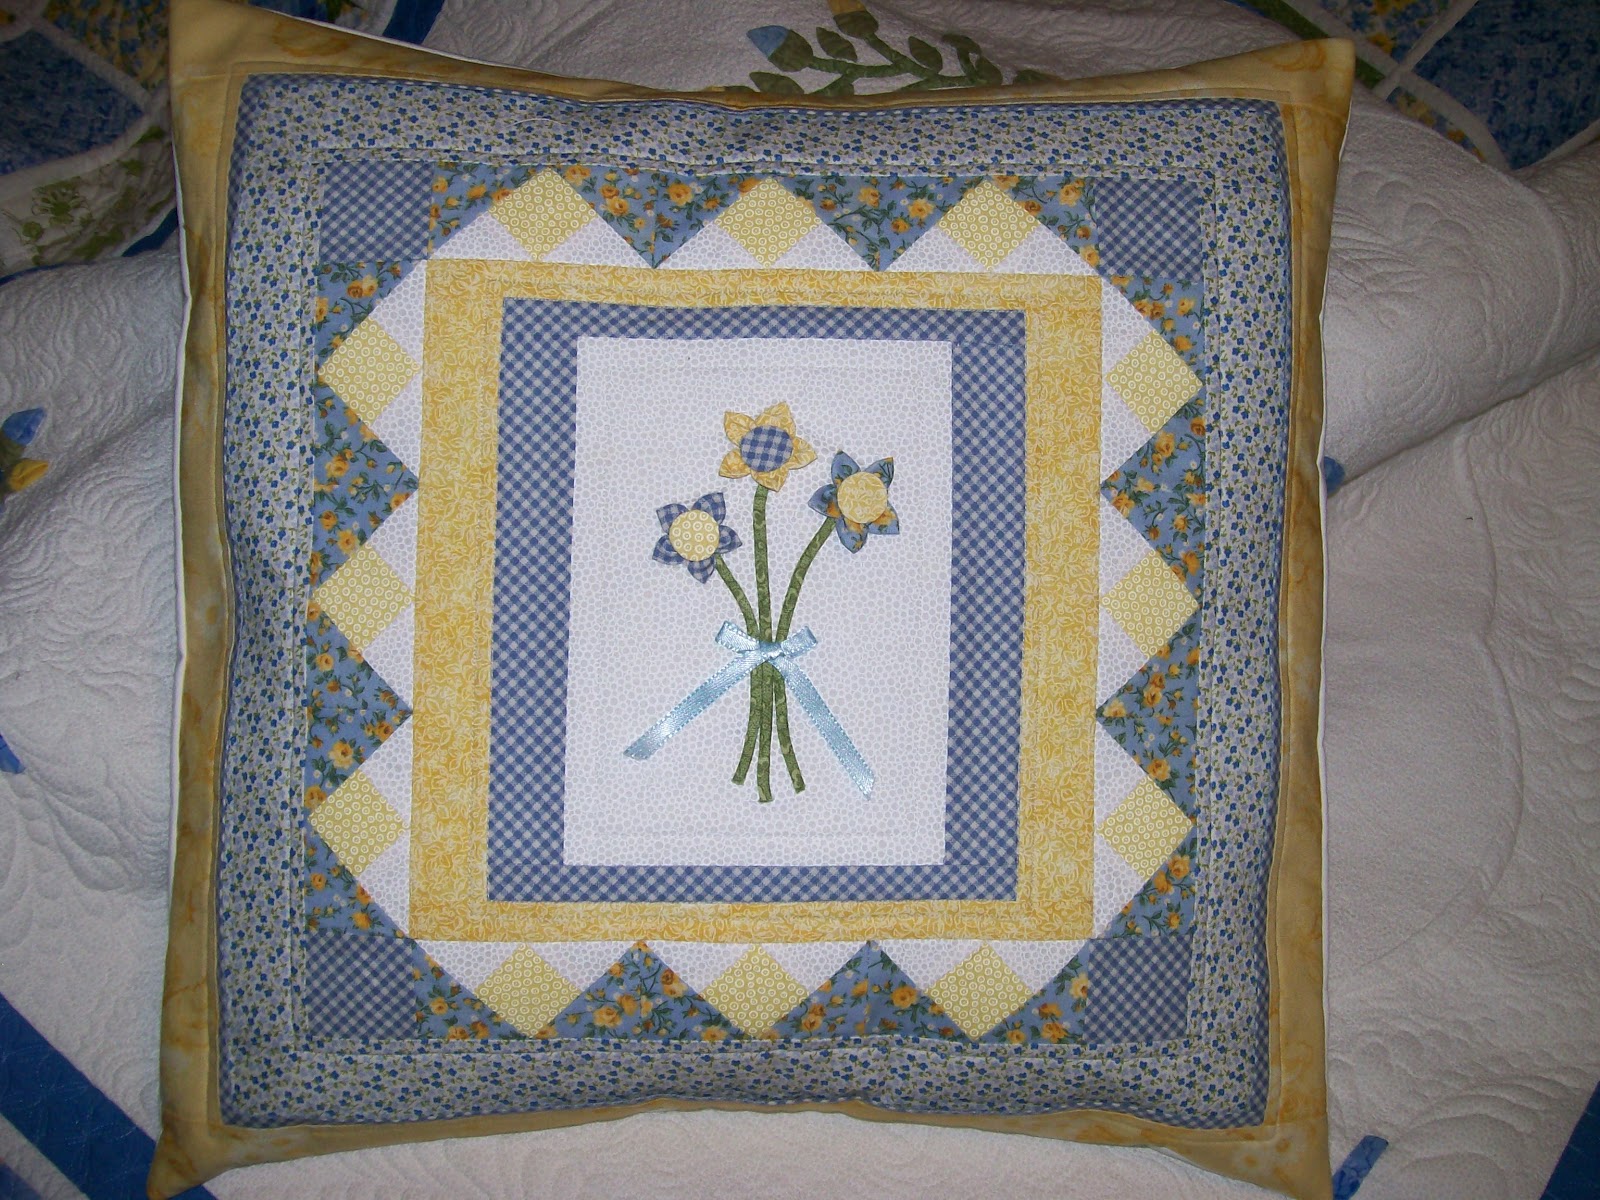
  Sometimes things just don't work the way they should.  Maybe its me.  The heart flower petal on the left was made using fusible interfacing.(YUK!)  And the one on the right, freezer paper method, much smoother looking, don't you think?  So in my opinion the new method is a two thumbs down.
Of course I made 24 of the wonky ones on the left before I realized how awful they looked.  Even with lowering my stitch length to 1.6 they just didn't look right, oh well live and learn.  I'll find something to do with them.
So I thought I'd share with you my freezer paper method.  You can buy quilters freezer paper that is thicker than the normal paper in the grocery store.  But for me I just layer regular freezer paper shiny side down on each piece and iron it.
Draw your shape onto the paper, cut it out, iron it shiny side down to the wrong side of your fabric.  Remember you may need to reverse that image before tracing to freezer paper.  Don't look at my old dirty iron, the new ones just don't last around here.  I've gone through 3 new ones in 2 years, so old ugly Betty here is here to save the day. 
Cut about 1/4" away from your template, cutting little snips about every quarter inch almost up to the template, leave about a 1/8" space not cut.  
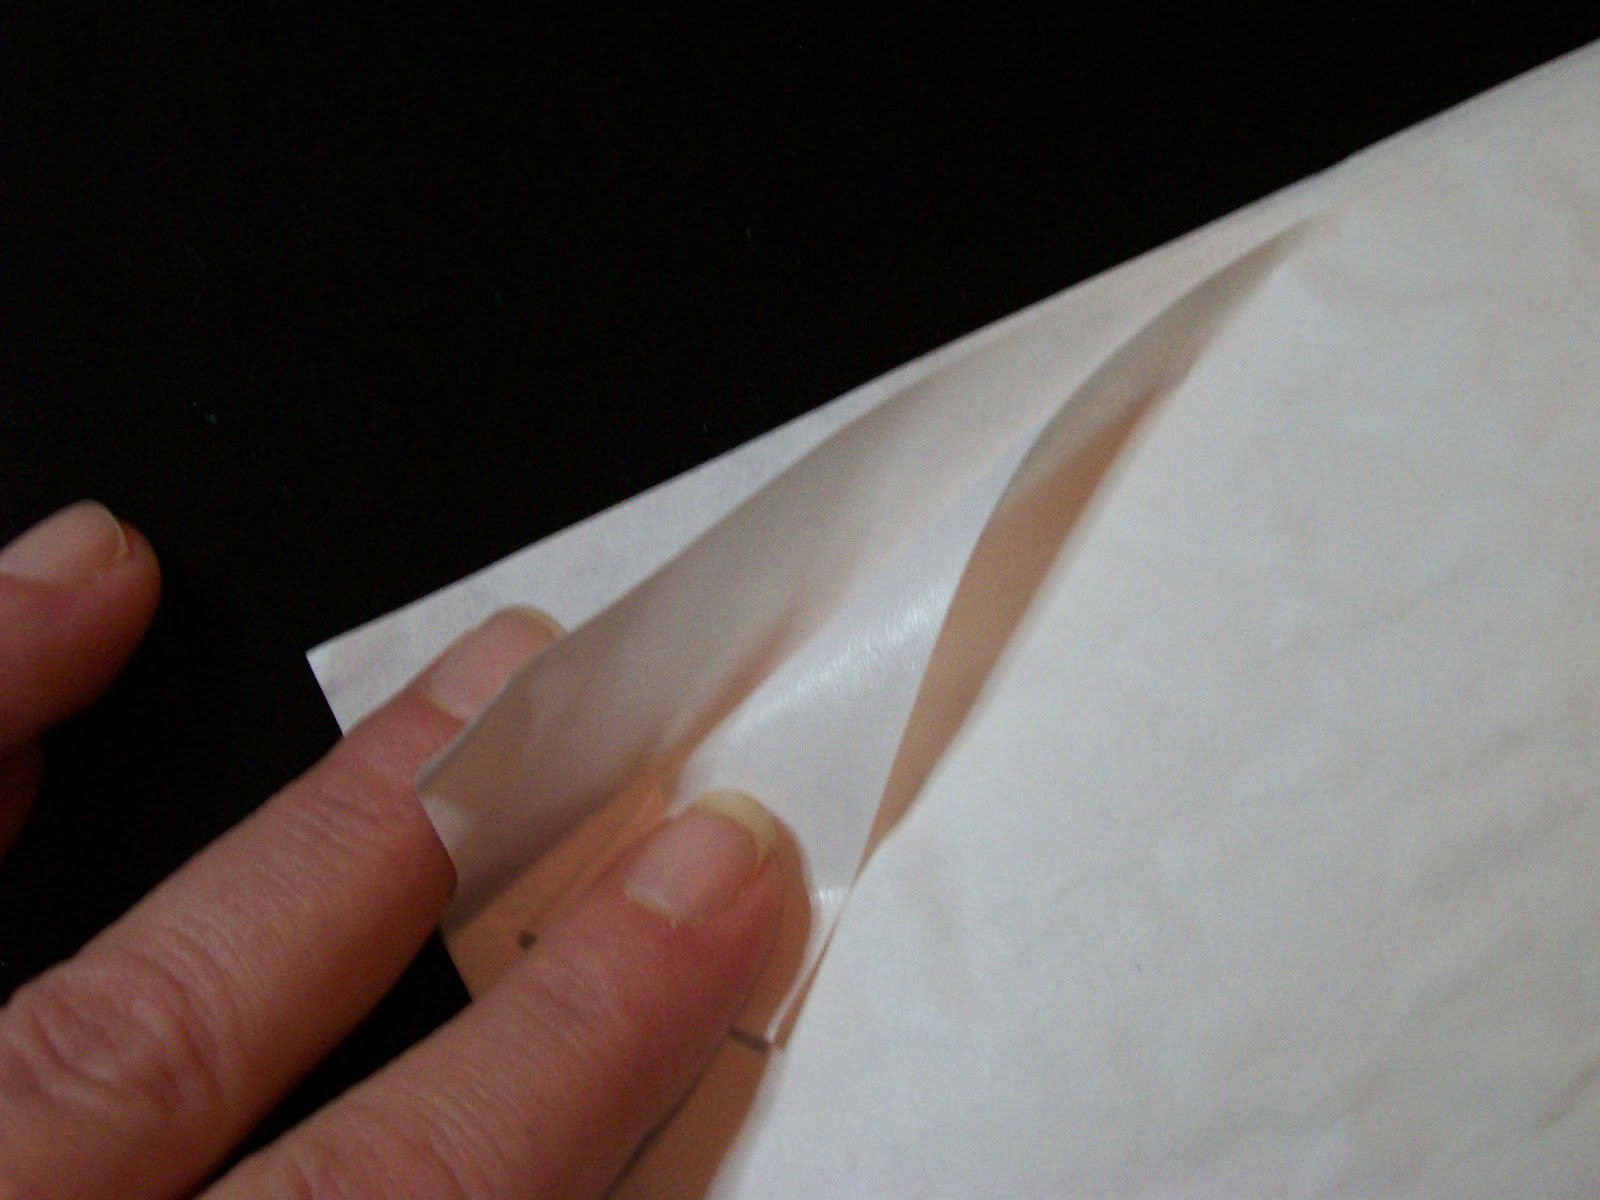
Using a small paint brush dipped in diluted  starch, I paint on the starch around the edge.
Carefully iron the edge down to the back of the template, the starch acts as a glue and also helps the fabric keep its shape as its being pulled away from the freezer paper. 
                     Remove the freezer paper, and TADA! the perfect shape, smooth                            edges and nothings wonky! And that template can be used several times.  How many?  I don't know I've never had one go bad.
 Now you can pin it to your quilt block, use a basting spray, basting glue, or my favorite washable school glue just a couple tiny dots on the back of the applique piece will hold it right where it needs to be and then like magic it washes away.  That's a little Sharon Schambers trick.  You haven't watched her youtube videos I highly suggest it!  Tons of info!
Until next time " Quilt out of your Comfort Zone!"
Lea


Pin It

Friday, January 11, 2013

Show and tell Contest


This is my Favourite quilt from 2012.  I entered it in a contest over at Quiltinggallery.com.  There's so many lovely quilts entered in this contest.  If your interested in voting you can vote for 4 quilts this month.  You can vote here.  My quilt Summer Romance was a Iron Quilter Challenge that wasn't finished until six months after the challenge closed.  Sometimes a gal can get in over her head!  However I was glad I took my time and finished.


This center design is from Applique Quilts by Craftworld books.  Its called the 65 Roses quilt.  The design was to be enlarged 200% but I choose to leave it as printed in the book and doing the math to make the little rosebuds fit.  I also reworked the corner motifs, thus not having 65 roses.  The little birds in this quilt were designed by Wendy Sheppard over at Ivory Springs.  I altered the pattern a bit to frame the heart, its also in the border.

 The little birds made this quilt.  The colors in the quilt reminded me of little bluebirds.

 Tons of SITD, micro stippling and crosshatching with Invisafil thread.  This was the first time doing micro stippling and using Invisafil thread.  I love this thread, it backtracks nicely and doesn't take over the quilt.

 This quilt was definitely out of my comfort zone of quilting.  The center quilting was inspired by Karen Mctavish books.  I used 2 layers of batting to help give the trapunto look with out all the trapunto effort.
Until next time "Quilt out of your Comfort Zone!"
Lea

Pin It

Wednesday, January 9, 2013

Jingle BOM

Monday night I ran out of thread for the quilt currently being quilted.  So that's a good excuse to go shopping at Joann Fabrics with my Gift card and coupons in hand.  I spent $68 and only paid $39.63 with my gift card!  No out of pocket money.  Of course all of this wasn't spent of thread, although I could have.  I had to pick up some fabrics for the new Jingle BOM. 

Here's what I've chosen so far for this BOM... not sure that I like them or will use all of them.  The red was pulled from the stash.  The yellow and green was purchased yesterday.  Now I need to make a quick run through the scrap box to see whats hiding in there.
 
Erin Russek from One Piece at a Time has a free BOM, this years is both applique and pieced.  There will be 2 blocks a month, totally 16 blocks,  that way we can have them quilted by christmas. 
Here's the quilt layout.  You can get the starting directions here.

The center block for Erins BOM isn't free but the cost is well worth everything else that you do get for free, you can purchase Miss Kringle here
 
Until next "Quilt out of your Comfort Zone!"
Lea
Pin It
Related Posts Plugin for WordPress, Blogger...