
Showing posts with label Bonnie Hunter Mystery quilt. Show all posts

Monday, February 22, 2021

On Ringo Lake(A Podunk Picnic) Finish

 Finishing a Quiltville Mystery is a major accomplishment in my quilting world.  I don't typically make quilts with so many little pieces.  Bonnie style of quilting is a little bit more classic/traditional than my style.  Every once in awhile it's good to get out of the comfort zone.


The challenge isn't just in the tiny pieces that are for the most part cut individually.  Choosing fabrics for a mystery can be challenging since I almost always change the colors.  Thank goodness she gives us a month to choose fabrics before the first clue is released.  It usually takes that long for me to commit to a color pallet.   My scrap bins are not over flowing with my pallet of choice.  So when I make a Bonnie quilt I'm cutting from scraps all the way up to yardage.


I'm not one of those quilters who counts how many prints or how many pieces are in a quilt but I can tell you there is A LOT of both in mine.  One of the good things about finally finishing this quilt is I can finally put all those larger pieces of fabric back in my stash cabinet.


Quilting this beauty went fairly quick since I chose to to almost 100% free motion.  My quilting plan was to keep the quilting fairly light.  I had an idea but the idea didn't work, so I just added a little more quilting until I was satisfied with the look of the quilting.  My plan was to only quilt in the white areas and the yellow sashing pieces.  In my mind it looked great but once on the quilt it left to much poof in the corners of the blocks.  Adding quilting to the yellow and green areas of each corner balanced out the quilting and pleased my picky eyes.  I also hadn't planned to do feathers in the border.  The plan was for straight line ruler work.  But feathers are quicker so feathers it is.  


The backing is pretty boring compared to the front of the quilt.   Just one happy little yellow heart for the label.  I've recently started adding the label to the backing before quilting the quilt.  This is a sure fire way to make sure the label is never removed.  It also seems to be faster than adding after quilting the quilt.  The white fabric on the back was also used for the binding.  I love how the white binding lets the quilt just fade off instead of having an abrupt ending frame.


The backing was two pieces of yardage I already had in the stash.  I was planning on a yellow floral but it was just too much yellow.  

My quilt labels for the last year or so have been simple white squares with a frame using scraps of fabric from the quilt.  This time I decided to get a little wild and crazy and make a cute little heart block.  I've also put together a quilt label making kit.  In my kit is everything I need to make the same size label for every quilt.  Anyone interested in how to make a quilt label kit?  


A Podunk Picnic is ready to be cuddled and loved.  I can't wait to put her on the guest bed later in the week.  So you'll probably see it at least one more time this week.  But for now it's time to just relax and enjoy the snow. Playtime, Let's make a Snowman!


Yes my friends I love snow.  It's so pretty.  Podunk in winter is brown.  Brown grass, brown trees, brown farm fields all around us.  BROWN with gray skies.  The pretty white snow brightens things up a bit and gives me and Mr. Podunk the opportunity to let our inner child come out to play.  Every year we try to make at least one snowman.  I make the bottom ball of snow and he makes he top two balls since they are too heavy for me to lift.  Dried up coneflowers for the eyes, dried gaillardia for the nose and a brick chip for the mouth.  Mr. Podunk made the arms and I added the accessories.  It was Mr. Podunk's idea to add the sign. 
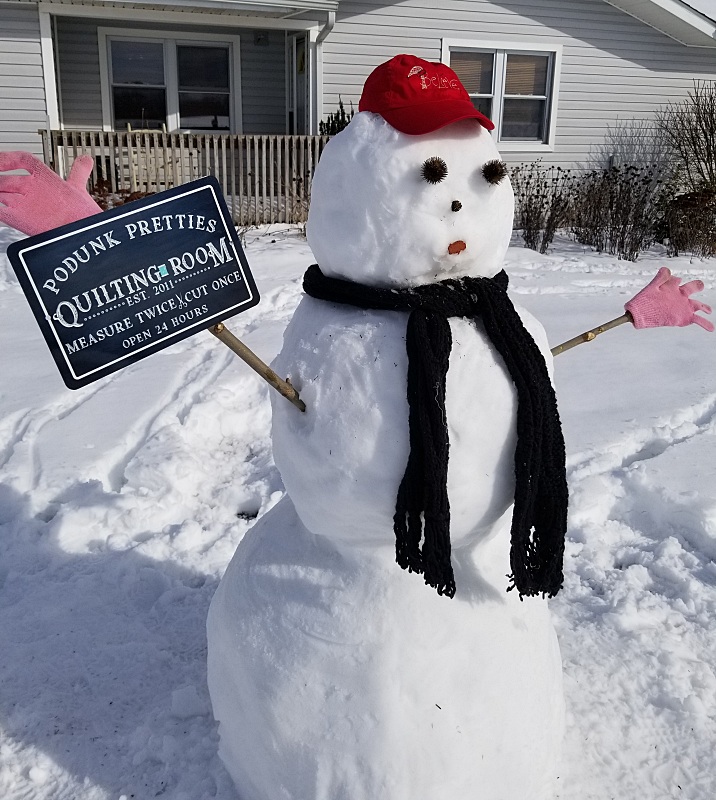

The sign was a birthday gift from my best quilting buddy Bev.  I've been a quilter for 30+ years but this blog began in 2011.  Wow, it's hard to believe I've been chatting away about quilting for 10 yrs. 


My Word of the Year


Pin It

Wednesday, February 17, 2021

Squaring up and Making a Path

Can you believe it?  A Podunk Picnic is off the quilting frame and ready to be squared up.  I think that was the fasted I've ever quilted a quilt of this size. 70 x 90 or 75 x 90...well it's somewhere close to those numbers.   Sitting for hours sewing the binding on is a well deserved break.


But before squaring up and attaching the binding I need to clear a path for the delivery of packages. The six inches of snowfall has made huge snowdrift on the front walkway and porch. I'm pretty sure the deliveries won't make it to my front porch if the snow isn't cleared.  This didn't take long because the snow is so powdery, it's like shoveling clouds.  This is one time I'm thankful for super cold weather.  Just a few degrees warmer and this would have been a real chore.  The warmer it is the heavier the snow.


The driveway isn't so bad, no drifts out here.  If you look closely at the middle of the drive you can see scrape marks on the top of the snow.  Those were made by me and the snow plow that is attached to the front of the 4-wheeler.  My plan was to clear the drive for Mr. Podunk.  It would take far to long to tell you about all the problems I encountered.  All that really matters is the 4-wheeler died when I went into the road to turn around. 


How was I going to get it out of the road if it doesn't restart?  I suppose I could find a way to pull it with my car?  No, that's not a good idea.  So many things could go wrong there.  More than likely the car would get stuck in the snow.  So I calmed myself and thought through the situation.  Why did it die?  GAS?  I can't see the gas gauge due to its frosted over on the inside of the gauge.  Then I remembered there's a gas reserve, I just need to flip the switch. I said a little mental prayer  "please lord don't let me be on the reserve tank already".   I find the switch that has 3 settings but I can't read them because I don't have my glasses.  All I can do is flip it and try to start.  The first flip of the switch and she didn't start.  The second flip and NO START!   NO NO NO!  This is not happening to me.  So I flip through the different settings again and finally she starts.  Hallelujah!  Let's get this thing out of the road before she dies again.  It was straight back to the garage to park that crazy machine.  I need some coffee and a little quilt therapy. 


Back in my happy place and feeling oh so much better.  In here I know how to make things work.  Let's get this girl squared up and ready for binding. 

To square up the corners of the quilt I'm using Marti Michelle's Diagonal Set Triangle ruler.  It's not meant for this but it works like a charm for the corners.


This ruler is for cutting set in triangles for an on point quilt.  When I purchased it I thought it would be easier and quicker to cut those triangles from strips instead of squares.  I like cutting them from squares.  It's faster and there's no scrap fabric.  


The long edges of the ruler are perfect for squaring up the corners. Sixteen inches from the corner out to the point.


I was pretty happy with the corners, not too much to trim away.  Just a tiny sliver at the very tip.  This is rare for my quilts.  Often my corners become skewed when I baste them down on the quilt frame.  Over the years I've tried so many different tips and tricks to keep this from happening but the one thing that has helped the most is starch.  Heavy starch.  Making the fabric as stiff as paper is best. I like to buy concentrated starch so I can mix it to my desired stiffness.


One down, 3 more go.


After cutting the corner I switch to a 6.5 x 24 ruler for the long straight sides.


It only took about 10 minutes to trim all the way around the quilt.  Now to separate the batting from the scrap fabrics and sort the fabrics.


My backing was made from two different fabrics. I cut them apart and sort them by color and size.


I ended up with quite a bit of scrap bin sizes.  My scrap bins are anything less than a fat quarter.  The larger piece is about 7-8" wide and over 90" long so I'm going to put it in with the FQ's.


And then the smallest pieces are less than one inch wide.  I save these for making rope rugs.  If you have never seen the rope rugs, you can read more about them here.


The smaller pieces of batting and fabric will go into a scrap bag for making my baby girl Khaleesi a new dog bed.  I'm getting pretty close to having enough stuffing I just need to come up with a plan.  Do I go simple or a little more fancy?  Any suggestions on a pet bed pattern?


Khaleesi will not come in when it's time for daddy to come home.  It was about 10 degrees and snowing.  She sat out there for 45 minutes.  


Pin It
Friday, February 5, 2021

A Friday Flimsy and Cleaning The Quilter

 Happy Friday Quilting Friends!  First I want to thank all of you who shared your thoughts on naming this quilt.  It's unanimous, she will officially be named A Podunk Picnic.  You all know me well and have chosen the perfect quilt name. 


Bonnie's mystery quilts are usually inspired by an event of some sort throughout the year.  One year she went to China and the quilt that year was inspired by all the colors she saw during her visit.  And since this one is called On Ringo Lake, I'm pretty sure she visited Ringo lake in 2016 or 17.  Her Ringo quilt was made with teal, brown, white and salmon fabrics.  Perfect colors for a lake quilt.

Click on image to purchase pattern.

Thursday evenings adventure of the quilt onto the quilt frame.

Before quilting A Podunk Picnic I need to do a little preventative maintenance on my quilter.   The quilter has been setting unused and uncovered since early September. I think I've only quilted one quilt since September but it was quilted on my domestic machine.


My quilter isn't some big fancy machine with bells and whistles.  She's a Bailey Home Quilter 15.  I've made a ton of modifications to this machine over the last 10 years to make her work the way I want her too.  The only fancy feature she has is a stitch regulator but it isn't as responsive as the newer stitch regulators on the big girl machines.


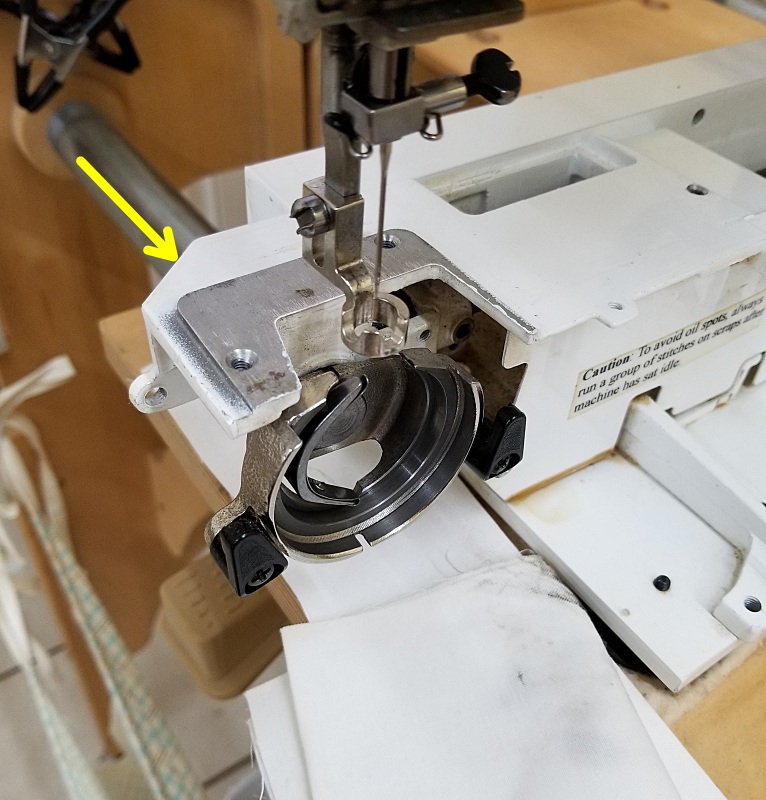
The manufacturer of this machine suggests oiling the bobbin area in between each bobbin used. I don't usually do that unless the machine sounds or acts like it needs it.  They also suggest oiling the bearing behind the bobbin area often.  When I talked to the owner of the company on the phone he suggested I oil after ever quilt because at the time I was quilting quilts to death.  These days I don't quilt my quilts to death but I still like to keep her oiled and running smoothly.  Taking it apart and oiling it between each quilt is much easier than having it lock up with a quilt on the frame.  Been there, done that and it's a chore.  You have 2 choices when that happens.  1. Take the quilt off the frame and oil it.  2. Leave the quilt on the frame and oil it.  It only took one time of doing #2 and getting oily black gunk on my quilt to change my mind about oiling in between each quilt.


Clearing out the gunk on the bearing is the worst part.  One or two drops of oil on the bearing and let my machine run for about 15 minutes.  Here's the oil I use to get into those tricky spots.  Before I found this I was trying to put a few drops of oil in a drinking straw to try to reach the inner workings of the machine.  Oh boy did I make a mess. This loosens up all the gunk.  Then once it's nice and warm I speed up the machine it throws the gunk everywhere.  Again it only takes one time of throwing gunk everywhere and you learn to cover the bearing with a rag or scrap fabric.  Could you imagine having this on your pretty new quilt top?  My goodness she was a dirty girl.


Cleaning the machine from start to finish takes about 2 hours.  While it sits idling and loosening up the gunk I dust and clean other areas of the machine and frame.  At last I can start loading the quilt backing.  With a pieced backing I like to have my seams running horizontal.  Vertical seams can cause puckering issues about halfway through a quilt.   You would think that it was as easy as pinning it on and rolling it up onto the bars.  NOPE.  I roll it up on the front bar, then roll it all onto the back bar and then back to the front bar.  Hopefully by this time the seams are lining up perfectly straight with the front bar.  As you can see in the picture below this one is perfect.  Yah!  I can get this girl loaded and based down before bedtime.


Oh but there's a snag in the works.  GRRR.  My quilt top is 75 x 90.  The only batting on hand is 72 x 90.  Sigh.  I could dig through the scraps of batting and make a franken-batting but it's late, I'm tired and I hate piecing batting.  Looks like I'm done for the day and there's going to be a road trip in the morning.


Oh well, I need to catch up on my reading of the book 
"Earthing, the most important health discovery ever"  

Boy what a long title.  When I was younger my books of choice were by Steven King, John Grisham, Danielle Steel and V.C Andrews.  I wasn't too picky as you can see by the list of authors.  These days novels bore me to death.  So I read books that teach me something.  I wish I had this love of learning when I was younger but that's a story for another day.  

Earthing?  What is it?  To sum it up short and sweet it's about putting your bare feet on the ground outside and the health benefits of doing so.  Who knew this is so important.  If your interested and would like to know more without reading, here's a link to the free documentary on Youtube.  It'll give you the basics in about an hour. 


I've been Earthing, also called Grounding, for a little over a month.  To my shock there have been some changes.  Could it be a placebo effect? Possibly.

  But here's what I've noticed.  Top of the list is I sleep more than 2 hours at a time.  For years(all my life) my sleep has been very little at a time.  Now I sleep 7-8 hours with one bathroom break. 

 As a quilters we stand or sit for very long periods of time.  For me the sitting causes leg swelling and the standing causes back pain.  Since grounding while doing either and grounding while sleeping, my swelling and pain have been reduced.  Especially the morning roll and groan to get out of bed.  It was a shock to me the first time I woke up and just got out of bed.  I didn't notice.  I had made it to the coffee pot one morning before it dawned on me how I just popped out of bed, dressed, made through the house without groaning in pain or running into anything. 

I could ramble on all day about this topic but I've got a batting run to make this morning.

  Hope you all have a Yippy Skippy day!
 
Happy Stitching!


I haven't joined in with a linky party in a long time.  While reading quilting blogs this morning I saw this one and thought " What the heck, lets link up!"  Hop on over, you might find a new to blog or a must make to add to the ever growing list.


Pin It

Monday, January 11, 2021

On Podunk Pond Assembly Line

 Happy Monday Quilting Friends!  It's days like today that make me thankful for my happy place.  Outside it's going to be another cold, gloomy and gray winter day in Indiana.  But inside it's bright and happy like a warm spring day.  The sweet smell of the lilac candle in the living room has drifted into the Studio giving me the illusion of spring.  My brightly color version of Bonnie Hunters quilt pattern called On Ringo Lake is singing to me....🎵🎵 Hello sunshine, Good Morning, Morning...Wakeup sleepy Head....I'm the happiest Girl...In the whole USA.🎵🎵  While admiring the vibrantly color design wall it occurs to me that this quilt will need a new name.  It's doesn't remind me of a lake.


Can you see it?  This quilt laid out on the ground with a picnic basket, me and my girl Khaleesi(dog) laying in the sun watching the clouds roll by on a beautiful spring day.  Yep it's official, my quilt will be called On Podunk Pond.  I feel this better describes my version of this pattern, color makes all the difference. Not to mention I have a strange emotional attachment to many of my quilts that helps me with making and naming them.


Quilting has always been an outlet for my emotions, good or bad.  I tend to stitch the happy times and the not so happy times of my life into a quilt.  It's also used as a way to keep the blues at bay.  I find surrounding myself with bright and happy colors makes my little ole heart go pitter-pat.  So when I feel a little negative or blue I like to open the fabric stash cabinets and just pet, sort or play with different fabric combinations.  
Not everyone feels the same working in the same color pallet and that's okay.  We each need to find what we are passionate about and what makes our heart and soul sing. 
 Following the popular color trends is not my thing.  Like right now, most fabric lines are muted with browns or grays and lean towards pastels.  I suppose it's a sign of what's going on in the world.  Things do seem a lot more dismal and gray in the last few months.  I may make an occasional out of my comfort zone quilt to challenge myself but I always go back to the basic box of crayons for color inspiration.  What colors make your heart sing? Are you more of a warm and cozy quilter?  

Another trend in quilting is efficiency.  A quicker way to do this or that is great but we need to remember to move.  While it can be great for pumping out the quilts quickly it can also have an adverse side effect if we don't take steps.  STEPS being the key word.   In the past I was always looking for the fasted way to get things done.  That has changed a bit.  I still want the process to be fast but I also want to move even if it's just a few steps.  Having my quilting assembly line set up in a nice "U" shape allowed me to never leave my seat.  Efficient for quilting but not for health.   So I've decided to make it a point to MOO-VE.  It's not about weight it's about health and being able to MOVE.  I'm sure many of you here in the USA have seen the TV commercial for a drug that says "A body in motion stays in motion".  
I want to stay in motion as long as possible.  We all do right?  So here's what I've done to make myself move a tad bit more in the studio.

Steps 1, 2 and 3 in the image below are the basic no movement, keep it quick and simple quilt assembly line.  In the past I would piece all the blocks at once.  Then get up press them all at once and put them on the design wall all at once.  That's the low movement way. 
The new more movement way is to piece one block at a time, press the one block and put it on the design wall.  I have two options for pressing the blocks.  I can either get a nice stretch by standing and stretching over my machine to reach the pressing board(4) or walk around the table to the other side press the block and walk back around to the design wall(5).   
The yellow arrows are pointing to the empty design boards, there's two sizes. Previously all of these would be put right beside me on a table, no movement.  Now I must stand and stretch a little to put the small ones on my cutting table...more movement.   While this isn't an aerobic workout at least I'm getting some movement and working the largest muscles in my body, the leg muscles.  And this project is moving along after years of being a UFO.


So far I'm loving this new game plan.  However, the efficiency police in my brain is having a cow right now.  Changing up my system/quilting rhythm has effected my attention to detail.  Interesting how changing the way I move can effect other areas like quality and attention to detail.  I'm so focused on the new  movement steps that I'm making more piecing errors and spending more time with jack the ripper.  Oh well, I guess I just need to make the best of it and look at it as more movement.  


Pin It
Related Posts Plugin for WordPress, Blogger...