Saturday, July 13, 2024

No Sew Day

 Hi Friends!  Yesterday was a full day of kitchen work.  First on the list of things to do was to add more cucumbers to the refrigerator bread and butter pickle jar.  Mr. Podunk loves pickles, so every year as soon as our cucumbers ripen a new batch of these pickles are made.  As he eats them I just keep adding cukes and onions to the brine.  If you like bread and butte pickles but don't like to home can them, this is the recipe for you.  Click here to go to the video recipe,


After making the beds, eating some breakfast and a few other odd house chores it was time to pick wild blackberries.  Mr. Podunk picked half of these two days ago.  We get about half of that  bucket every other day.  


Of course with the first picking I always make a cobbler.  So half of the berries were made into a cobbler.  As it cooked in the oven it was time to freeze the rest of them on cookie sheets.  


It was early enough in the day that they would be frozen and ready to package up before bedtime.  While I waited for the cobbler to finish cooking I whipped a two small meatloaf for dad and Mr. Podunk.  They will go in the oven when the cobbler is done.


As cobbler is cooling on the stove and the meatloaf is in the oven  I emptied the dehydrator and reloaded it with more sliced hot dogs.  Yes I'm dehydrating hot dogs.  These are for the our German Shepherd, Khaleesi.  It's cheaper and healthier than store bought dog treats. 


A three pound package of these hot dogs costs $4.58.  I buy 4 of these at a time.  They will last four to six weeks.  Sometimes longer.  The total process to dehydrate 12 pounds of hot dogs takes three days.
It takes about 24 hours for them to dehydrate at 145 degrees.  And let me tell you, the entire house smells like hot dogs.  


Here's the first batch.  I'll need another jar on the third day/third batch.


They are nice and crunchy and safe for humans if you like dried out meat. I do not!   I've never like any type of dried meat.


The meatloaf came out of the oven and was cooling when I noticed my Instant Pot was getting close to the 24 hour mark.  Inside is homemade yogurt.  Mr. Podunk has had yogurt almost everyday for the last 6 or 7 years.  Why?  Gut health.  He had a bad gut infection a few years ago.  The doctor told him the best way to keep it from coming back was to eat yogurt everyday.  Since 2020 and inflation I've been making my own yogurt in the Instant Pot every two weeks.  The cost is the price of a gallon of milk.  If I were to buy the yogurt it would cost $18.


After folding laundry, playing with the dog and eating a quick supper it was time to strain the yogurt.  This too takes a little time.  I'll let them set on the counter for a bit then will go into the fridge overnight.


Next was to check on the veggie garden.


Not much to pick.  Just a few jalapenos, one small squash and a few tomatoes.


We have a bunch tortilla chips and yellow tomatoes leftover from the 4th of July gathering so I decided to make a fresh batch Salsa with my leftovers and fresh pickin's.


How do you like my fancy recycled jar?  Yep, I'm just as cheap in the kitchen as I am in the sewing room.  I save all store bought jars for home canning emergency water.  As long as the lid has a rubber ring and a button on top, they can be reused.  Yes, I know our government says you can't reuse this type of  jar but it's not the first thing they've lied about.  I've been doing it all my life because I learned it from my mom and granny.  These jars will reseal every time.  The lids are better than the Ball lids for canning jars.  I've even used them for pressure canning without issue.  "They" say these jars are not thick enough and will explode or crack.  The only jar I've ever had break in my canner is a Ball jar.  And it was brand new, first time use.  I'm not saying you should start canning in these jars.  I'm just telling you I'm a rebel and like to take chances.


By this time it's was getting late, about 8:30pm.  I checked the berries and they are ready to vacuum seal and store in the freezer.


The last thing to do before calling it a day is freeze some pumpkin for the Khaleesi.  Pumpkin is good for dog tummy troubles.  If you see your dog eating grass it means they have tummy trouble.  She does this occasionally.  I think it's because she eats animal poo from time to time.  I know, gross.   But a dogs gonna do what dogs do.  Just one little frozen scoop of frozen pumpkin settles her stomach.  This one can of pumpkin will last about six months to a year.  We give them to her even when doesn't feel bad. She love them.  By now you might have figured out we don't buy dog food.  I make all of her food.  She eats a raw dog food diet.  It's cheaper and healthier than the so called better dog kibble.  I make a months worth at a time and store it in the freezer.


I just made a batch last week.   This is one frozen dog meal.  It's thawed when she eats.  We love our girl and want her to live her best life.  She was not so loved before.  Mr. Podunk was against feeding her a raw diet until I showed him the math.  It's $10 cheaper a month.  Not much of a price difference but the health benefits are amazing.  


Pin It

Friday, July 12, 2024

Bias Basket Handles Finished ~ How To

Hi-diddly-O Friends!  Progress is being made on the patriotic baskets.  The striped fabric for the basket handles adds a nice movement to the block, don't you think?  Kind of gives it the look of a real weaved handle.


The handles look difficult to make but they are easy when you have the right tools.  Cutting the fabric on the bias(45 degree angle) and using the Bias Bars made quick work of the handles.  I'm not sure if this brand of bias bars are still available but there's a few other brands available in both metal and plastic.


This set of pressing bars includes 7 different width bars.  Of course you could could make your own, which I have done as you can see below.  All you need is Dritz No Melt Mylar Quilters Template, a ruler and rotary cutter.  


The instructions tell you how wide to cut the bias strips for each different size bar.  A time saving tip is to label each strip with their width and fabric cutting width.  


After cutting the strips to the proper width, fold them in half, wrong sides together, longways and sew a 1/8" seam.  If the thought of sewing a tiny seam sounds crazy, you can cut your fabric wider  and sew a larger seam.  Just make sure the finished opening isn't too wide or narrow.  Here's a link to a video about how use the bias bars per the product instructions.


After stitching down the long side, it's time to work the magic by sliding the bar into the pocket made.  My strips are longer than the bar, this means I will need to press a section then slide the bar down and press again.  The seam needs to be lined up in the middle of the bar then we press the seam to one side.


Below you can see the left side has not been pressed and the right has been pressed.  The scrunched fabric in the middle is how I moved the bar down farther in the fabric tube.  As soon as I snapped the picture the scrunch the fabric was stretched out on the bar and ironed.  


Word of warning!!  The bar gets hot so be careful when removing them from the fabric.   This is something I  forgot...I said a naughty word!   After pressing the entire bias strip and removing the bar, the strip needs one more press.  The picture below shows before and after pressing.  You can spritz with water for a flatter strip.  Starching isn't a good idea, it may over stiffen the fabric.  The fabric need to be flexible in order to make the curves without puckers.


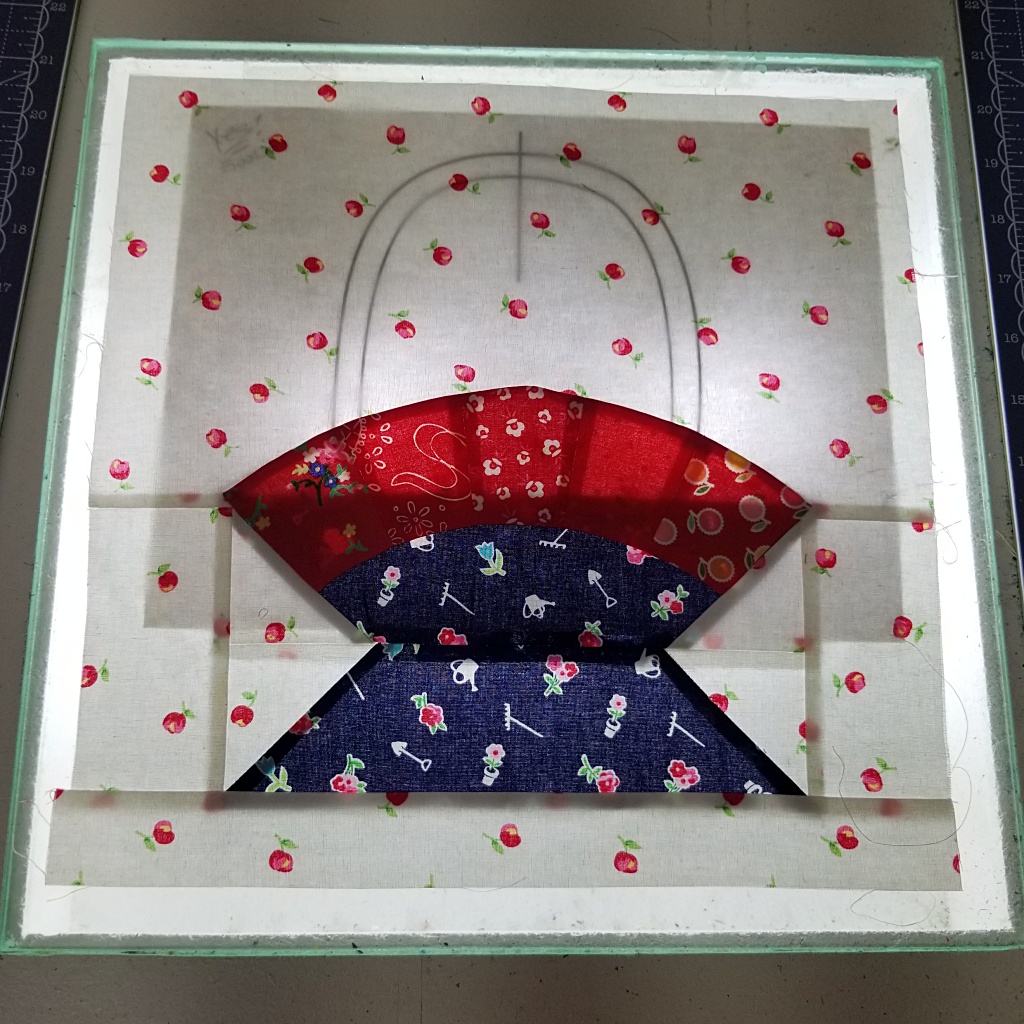
To apply the applique to the background fabric you may need a lightbox or window.  If the background fabric is light in color and the applique template is dark enough you may not need a light source.  Below is without a light behind the template and quilt block.


I have a lightbox built into my cutting table.  It hides under my cutting mats.  Mr. Podunk installed it using a piece of tempered glass.  The light switch is inside the table. 


It's much easier for my aging eyes see the dark lines on the template.


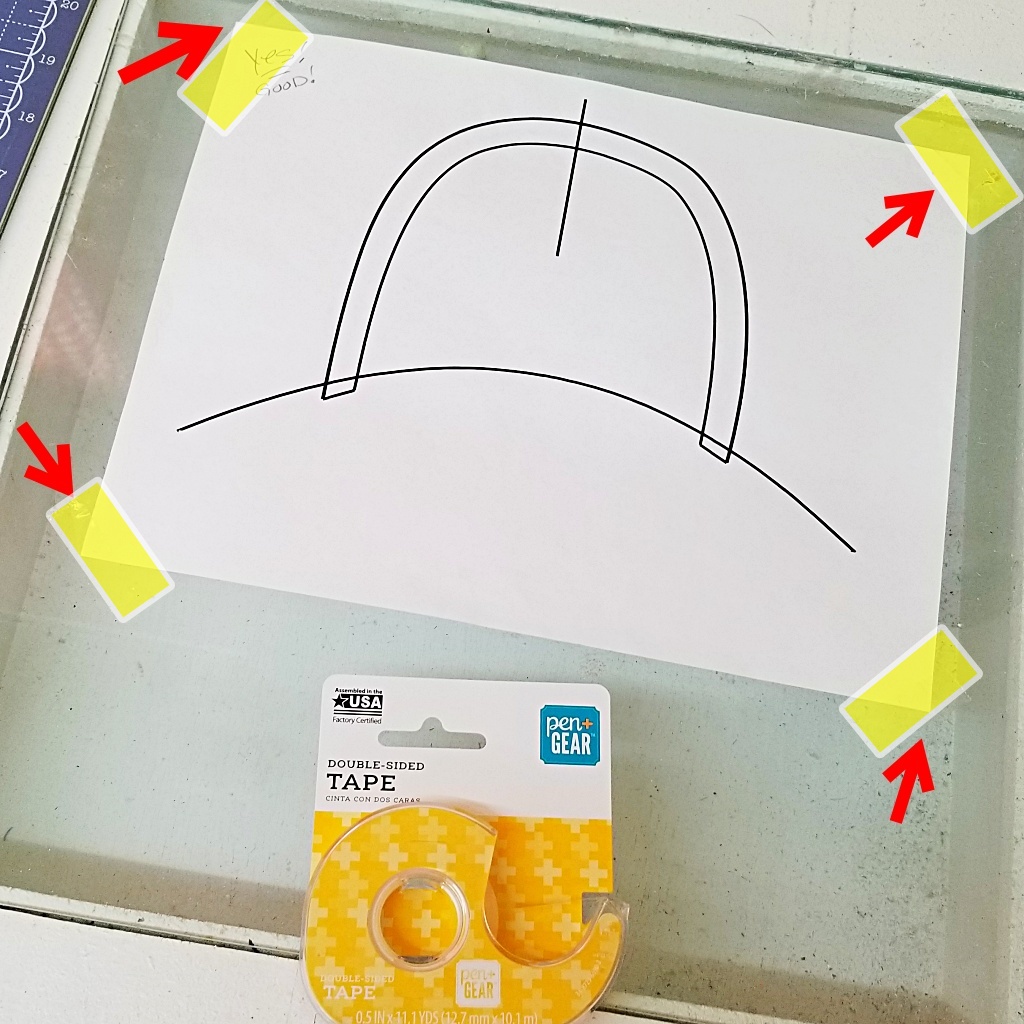
Another tip to save you time and money.  To tape a template in place use clear double sided tape on each corner of your template paper.  Place the tape on top of the paper.  This stops the paper from shifting and now you can line up your block and it too will not shift.


Instead of pinning the bias strips in place before stitching I glued them in place using washable school glue.  It works just as well as basting glue.  You can even buy fine tips to fit the glue bottle if you want.  I haven't had an issue so I use it as is.  Plus those fine tips must be cleaned after every use.  The original tip on this bottle doesn't clog like the finer metal tips.


It doesn't take much glue to hold the applique in place. A few little drops. But if you need more, go for it!  If it makes a mess, it's okay.  It'll wash out!  Ask me how I know...yep I've made a mess with the glue on a previous quilt and it came out in the wash.  Being careful not to touch the tape on each corner, I press the basket handle to dry the glue fast.  


Now all that's left to do is stitch the handles in place.  A teeny tiny blanket stitch is my go to for invisible machine applique.


And of course Invisble thread helps too.  I love this stuff.  It's expensive, about $10-$12, depending on the store. Worth every penny.  It's softer and more durable than other brands.  I've tested many and trashed many before finding  Superior Threads Mono-Poly.  It out preforms the suggested iron heat setting. It's not as shiny, so it's good at hiding in the quilt.  It's softer to the touch.  And last but not least it doesn't twist and curl under tension in my sewing machine.  


Once the quilt is washed and dried the puckers and pokes in the fabric will disappear and so too will the thread.  It will still be there, just less noticeable.  The only reason we can see it now is because of the puckers and holes. 


Now that the handles and basket tops are stitched into place it's time to start on the rest of the applique on the blocks.


Luckily when I started this quilt years ago I printed out the applique templates on Heat N Bond sheets.  Yes, I'm mixing fusible applique and turned edge applique in this quilt. The stars and flowers would take a considerable amount of time if I did prepared(turned) edge. I would guess an afternoon, maybe more.  So fusible it is!


But these won't all be done in a day.  There's much to be done.  Today I'll be picking wild blackberries and making a cobbler.  Whatever is left will be frozen.  The picking will continue every two days until the berries are gone or I tire of picking.  There's also weeding to be done in the gardens.  If the cucumbers and tomatoes ripen then they will need to be preserved.  It's never ending this time of year.  I'm looking forward to fall!


Pin It

Monday, July 8, 2024

Look What I Found!

Hello Quilty Friends!  Let's start the new week with a new project.  Well, it's not really new, it's a UFO. 


It took some digging to find her. Over the last couple of years there's been a lot of rearranging going on here in the studio.   After about an hour of searching, I sat in my sewing chair wondering if I had  accidentally tossed her in the trash or donated it along with unloved fabric.  And then I saw the white plastic baskets in my little green cabinet.  That's where I hid these little lovelies!  Thank goodness!


It looks like everything I need to finish the blocks is in the basket. Yeehaw!


There's 16 blocks in various stages. Some have the handles and red basket rim stitched down and some don't.  One block is complete.


Three blocks still need basket handles.  This will be a good place to start. 


The bias strips for the handles are right there on the top.  A good press with the iron to get out the creases and wrinkles is all they need.    That's the plan for today.  Get the handles on these baskets and then start stitching the handles and rims into place.


See you soon with my progress!


Pin It

Saturday, July 6, 2024

New Quilting Book

 Hi Quilty Friends!  Can you believe it? I bought a book.  It's been years since my last book purchase.  This one stole my heart about or two year ago.  The author, Judy Martin, has a unique eye for taking traditional quilt blocks and putting them in some fabulous layouts.  Very clever minded quilter indeed! 


To be honest, I don't follow Judy on social media and I had just assumed she was probably retired or dead by now. Seriously, she was publishing patterns way back in the late 70's.  I have one or two of her earlier books that use templates for making HST's. For me the older quilting books are only good for inspiration because there is no way I'm going to trace squares, rectangles and squares for making a quilt.

As with some of you, Youtube is my go to entertainment.  If there's a topic that sparks my interest a quick YT search will bring up an endless list of videos to watch.  One day I was in the mood to see some quilts, so a quick search for quilt trunk show brought up a Judy Martin trunk show for this book.  If you would like to watch it, click here

The quilts were gorgeous and I wanted to make them all, I had to have this book!  As I ramble on I'll share a few of my favorites.


I know me well.  I'm an impulsive SQUIRRELL! type of quilter.  


 My quilt book and magazine collection is nothing more than a dust magnet until I need to rearrange the studio.  Only then will I browse through a few of them and think "I should make this someday".  It never happens.  More often than not I draft my own patterns or use a free online pattern.  My most recent quilt finish, Stars and Stripes, was a quick and easy free PDF.  A few days after starting that quilt, I was scrolling Facebook while eating lunch and saw a version of the quilt below.  I immediately recognized the pattern.  That was all it took.  I had waited long enough, I need to make this quilt.  It has the illusion of curved seams but it's all straight piecing.


Within 2 minutes the book was purchased and would be delivered by Amazon in two days...WOOHOO!  It was pedal to the metal time, finish the current project so I could make this beauty.  The book came I skipped right to the pattern and started reading.  My heart sank as I saw Judy was still doing some odd to me cutting and piecing.  Take a look a the shapes she wants me to cut.  Seriously?


So, I start looking for the instructions on how to cut these shapes.  I first flipped to the back thinking there would be templates...nope.  Those first few skipped pages held all the details.  BUY MY RULER TO MAKE THESE SHAPES.  I was not a happy quilter. This type of information should be put in the description of the book when purchasing online.  Sure, I could return it Amazon but there is nothing really wrong with the book.


Maybe one of the rulers I already own can do the same thing.   With the new hope, the buyers remorse subsides and I start digging through the ruler stash.  I think the large Fons and Porter ruler will work. Sigh....lesson learned...Never buy another quilting book unless I hold it in my hands or know how that quilter writes patterns.


The new quilt project high was over.  Disappointment overload.  I don't want to buy a ruler, I don't want to test the ruler from my stash and I don't want to do quilty math for flippy corners and yardage changes.  Yes, I know I'm being a little dramatic and stubborn.  The book was tossed into cabinet with all the other inspirational dust collectors.  Maybe someday I'll change my mind.  

There's plenty of UFO's to finish.  I'm pretty sure there's a red, white and blue quilt hiding somewhere in the studio.  I'll start digging and let you know what I find in a few days.


Pin It
Related Posts Plugin for WordPress, Blogger...