Showing posts with label Scrappy flowers. Show all posts

Tuesday, September 25, 2018

~ Scrappy Background Tutorial ~

Hi! Quilty Friends!  I've got he cutest little project to share with you today made from scraps.  


The binder divider was made using Patchouli Moon Studio's Scrappy Background Tutorial.  It's a free download on Craftsy.  You can find it by clicking here.  Daryl has other great patterns and freebies available also.  Click here for her latest fabric folder pattern with some inspirational pattern tester ideas.  This is what inspired my fabric divider.   


You ever had a slap in the head moment? Why didn't I think of this?!  I love how quickly it came together once I got the hang of the freestyle, impromptu sewing. 


 The hardest part was deciding what applique to add.  How cute is this! Fusible applique and a little stitching made it easy peasy.  


Originally the plan was to make button holes...but as I searched through my buttons I had an epiphany.  BUTTONS HAVE HOLES!


The zigzag stitch and some careful stitching to hold them in place.


The backing was also pieces of scrap.  There was not one piece of stabilizer in the house so I decided to just sew the front and back together using the birthing method.  Right sides together, sew all around the outside, leave a 2 inch hole.  Turn right side out, stitch around the outside and TA-DA! Done!


So what are you going to make with a scrappy background?  

~ Lea Anne ~

Pin It

Friday, September 25, 2015

Flimsy Friday

So tell me, does this fall in the modern quilt category?  Is it a baby quilt due to the size?  Maybe a wall hanging?  I'm not sure what it is other than bold.  
I had big plans for adding applique and more color in the borders.  You can see the border ideas here and here.   As the quilt came together my vision for the finished quilt changed.  There was even a thought of appliqued words in the borders.    But it all seemed just too over the top.  Now my thoughts are on the quilting.


I could quilt the leaves and words....maybe.  There so much quilting space for such a small quilt.  Definitely a quilting design challenge.  


Getting the print to show up in the pictures was almost impossible.  Photo editing to the rescue.


If you'd like to make this block you can find a very basic cutting tutorial here.  It's just for the block, not the entire quilt.


Thank you for all your suggestions on naming this quilt, you gals are so creative.  As I sit here typing up this post I came up with the name.
Moody Blooms

I'm linking up this post with


~ Lea Anne ~
Pin It

Monday, March 16, 2015

Podunk Posy quilt block tutorial (lots of pics)

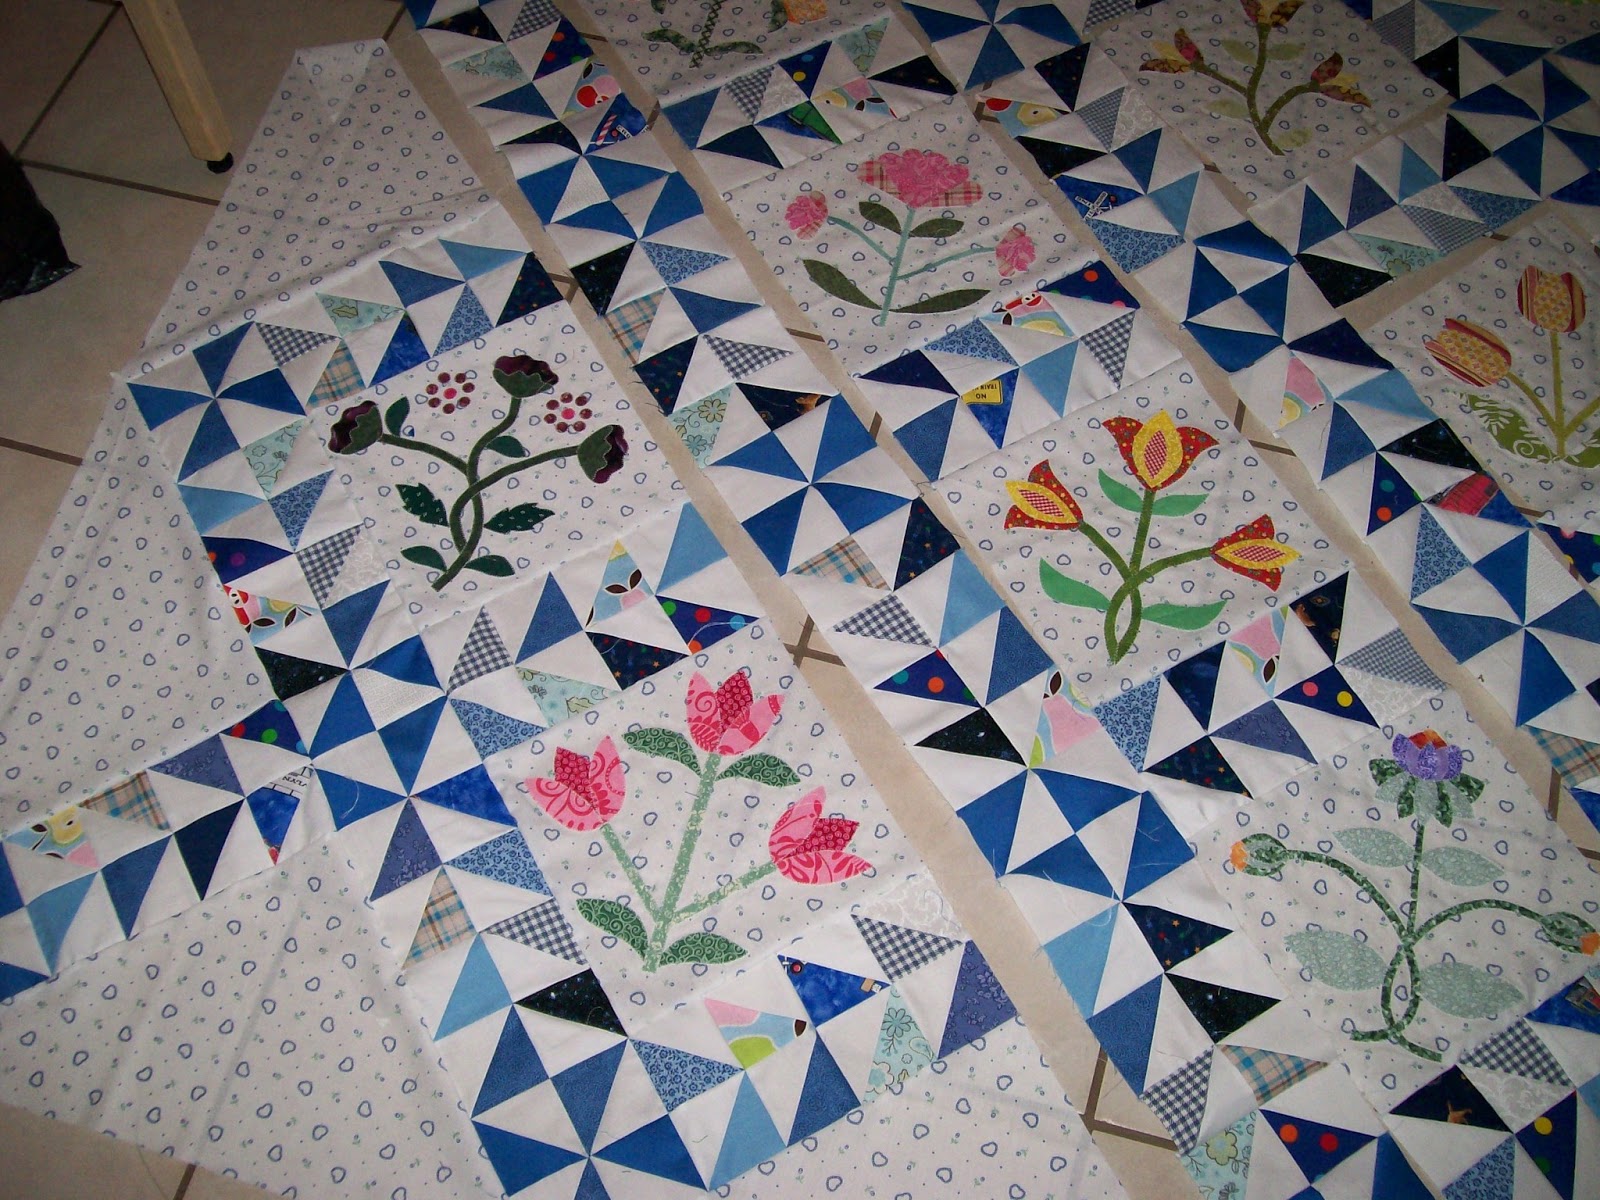
This is the first of several tutorials that I'll be sharing over the next couple of weeks.  Several Podunk Posy's will make up the border on my current quilt project.  Normally I don't make the border first, buy since so many of my followers expressed an interest in using the block in other projects I wanted to get this tutorial posted A.S.A.P.   You can see my plans for the rest of the quilt HERE.


Before we get started let's go over a few things that could be helpful.  All seams are a quarter inch.  Press seams to the dark unless stated otherwise.  I also  assume that you know to always sew pieces with right sides together.  This pattern has only been tested by me.  I draw up a plan, and make a block.  Then write a pattern then make another test block from my own instructions.  That doesn't mean that I won't make a typo or just simply write down something wrong.  May I suggest that you make one test block of your own before cutting out several blocks.  Should you find an error please feel free to contact me so I can get it corrected A.S.A.P.  

If your making the quilt with the inner border you will need 36 Podunk Posy blocks, 32 blocks if your making the quilt without the inner border.

For each block you will need

White or background fabric
(2) 4.25" squares
(2) 3.25" x 3.5"
(1) 3" square
(2) 2" x 3.25" typo below states (2) 2" x 3.75"
(1) 1.5" x 2.5"
(5) 1.5" squares

Green(stem) 
(1) 1" x 7"

Posy (aqua dots)
(1) 3" square
(1) 2.5" square
(1) 1.5" dark aqua square

Leaves(green floral)
(2) 2.5" x 3.25"


Cut both 4.25" squares in half diagonally.  Mark 4 of the 1.5" squares and the 3" square with a diagonal line.


I've laid out all the pieces for my block on a mini design board beside my sewing machine.  The white and aqua 3" squares are placed rights sides together.  And the 4 diagonally marked 1.5" squares have been laid on the green leaves print.


On the 3" squares stitch a quarter inch away from the line on both sides.
On the leaves stitch on the drawn line.  TIP  instead of stitching directly on the line, stitch just to the right of the line as shown below.


Cut as shown below and press. You'll end up with 2 Half square triangles and 2 leaves.


Square up the two Half square triangles to 2.5".


Lets piece the posy first by stitching together one HST and the 2.5 aqua square as shown below.   Press towards the square.


Sew together the 1.5" white and the 1.5" dark aqua.
Press this seam open.


Sew the 1.5" x 2.5" white to the last unit made. Press towards the white.


Sew together the two units as shown below.
press away from the HST.


Now just sew the two units together!  And TADA a Posy!


Fold all the triangle pieces in half and make a crease as shown.
Line up that crease with the seam on the Posy and stitch.


Press .  If you want to cut off those wings now you can,  I waited until after the next step.


Add the other two triangles and clip those wings!
Press .


This block is a bit over sized and will need to be squared up to 6.5".   It's important to make sure you have a half inch from the bottom of the Posy to the edge of the block.


Now cut off that half inch at the bottom of the block.  I know it seems silly to square it up to 6.5" and then cut off the bottom half inch but it seemed easier for a new quilter to understand.


Okay lets sew together all the pieces to the left of the stem, pressing away from the leaves.


Stitch together the right side and press away from the leaves.( I forgot a picture, but you all got this!)


Sew both leaf units to the green stem.


Center the stem onto the Posy and pin, then stitch for the finish!  Press open.  If you're making the Podunk Posy quilt scrappy, you might want to leave the top posy unit and the stems and leaves units separate for now.  Stitching them together after you lay them out on a design wall.  


If you are making my quilt design with out inner borders you will need 32 Podunk Posies, with inner borders 36 Posies.  If your making your own quilt design I'd love to see it and share it here.  So send me some pictures or link to your post and I'll link back.
OOPS!  forgot to tell you that the block is 6.5 X 12.5 at this stage.


~ Lea Anne ~
Pin It

Wednesday, February 25, 2015

Podunk Posy

 After running into a couple of design snags in my string quilt  I decided to take a short break from it this morning and do a quick Studio clean up.  As I was putting away some scraps I ran across the sweetest little scrap of pink posy fabric.  The little posies jump started an idea....  That's all it took to side track my mind and whip up a quilt block design on some graph paper.   Well what the heck let's go ahead and make a test block.  I need several more of these!


The adorable Podunk Posy block finishes (in quilt) at 6 x 12.  The design wheels are turning for a super simple, quick and easy, scrap busting quilt using a few of these Podunk Posies and scrappy charms.  Can't wait to get started!  But...I've a string quilt calling me back to the Studio.  Actually screaming load!  Wait till you see the colors...sunglasses required!


I found the perfect spot for her while I finish up my string quilt.  Maybe I should make a couple more, there's plenty of room on the curtain rod!


~ Lea Anne ~


Pin It

Monday, April 22, 2013

Slow progress

Good Monday morning!  Hoping that everyone had a good weekend.  Did you get all your goals accomplished?  I didn't....Yeah!  Well the way I see it I might as well be happy about it because whining will not make it any better.  So a big round of applause for those of us with to many projects....WhooHoo!  Anyway...Some progress was made on my Ultimate Super Scrap Happy quilt.  It seems that the seams on this one are quite tricky.  Solving the problem by clipping them the Jo Morton way in order to make them lay flatter and in the right direction. 
 
See how the seam below is clipped right up to the stitches but not cutting the stitches.  A little extra CAREFUL work but well worth the effort.  I know your wondering why I used different color thread for piecing.  Well I needed the bobbins that were full of thread.  So if haven't used that color in awhile I use it for piecing, please don't tell the quilt police!  The last time I got by with a warning, not sure what type of citation comes after that, rotary cutter suspension?, confiscation of my colored thread?
My design wall is 4x8, doesn't hold much.  I'm thinking about making one whole wall in the studio a design wall.  Crawling around on the floor just isn't working so well anymore.  Almost to the halfway point on piecing. 
Still undecided on the borders, they always give me troubles.  There's plenty of HST's left to work up a border.


My other on going project is getting closer to done also.  Its been moved inside for the many layers of paint and sealer.  Today will be the last coat!  FINALLY!  
 
This made me really sad...I wasn't going for the antique crackle look but some how I got it on top of the dresser.  Its staying because fixing it would mean more time.  So we'll just say it adds character to the room!  TADA!  Problem solved!
I'm linking up with Judy for design wall Monday today.  Hop on over to check out what others are working on!
Until next time "Quilt out of your Comfort Zone!"
Lea

Pin It

Wednesday, April 10, 2013

Scraplique

Between housework and putting up the trim in the spare bedroom I managed to get 2 scrappy blocks finished.  This technique of not really caring if it matches or not is great!  It makes me cringe to remember how many little pieces of fabric I threw away when I first started quilting. 
 Of course I chose a quick method of applique, fusible machine applique.  Makes thing just so easy!  And with Invisafil 100 wt thread the stitching doesn't take over the block.  

Now I save everything.  Probably pieces that I should toss out.  These will go in the baggy of bits and pieces.  Does a woodworker save sawdust?  Or a mechanic broken parts?  
I also wanted to share with you a free BOM pattern that I found via Pinterest.
Its in dutch and english.  If you get to looking around this site there's many free patterns.  Just go here and scroll down a little bit and you'll find a link to each part of the quilt.  This BOM just finished up this month.  Isn't it cute!?
Here's a picture I stole from the blog...Yummy!
Until next time "Quilt out of your Comfort Zone!"
Lea


Pin It
Related Posts Plugin for WordPress, Blogger...