Tuesday, July 11, 2017

The forgotten flimsy

Good Morning Happy Quilters!  There's a whole lot going on in the studio right now that I can't it share with you.  Super secret quilty stuff is hidden behind the quilt below and it's taking every ounce of self control I have not to share it with you.  I'm horrible with secrets so maybe a sneak peek later in the week.  For now we'll focus on this quilt top.  I started it last year when caring for momma.  It was finished and shoved in the cabinet.  Measuring 91" she was hard to photograph.  Naming her has been a real challenge.  The thought was something more traditional sounding.  But my hillbilly mind could only come up with
 "Square Dancing in the Garden".  You know you just can't fight what and who you really are, it will surface every time.  So I've learned to embrace my country bumpkin ways.


A simple quilt with two HUGE blocks and a traditional sashing.  The colors are a bit out of my normal pallet, but I love the traditional feel.  The design came about one day when looking at vintage quilts.  I was trying to mimic the old fashion wreath quilts without doing applique, and then add the simple chain that you see so often in vintage quilts.  So what do you think?  Is it a keeper?  There's lots of great white space for a quilter to quilt it to death.  But I'm thinking this one might get some simple straight line quilting.  Hand quilting would be my choice but my hands don't agree...haha.


Now that top is done I wonder what it would've looked like in other colors.  LOVE LOVE LOVE it in yellow and red.  Just my colors, and would look fabulous hanging on the studio wall.


Of course my second love is scrappy....


Let's get wild and go 100% scrappy.  How cute is that.  For some reason it reminds me of the county fair and the ride called the Tilt a Whirl.  See I told you...hillbilly to the core!


Getting back to the more traditional color combos.


A little more shabby chic.


Oh this one is super shabby.
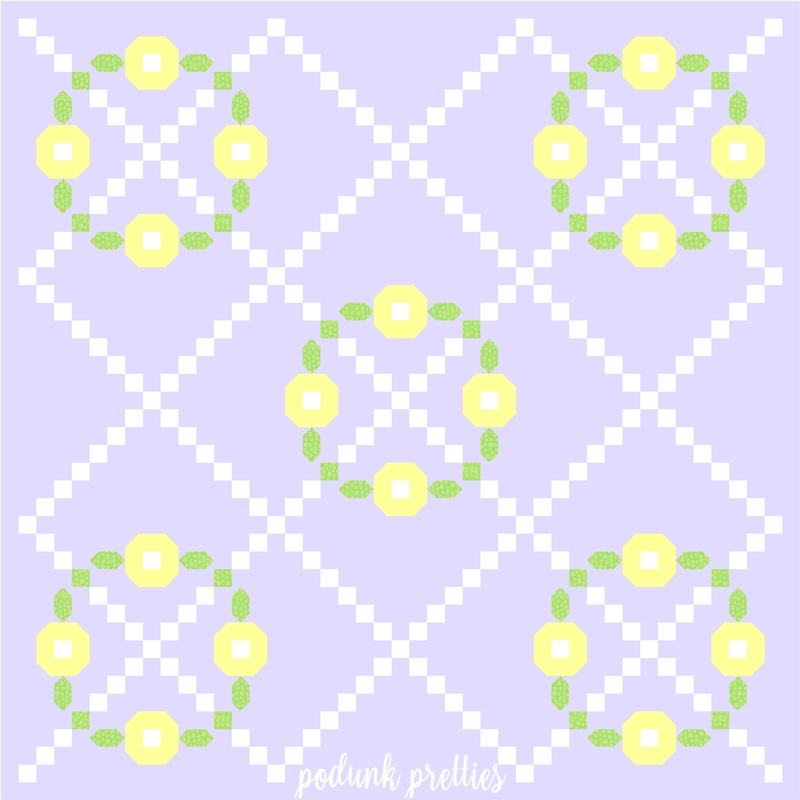

And a color combo Mr. Podunk would love.


After looking at in so many different colorways I don't like the original as much as some of the others.  Might need to make this one again in a different colorway.

~ Lea Anne ~
Pin It

Saturday, July 8, 2017

Fabric Pull - I Love Home Free BOM

What a mess I've made in the Studio this morning.  Today is the fabric pull for the I Love Home Free BOM by Jacquelynne Steves.   There was a definite color plan when the pull began.


But maybe something a little different, work out of the comfort zone.  So a few more fabrics were pulled and put on my ironing station.


Fabric is exploding from every nook and cranny.  Hmm...maybe I need to do some fabric shopping..not in my stash but a ROAD TRIP!  


So are you making this quilt?   If you've not seen the full quilt yet you should hop over to Jacquelynnes blog.  It's super cute.  She's posted several color options and ideas.  You can even order kits and not have to worry about finding the perfect fabric.  The pattern has been designed for whatever your quilting style or skill level.  It can be applique, embroidery or just a pieced block.  The fabric requirements have been posted and the first block will be out in August.  If you sign up for this BOM she'll send you the new block right to your email every month, how great is that?  Oh I don't want to forget to tell you about the prizes.  Well how about I let Jacquelynne tell you.  Just click here.


Hope to see you there!
~ Lea Anne ~
Pin It

Thursday, July 6, 2017

Throwback Thursday ~ Old Technique revisited

While putting the recently finished Quilt Doodle Design 2017 BOM quilt blocks on the design wall this week I noticed some fabric shadowing in my blocks.  What's that?  It's when the darker fabrics show through the lighter fabrics on the front of the block.  Let's hang one on the window so we can get a better look.  You really can't see it at a distance.

So let's get up close and personal with my blocks.  The green arrow is pointing to the white seam allowance, which is good.  The red arrow is pointing to the colored fabric that extends past the normal seam allowance, which is bad.  The excess seam allowance should have been dealt with before attaching to the background fabric.  No need crying over spilled milk, all I can do is get inside the back and fix the problem.


   Most quilters these days think if you can't see it from a galloping horse then don't worry about it.  Honestly most of the time I think the same thing.  But I've put far to much time and effort into these appliqued blocks to let  the finished quilt be ruined with something that can easily be fixed in an afternoon.  There was a time back when I first started quilting that it was standard practice when doing applique to cut away the excess fabric on the back.  This would reduce the amount of fabric when hand quilting.  Once you had the back cut away you could fix any shadowing.  Most quilters no longer hand quilt so this technique has been eliminated.  And I personally think there's a little marketing going on here also.  You can buy products to sew or iron into your project in advance to help with shadowing, but it adds more bulk and cost.  And most designers just don't worry about how it looks, its all about selling more fabric and patterns and meeting tight deadlines.  Where do you think the galloping horse statement originated?  Now let me say, I altered this pattern which caused the shadowing.  In the original pattern the center was to be curved pieced and with proper seam allowance there would be no shadowing.  So the above statements do not apply to Cindy's wonderful free pattern.   With that being said let's open this baby up!


  I used my sharpest pointy scissors to poke a hole and start cutting.

  
Snip, snip, snip...it was not hard and went pretty quick.


Now that I'm in here there's two options.  Option one is to cut a large circle of fabric and slide it behind the seam allowance.  I'm using paper for demonstration purposes...I'm cheap!


It would be tucked up under the seam allowance and be carefully tacked into place.  


The second option and the option I chose is the old fashion way of dealing with shadowing.  Just cut away the excess.  I snipped a few of the stitches between two of the dresden blades to make it easier to start cutting away the excess.


This really is the fastest, easiest and cheapest way to deal with an unsightly little issue of shadowing.


TADA! Finished all twelve blocks while I watched the noon news.  


This will look so much better in the finished quilt.


 And I won't need to borrow the neighbors horse to look a my quilt and be happy with it.


The best thing about fixing the shadowing is now I have some pretty low volume scrap to add to the scrap bin.  A happy mistake indeed!


~ Lea Anne ~
Pin It

Monday, July 3, 2017

Two fun Mystery Blocks

Happy Monday Sweet Quilting Friends!  Did you get in some quality sewing time this weekend?  I love it when I can spend an entire day in my Studio.  It recharges me for whatever lies ahead for a few days.  This weekend I made the July blocks for the Quilt Doodle Designs Mystery BOM 2017.  While I've enjoyed making all the blocks so far, these two are my favorite.(I think I say that every month)


 The theme for the Quilt Doodle BOM is Grandma's House.  So each block brings back so many good memories of both of my Grannies and the simple pleasures of years ago.  


A few changes were made to the pattern again.  The main reason for changing most of the patterns is.... the pattern calls for raw edge applique which is much easier to make.  Since I'm doing turned edge applique I sometimes need to alter the pattern to make the process of making the block a little easier on me.  Take for instance the fence.  The original pattern calls for a few more pickets and the fence also covered the front door, it was all one big applique piece.  My fence has fewer pickets and 10 small pieces.   


After  making all the tiny pickets I was searching for ways to simplify the rest of the block. The window applique template was cut and ready to use when an epiphany hit.   As you can see below the fancy stitches on my machine are finally being used.  A simple scallop stitch to dress up my double stitched windows.  And since the entire door is exposed a doorknob was added by using another sewing machine fancy stitch. 


 The next change was the smoke stack.  Both my grandparents heated their homes with wood, so adding a little puff of smoke seemed like a good way to make this block a little more personal, it also added a touch of whimsy, don't you think?


The Singer sewing machine block really opened up a flood gate of memories.  The Podunk Pretties Studio has many old machines.  Not just any old machines but machines that belong to my mom, both grannies, and a great aunt.  There's been several machines passed down to me over the years.  Not all could stay, some have been donated and re-gifted.  My aunts, cousins, and a best friends machines have also passed through my studio.  And allof them have been Singers.  So when I saw the Singer logo on the applique...adorable!  Again some modifications were made to suit my applique technique.  The original pattern has 6 applique pieces, mine has 3.


The Singer Logo was a challenge to do by machine.  It probably would have been quicker by hand or embroidery machine, but I was at the sewing machine so I went with it.  The little buttons are part of the original pattern.  My button color choices aren't sitting well with me.  Might need dig a little deeper in the button stash.


Can you believe it, I'm almost caught up on this mystery?  All that's left to do is stitch the dresdens to the background fabric.  The plan is to get that done today, but it's so sunny outside and there's blackberries to pick.  See that is why I get behind.  Oh well whatever happens...happens.  Are you doing the Quilt Doodle Mystery?  If not, it's not to late to join in the fun.  You can get all the information about these two blocks and the previous months by clicking right here.


Pin It
Related Posts Plugin for WordPress, Blogger...