Showing posts with label Cherry Blossom Marmalade. Show all posts

Monday, June 15, 2020

~ A UFO Finish ~

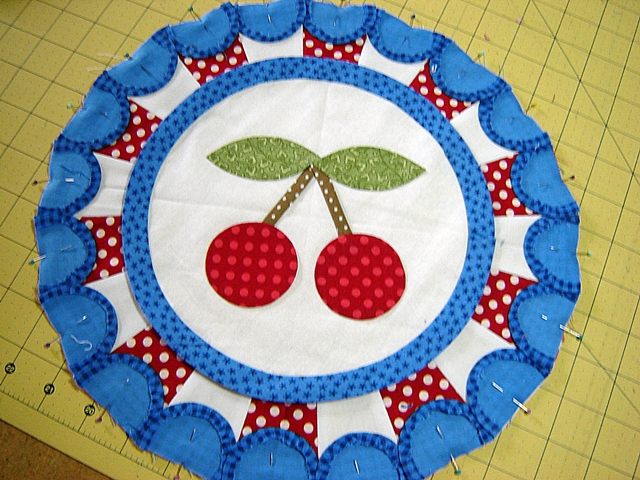
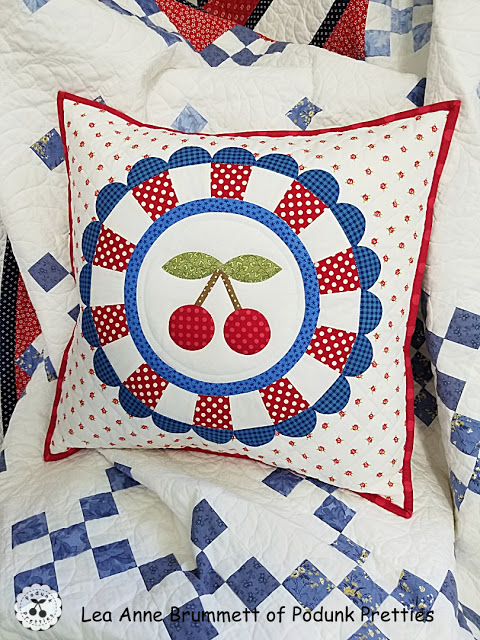
Hello Quilting Friends!  I'm super excited today to share my latest finish.  This one has been a UFO for quite some time, 7 years.  It was made for a tutorial here on my blog after so many of you loved the original block which I will link to later in this post.  For now lets talk about this cutie.


The fabrics used in this Dresden block are scraps from various manufacturers.  Some are quilt shop quality and some are not.  The UFO consisted of the Dresden only, it still needed a background fabric.  I pulled several different fabrics from my stash but as usual I chose a light colored background.  You all know me, I love white backgrounds.


The Dresden applique was attached to the backing fabric by invisible machine applique.  You can find a tutorial for this method here.  Then I cut away the background fabric so the print would not show through on the front of my block.


Since I already have a LARGE quilt on the quilt frame I decided to quilt this one on my domestic machine.  It would be much quicker than taking the quilt off the frame.  Keeping the quilting simple was a must.  Using my ruler and a water soluble marker I added a simple 1 inch crosshatching design to the background fabric.


The crosshatching compliments the curves of the Dresden and also gives it very traditional quilting look.


I'm not a fan of Dritz Basting spray but it's what I have on hand and I don't like to pin baste.  Normally I use it for a non slip coating on rulers and templates or crafty type projects.  I've had issues with this stuff not washing out of a project and then turning yellow and showing through.  I was told by other quilters the trick is to wash it within a couple of weeks of using.  So we'll see how that works out.  I'm crossing my fingers and hoping the basting spray doesn't ruin this much loved project.   


Pedal to the metal and within 40 minutes the quilting was complete.  


As you can see I kept it fairly simple with stitch in the ditch and outlining the applique.


The simple envelope closure was quick and easy as well.  This closure is my go to for pillows no matter how I finish the edge of them.  More often than not I use binding as my edge finish just because it's easy and adds color.  Years ago I used to finish all my pillows with piping.  It's a nice finish also but a little more finicky and time consuming.


And the best thing about binding a pillow is it makes it multipurpose.  Just remove the pillow form and  TADA! you have a small wall hanging! 


As I mentioned at the beginning of this post the was Dresden was made for a tutorial here on my blog many years ago.  You can find the tutorial with the printable applique templates here.  You will also find links to the original quilt made with this block I call Cherry Blossom Marmalade.  


How many of you noticed that this block was the inspiration for my business logo?


Pin It

Saturday, November 2, 2013

Flimsy Friday

How about a sneak peek?  Just a little.  There was a quilt already on the frame that had to be taken off unfinished in order to do this one.   What can I say other than I'm a procrastinator.  And really just wanted to keep the Quilty Mojo going on this cutie.   The color issue from earlier in the week is fixed and she's well on her way to being done.  The plan was to go simple and be finished by today but....Whats a quilt without a few feathers?   And when you don't quilt for awhile and your over 40 yrs old the previously dormant muscles rebel.  
Wanna see just how much I procrastinate.  
 Here's all my flimsy's in waiting.  Eleven flimsy and 2 partially quilted quilts not shown.  One of the partials isn't my fault(the blame game, procrastinators favorite tool) I ran out of thread and my local shop no longer carries it, and I can't find it online.  We won't even talk about the UFO's.  

See you when it's done!
~Lea Anne~


Pin It

Monday, October 28, 2013

Oh what have I done

It's that time again, show off you're design wall, NO MATER WHAT!
Hop on over to Judy's and  Freshly Pieced to get a good dose of creativity.  

Do you ever think "Well I've gone to far on this one"?  Yep..too too far with the colors.  Maybe that teal was just way too TEAL.  What's done is done, the only thing I can do now is to find a way to slow down the teal.  My quilty Mojo has been on the fritz, maybe I should have left it alone.
Such a lovely block..and my intentions were good.  Go loud and proud!  Make'm go WOW!  Instead I get the HOLY $#!& feeling.  
 My thought was to come in and Hexi off the corners of the TEAL block with some white.  Maybe add some more applique in the corners of the blocks?  What's even sadder is that the yellow and the TEAL in the quilt are vintage.  Not super old, but from the early 80's.   Maybe I'm over reacting due to my crappy mood.   
This quilt reminds me of my first(and last) experience eating Cherries Jubilee.  Valentines Day, I was a 14 yr old country girl.  The nicest restaurant I'd been in was Steak and Shake.  Well dad and I had lunch at a REAL restaurant.  He ordered for us.  They brought out the Cherry dessert on a cart, parked it right by the table and set it on fire!  My first thought was how in the world  am I supposed to eat that!  So I sat back in my seat for fear of setting my over hair sprayed head on fire and watched as my dad blew out the blaze.   Oh it's like roasting marshmallows!  I like a little black on my marshmallows, so my thought was to let'er burn.  The waiter, seeing me hesitate with eyes the size of dinner plates, promptly put out the blaze with a metal plate cover.  Of course dad giggled, and said "I should have warned you."  
So how can I put out this blaze?  I think gale force winds would be hard pressed to put out this fire!  For now I'm walking away from this quilt so I don't get burned.  

Enough whining, I wanted to share also share the way I squared up these 18.5 blocks.  Last week Erin Russek made a short tutorial.  The only thing I did differently was to do this method on my cutting mat.  

Hope you have a Cherry Day!
Lea Anne


Pin It

Friday, October 25, 2013

She Made My Day!

Nothing makes me smile bigger than seeing a quilt that someone has made from one of my patterns.  Lisa over at Always Home contacted me yesterday to let me know she had a Cherry on Top  flimsy.  Just tickled me pink!
Love her fabric choices!  Hop on over to her blog and see the cute label she stitched up and backing she chose.  As I wandered around her blog and noticed that she has a love for vintage items, lots of eye candy!   Thanks again Lisa!
I must say that this has helped a bit with my quilty rut, don't you just love blog land friends?  Seems they know just what you need.  
So it was back to the studio, and a light bulb came on, an epiphany!  Well at least that's what I thought.  Remember I told you I needed new glasses in order to get an even tinier stitch?  The brilliant plan was to use my magnifying light.  Bad move!  Oh my gosh it was horrible on they eyes to look through.  
Even though the first plan was totally stupid, the lamp did provide the extra lighting needed to see better.
It's a good thing this machine has the ability to program in stitches(not as easy as the book makes you think it is, HOURS of  work). The makers of this machine must have thought that no one needs a stitch this tiny.  And the blanket stitch would take a stitch backwards in between each stitch.  Way to much thread build up.  The machine is  sold as a Quilters machine, what do they know!  The first block stitched was done at 3.5 width and 4.0 long. 
So what does that mean?  Here's a couple of pictures to show you how tiny that stitch really is.  Below is the needle in the white background fabric. 
 and below...it's in the red.  Super tiny!  As tiny as this gal can get it without getting a massive headache from straining the eyes.  Adjusting the speed control to a slow speed also was a big help, this helps with the temptation of putting the pedal to the metal.  The pedal is still to the metal but it's like Grannies Sunday driving.
 TADA!  Yep this is definitely more invisible.  Now lets hope those small puckers wash out.  Could it be the tension causing the puckers? After adjusting the tension over and over this was the best setting.  Switching up needles several times didn't help either.  I can live with it.  It's better and quicker than hand stitching!  There's enough of that in the UFO pile, so this ones getting machined.
Well it's time to put my eyes back on and get to work!

~Lea Anne~

"I am determined to be cheerful & happy in whatever situation I may be; for I have also learned from experience that the greater part of our unhappiness or misery depends upon our dispositions and not about our circumstances" - Martha Washington


Pin It

Thursday, October 24, 2013

Invisible Machine Applique

Finally!  Something accomplished, although it's not much it's a start back in the right direction.  It took all day to get the 12 background squares cut and the 
Dresden's glued down , then ONLY one block completely stitched down to the backing.
The free pattern for Cherry Blossom Marmalade block can be found in the tutorials tab at the top of the blog and on the right hand side of my blog.  
Two different colors for the background....that teal isn't as dark as it looks here.
And it's showing through on the white, darnit!  So after it's stitched down I'll need to cut away the backing.
Hand applique?  Heaven NO!  Its invisible machine applique.
Here's a couple of tutorials for this method. Here and here. If my eyesight were better and my glasses newer I could probably go even narrower on the tiny blanket stitch.  
I'm using an invisible thread to stitch every thing down.
A few months back with my Joann's 50% off coupon I purchased Signature Invisible Thread.  What a great find and deal!  This thread  also great for SITD quilting.  I've actually quilted an entire quilt with nothing but this thread.  
Today I'm linking up with two new to me bloggers.  
Julie over at 627Handworks
and
Kelly over at My Quilt Infatuation.

Thanks for stopping by my little place in Podunk!

Lea Anne


Pin It

Monday, July 15, 2013

It feels so good!

To be back in my happy place after over a week of no sewing feels like heaven!  Before we move along -  its DWM!  So that means Judy is our host, be sure to hop over and browse all the yummy Design walls.
Sunday was spent jumping from one project to another.  That's my normal...Creativity in chaos.  The cherry quilt is almost quilted, hopefully it'll be done by the end of the week.  
Not much actual work was done on this one below, I did manage to do the quilt stare when I needed a break from sweating in this heat wave we're having.  No AC!
 The flying geese border for Connie's shirt quilt will be attached soon.  Possibly a lighter border added between the geese and the dark blue.  The plan is to slow down the busyness of the quilt.
 Digging through the stash is always a favorite past time when a gal needs a to move around a little.  So I pulled out a few pieces and then quickly went to EQ7 to help me with an idea.
 I'll be testing out the bleaching of the aqua fabric today, its just a shade or two to dark.  Not so sure about the yellow posies below, it means  more applique.  Maybe a yellow cornerstone could replace them?
Until next time "Quilt out of Your Comfort Zone!"
Lea

Pin It

Monday, June 10, 2013

Cherry Blossom Marmalade Tutorial

Good Monday morning!   As promised here's a tutorial for how I made my Dresden with scallops.  Before we get started I'd like to apologize for picture quality.  My camera quit working so I had to grab Ross's camera(older).  It didn't like up close shots and I just couldn't make sense of the manual.  Well here we go anyway.
You can get the templates for the applique here and here.


  Fabric needed for one block
(20) 2.5 squares (Dresden blades)
(1) 3.5 square green(leaves)
(2) 1.5 x WOF (scallops)
(2) 3/4 x 3.5 brown (stems)
(1) 1 3/8 x 26 bias strip (circle frame)
(2) 2.5 squares (cherries) 
(1) 9" square white (pic shows circle because I cut mine before pic..OOPS)


 This is the ruler I used, marking with glow tape as shown in picture.  If you don't have this ruler the templates for this block are provided here and here


So lets get started by cutting all 20 blades 


Sew them together in pairs.


 Keep sewing till you have a complete circle, then press seams open.  I don't use steam throughout the entire process of making this block.


 Trim away these little wings sticking out.  It will make it easier to sew on the scallops later.


 Once trimmed it can be set aside for now.


Because I made this pattern into a full size quilt with 12 blocks I made 20 scallop templates.  It made the process move along quicker.  Also my templates are made by taking 3 sheets of regular freezer paper and ironing them together, then tracing my templates onto them.  You can use these many times and they still stick really well.  This is the 13th time I've used this set.  Once your template is made line the straight edge up with the straight edge on your fabric and iron them shiny side down, the waxy surface sticks to the fabric and will not leave a residue.  


 Now cut them apart.


 Trim away the excess fabric about 1/4 inch away from the template.


  Any type of fabric starch will work for this next step.  I prefer Sta-flo concentrated starch.  It's economical and I can mix it to the desired stiffness needed.  For this type of applique my mix is 1 part starch 3 parts water.  Of course you can mix it however you like.  Any spray starch will work, you do not need to use Sta-flo.  If using an aerosol starch, spray a little of the starch in the cap or a small bowl. 


 Using a paint brush apply starch to the exposed fabric.


Carefully press the seam in towards the template. 


 Only 19 more to go! 
    

The same method was used to make the leaves and circles for the cherries.


 The starch when dry will stick to these templates, I was trying to show you how I use my thumb to loosen the edges before trying to pull out the paper.  Instead you got a great pic of the background...

 Remove the freezer paper templates from all applique shapes.  After removing the paper, press the applique shape.


Fold the bias strip in half wrong sides together(do not press). Using a contrasting thread(the contrast will be helpful later) sew a very small seam, about 1/16" to 1/8" .  Repeat this on the 3/4" x 3.5" Brown stem pieces.  


 I use these pressing bars, but the next step can be done without them.  I chose the 1/2" bar for the larger blue fabric and 3/16" bar for the brown fabric to be used or the cherry stems.


Weather you use the bias bar or not for pressing the bias strips, try to keep the seam in the middle of the strip it will serve as a guide later.  But if it gets a little wonky or off it's no big deal.  As long as you can't see it from the other side it's fine.


Remove the bar after pressing and press again.  I gave mine a little shot of steam to help it lay a little flatter.   I know I said I didn't use steam, but there's an exception to every rule, and this is one of them.  I like my applique to be thin with sharp edges.  The steam helps remove any creases or lines caused by the pressing bar.


Carefully tuck one end inside the tube about a quarter inch.


Cut out your circle using the template provided.
For this next step I use Roxanne's glue baste.  Any basting glue will work.  Even Elmer's Washable School Glue works perfectly fine.


 This is when that contrasting thread come in handy.  Put a few tiny drops of glue on the edge of your circle.  I line up my seam with the edge of the circle, working in about 2" sections, use an iron to set the glue and move on to the next section until you make it all the way around the circle.


 Trim away excess leaving about 1" overlap.  Tuck the over lap inside the other end.  After you get it in just the right spot add a tiny drop of glue inside to hold it in place until stitched.


Tada!  A pretty framed circle.


 Lightly press in half both ways as shown below.  


Line up the pressed lines with the lines on the template


  Glue baste the stems leaving the top longer than needed and not glued.


 Apply glue to leaves only as shown below.


  Position your leaves then press them with an iron to dry glue.  Next place a pin in the middle where the two leaves intersect.


  Trim off the top of the brown stems  right next to the pin.


Finish glue basting down your leaves, then glue baste the circles for the cherries.


Press the Dresden in half both ways.  Depending on the look that you want you may want to use the seam in the Dresden for the center, I chose the middle of the Dresden blade. 


 Line up the pressing lines on the circle and the Dresden, using one drop of glue at each pressed line to secure.


Finish gluing your way around the circle.  


Lets start adding those scallops.  You can glue them if you would like but I chose to pin them in place. 


 These are going to overlap just a bit.  One at a time pin or glue each scallops in place.  The next piece will be line up with the seam that the scissors are pointing to.  Allowing the overlap on the previous piece.  


 Carefully stitch that famous quarter inch seam.


  Press lightly out towards the scallop, NO STEAM...just give them a little press.


  Now turn it over and press the seam open to help reduce the bulky seam.


Flip that baby over and give her a good steam pressing if you like.
Ain't she a cutie?
  It's ready to be appliqued to your project.


Below is my original Scalloped Dresden.  I love how changing the fabrics can change the feel of a project.  I'm calling the one above "As American As Cherry Pie".
 The original below is "Cherry Blossom Marmalade".  Click here see the quilt I made using this color way.


And the American as Cherry Pie version was turned into a pillow.  Click on the image below to see it along with a few tips for making the pillow.  It's not a tutorial.


~ Lea Anne ~


Pin It

Related Posts Plugin for WordPress, Blogger...