
Good Monday morning! As promised here's a tutorial for how I made my Dresden with scallops. Before we get started I'd like to apologize for picture quality. My camera quit working so I had to grab Ross's camera(older). It didn't like up close shots and I just couldn't make sense of the manual. Well here we go anyway.

Fabric needed for one block
(20) 2.5 squares (Dresden blades)
(1) 3.5 square green(leaves)
(2) 1.5 x WOF (scallops)
(2) 3/4 x 3.5 brown (stems)
(1) 1 3/8 x 26 bias strip (circle frame)
(2) 2.5 squares (cherries)
(1) 9" square white (pic shows circle because I cut mine before pic..OOPS)

This is the ruler I used, marking with glow tape as shown in picture. If you don't have this ruler the templates for this block are provided here and here.

So lets get started by cutting all 20 blades

Sew them together in pairs.

Keep sewing till you have a complete circle, then press seams open. I don't use steam throughout the entire process of making this block.


Trim away these little wings sticking out. It will make it easier to sew on the scallops later.

Once trimmed it can be set aside for now.

Because I made this pattern into a full size quilt with 12 blocks I made 20 scallop templates. It made the process move along quicker. Also my templates are made by taking 3 sheets of regular freezer paper and ironing them together, then tracing my templates onto them. You can use these many times and they still stick really well. This is the 13th time I've used this set. Once your template is made line the straight edge up with the straight edge on your fabric and iron them shiny side down, the waxy surface sticks to the fabric and will not leave a residue.

Now cut them apart.

Trim away the excess fabric about 1/4 inch away from the template.

Any type of fabric starch will work for this next step. I prefer Sta-flo concentrated starch. It's economical and I can mix it to the desired stiffness needed. For this type of applique my mix is 1 part starch 3 parts water. Of course you can mix it however you like. Any spray starch will work, you do not need to use Sta-flo. If using an aerosol starch, spray a little of the starch in the cap or a small bowl.

Using a paint brush apply starch to the exposed fabric.

Carefully press the seam in towards the template.

Only 19 more to go!

The same method was used to make the leaves and circles for the cherries.


The starch when dry will stick to these templates, I was trying to show you how I use my thumb to loosen the edges before trying to pull out the paper. Instead you got a great pic of the background...
Remove the freezer paper templates from all applique shapes. After removing the paper, press the applique shape.

Fold the bias strip in half wrong sides together(do not press). Using a contrasting thread(the contrast will be helpful later) sew a very small seam, about 1/16" to 1/8" . Repeat this on the 3/4" x 3.5" Brown stem pieces.

I use these pressing bars, but the next step can be done without them. I chose the 1/2" bar for the larger blue fabric and 3/16" bar for the brown fabric to be used or the cherry stems.

Weather you use the bias bar or not for pressing the bias strips, try to keep the seam in the middle of the strip it will serve as a guide later. But if it gets a little wonky or off it's no big deal. As long as you can't see it from the other side it's fine.

Remove the bar after pressing and press again. I gave mine a little shot of steam to help it lay a little flatter. I know I said I didn't use steam, but there's an exception to every rule, and this is one of them. I like my applique to be thin with sharp edges. The steam helps remove any creases or lines caused by the pressing bar.

Carefully tuck one end inside the tube about a quarter inch.

Cut out your circle using the template provided.
For this next step I use Roxanne's glue baste. Any basting glue will work. Even Elmer's Washable School Glue works perfectly fine.

This is when that contrasting thread come in handy. Put a few tiny drops of glue on the edge of your circle. I line up my seam with the edge of the circle, working in about 2" sections, use an iron to set the glue and move on to the next section until you make it all the way around the circle.

Trim away excess leaving about 1" overlap. Tuck the over lap inside the other end. After you get it in just the right spot add a tiny drop of glue inside to hold it in place until stitched.

Tada! A pretty framed circle.

Lightly press in half both ways as shown below.

Line up the pressed lines with the lines on the template

Glue baste the stems leaving the top longer than needed and not glued.

Apply glue to leaves only as shown below.

Position your leaves then press them with an iron to dry glue. Next place a pin in the middle where the two leaves intersect.

Trim off the top of the brown stems right next to the pin.

Finish glue basting down your leaves, then glue baste the circles for the cherries.

Press the Dresden in half both ways. Depending on the look that you want you may want to use the seam in the Dresden for the center, I chose the middle of the Dresden blade.

Line up the pressing lines on the circle and the Dresden, using one drop of glue at each pressed line to secure.

Finish gluing your way around the circle.

Lets start adding those scallops. You can glue them if you would like but I chose to pin them in place.

These are going to overlap just a bit. One at a time pin or glue each scallops in place. The next piece will be line up with the seam that the scissors are pointing to. Allowing the overlap on the previous piece.

Carefully stitch that famous quarter inch seam.

Press lightly out towards the scallop, NO STEAM...just give them a little press.

Now turn it over and press the seam open to help reduce the bulky seam.

Flip that baby over and give her a good steam pressing if you like.
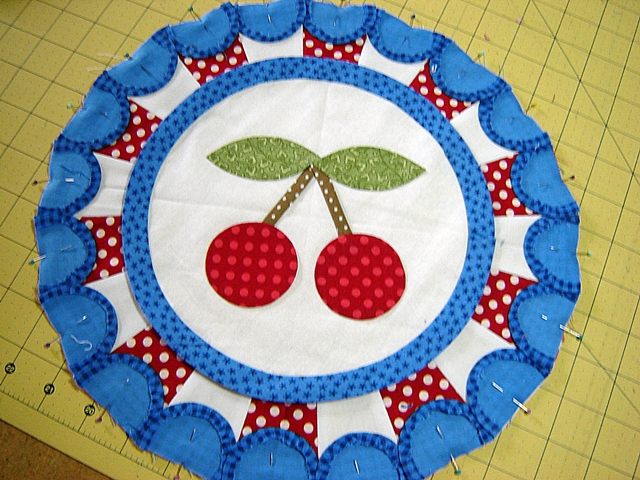
Ain't she a cutie?
It's ready to be appliqued to your project.

Below is my original Scalloped Dresden. I love how changing the fabrics can change the feel of a project. I'm calling the one above "As American As Cherry Pie".
The original below is "Cherry Blossom Marmalade". Click here see the quilt I made using this color way.

And the American as Cherry Pie version was turned into a pillow. Click on the image below to see it along with a few tips for making the pillow. It's not a tutorial.

~ Lea Anne ~
Pin It

That is tooo cute! Thank you for the tutuorial. You make it look so easy. When I get brave one day I will try this.
ReplyDeleteUrsula
thank you 'sew' much for taking to time to do a tutorial!
ReplyDeletei might have to add this to my to-do quilt list!
I love both of your cherry quilt ideas. I would like to make them both! Adding them to my bucket list. LOL
ReplyDeleteExcellent tutorial!!
ReplyDeleteI totally agree with Rhonda....excellent tutorial!
ReplyDeleteExcellent tutorial Lea. Really like the red, white and blue cherry one. You certainly have a lot of patience.
ReplyDeleteThank you so much for sharing this...I am going to have to give this method a try..
ReplyDeleteThis is definitely on my to-do list!
ReplyDeleteHow cute are these?! Your tutorial is terrific and makes it seem very doable. Thanks so much!
ReplyDeleteLeslie
I love your Dresden cherry plate! Do you have a printed pattern to go with it?
ReplyDeleteLove this block!!!! Many thanks for the tutorial!
ReplyDeleteRound stuff always looks SO scary - but you have done a perfect job on these blocks. Thanks for the detailed instructions.
ReplyDeleteWhat a beautiful block and a wonderful tutorial! I think your photos look great also! Thanks for sharing.
ReplyDeleteFreemotion by the River Linky Party Tuesday
I hope you don't mind people "pinning" photos with links to your tutorial, Lea, because I just KNOW that my sewing friends will love seeing this A-D-O-R-A-B-L-E little creation! Once paired with batting & backing plus a little quilting, it would make a darling tabletopper or just set beneath a teapot.
ReplyDeleteThank you SEW very much for sharing how you made it. I hope to try one very, very soon!
This is a darling block and the scallops are a wonderful touch. I can imagine all sorts of cute projects that I can cherrify :)
ReplyDeletepopped over from another blog so glad I did, now another one to follow, soon there will be no time to stitch!
ReplyDeleteO I cant wait to start this. Love the tutorial.
ReplyDeleteYou did a great job with this tutorial! While I can't make this right now, it is definitely going to my favorite places to wait for it's place in the queue! Thank you so much for taking the time to give such thorough directions.
ReplyDeleteGREAT tutorial!!!!! thank you
ReplyDeleteI love this block. Thank you for including the templates. I am not familiar with glue basting. I noticed that you glue basted and never mentioned sewing these items. Do you sew each of the items as you glue them? Do you let the glue dry and then applique them down? Or do you wait and stitch everything at the end? Never having done applique in this way, I would be concerned that when working with the previously glued items, they might become unglued when working with the piece further, if they had not been stitched down. I'm assuming that all the glued pieces are eventually appliqued? I'm just familiar with glue basting. I have tried needle turn and freezer paper. Thank you not only for this adorable block but also an introduction to glue basting. I love the idea of not having pins in my way to catch on my threads.
ReplyDeleteYes it's all stitched down.
DeleteI so want to do a full quilt of this! I will try one block and then decide if I will do a full quilt or not! I love your pattern and your tutorial was great
ReplyDeleteThis is so neat. Going to make this for my daughter-in-law. Just a suggestion: why not use large rick-rack instead
ReplyDeleteof fabric for your scallops? Thanks for a great idea and for sharing.
Rick-rack is stiff but it would be cute. I like the softer feel of fabric. Would love to see your quilt when finished.
DeleteEXCELLENT tutorial!! Thanks so much for sharing!
ReplyDeleteP
Hi, I just arrived from Bev's and I am so glad she posted a link. This is amazing and so darling! Thank you for sharing. I am now following you through Feedly. Have a nice weekend.
ReplyDeleteWhat a great tutorial! Heading over now to see the finished quilt...I don't need to start another project, but this is so tempting! Thanks for sharing this.
ReplyDeleteWhat size does this block finish at?
ReplyDeleteI found the answer! 18.5 inches?
Delete