
Wednesday, June 17, 2020

~ Home Again Progress and Tips ~

Hi Quilty Friends!  Today I'm taking a little break from quilting the Hunkering Down quilt to play a little game of catch up on the Home Again quilt by Erin Russek.


I'm 3 blocks behind but due to my lack of attention to detail I will need to redo/fix two of the blocks on the wall.  Color placement is an important part of any quilt.   It helps to visually balance or distract depending on the effect you're after.  Block design can also be a balancing effect.  Notice the symmetry in the blocks of this quilt.  Block placement is key in this pretty girl.  Since I'm not following Erin's color pallet it was easy for me mess things up.  Oh well, such is the life of a crafter.  We make mistakes from time to time.  I could leave it as is but with this much work going into a quilt I want it to be as perfect as possible.  The problem is I put the wrong colors in the blocks below.  Visually right now it looks right but the blocks are in the wrong spots just so I can see the color in the right place.  However there is a slight design difference that also adds balance.  Today I'll remove and replace the offending applique pieces.


To aid in the construction of my last few blocks I've taken a few extra precautionary steps.  First was to print a few images from Erin's blog. The image below shows all the blocks in the correct places. 


I've pinned it to my design wall for easy reference.


 Next was to print Erin's last three block images.  I didn't do this with the previous blocks.  Since my attention to detail seems to be a little off right now I thought it might be worth a little printer ink to have the images right there beside me on the last four..  


Next I've labeled the pattern with the proper colors from my pallet.  I also added a diagonal to the applique template sheet for lining up my fabric.  This was done out of pure habit.  Erin's pattern is centered perfectly on the paper.  The fabric background square is 8.5" and they have all fit perfectly without needing the centering marks.  Just line up the fabric with the edge of the paper and start adding applique.  I haven't needed to use my light box for these either.
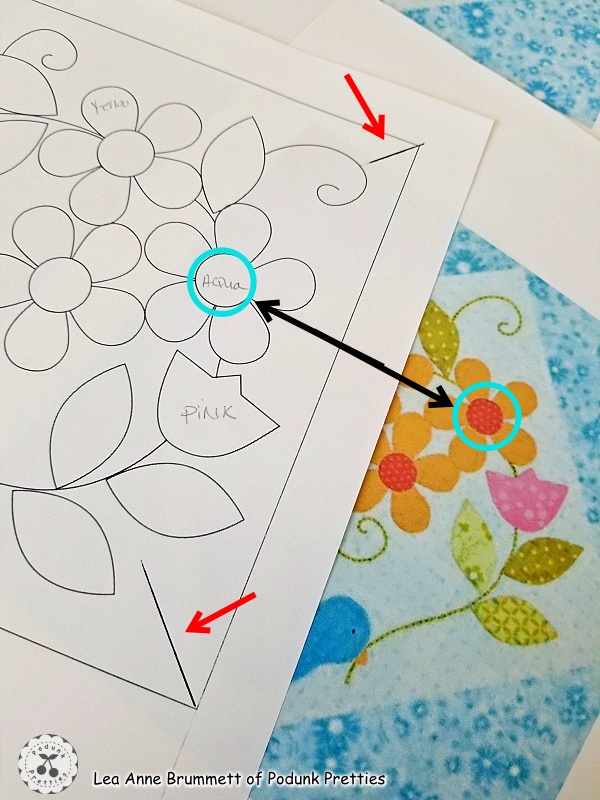

 Another precaution I'm taking (just encase my brain decides to take trip into la-la-land) is labeling my circles on the fusible with the correct color.  The center for the large flower is a little bigger than the other 4 flower centers.  It would be easy to attach it to the wrong color.  Hopefully taking these extra steps will make these last few blocks go together properly.


I know some of you may already use these methods as a standard when making applique.  In my earlier blocks my thought was to just get them done quickly and move onto something else.  Lesson learned!  It's quicker to do it right the first time.

All of these small blocks are FREE on Erin's blog.  Click here to go to her most recent post.  Do a search in the sidebar of her blog for Home Again or just keep scrolling and clicking older post to find all the blocks.


Pin It

Tuesday, June 16, 2020

~ Sneak Peek ~ Quilting the Hunkering Down Quilt ~

Hello Quilting Buddies!  Just thought I would pop in for a sneak peek of my Hunkering Down quilt as its being quilted.  Custom quilting on my set up is tricky business.  I own a very low end midarm machine called a Bailey Home Quilter 15.  The 15 means she has a 15 inch throat, that's not much quilting space in the frame quilting world.  So quilting large blocks or spaces can be tricky but doable with a lot of rolling back and forth.  She is equipped with a stitch regulator but it's first generation or as I call it an old school regulator which makes it a little more difficult to maintain uniform length stitches.  Again, it's doable once you get the hang of how it works.  The quilting on this quilt is a mix of free motion and ruler work.  The feathers, circles and ovals are free motion.  The arcs, straight lines and crosshatching is ruler work.  Yes, she is quilted to death.  With so much open space for quilting I just couldn't help myself.  Over the last couple of years I've greatly reduced the amount of quilting on my quilts but every once in a while a gal just needs to take a quilt over the top and quilt it to death.


Deciding the quilting design can sometimes be the death of a quilt, at least for my quilts.  I've about 30 quilt tops in need of quilting because when they were finished I couldn't decide on the quilting.  With my quilt top storage full I must quilt quilt tops as they are finished or make room for more quilt top storage.  The more quilt tops in storage the less room for new fabric and I don't want that to happen!....HAHA!  So I spent many hours looking for quilting ideas and drawing out my ideas.  I'd like to give credit to the owner of the image below but there was no information provided.  Anyway...As soon as I saw it I knew it was perfect for my quilt.  Feathers combined with crosshatching, it just doesn't get much better than that!


Finding the perfect border design was much easier than deciding on the block quilting.  
Hours were spent doodling on my quilt top with the plexi-glass and dry erase marker.  Until I finally said this is good enough, just QUILT IT.


Oh but I wasn't finished designing.  There's still the matter of the blank alternating block.  The first idea was to do a very traditional feathered wreath with cross hatching to match the border.  But since the throat on the quilter is 15 inches and the 12 inch on point blocks are 17 inches long it would require some super tricky quilting maneuvers.  Nope, I need a plan that is easy to break down into 2 quilting areas.   After a few hours I finally came up with a quilting plan that will compliment the border and can easily be broken into 2 or more quilting areas.


Pulling together all the quilting can be quite tricky.  Sometimes I get it right and sometimes I don't.   To late to make changes now!  See you in a few days with the finish!


Pin It

Monday, June 15, 2020

~ A UFO Finish ~

Hello Quilting Friends!  I'm super excited today to share my latest finish.  This one has been a UFO for quite some time, 7 years.  It was made for a tutorial here on my blog after so many of you loved the original block which I will link to later in this post.  For now lets talk about this cutie.


The fabrics used in this Dresden block are scraps from various manufacturers.  Some are quilt shop quality and some are not.  The UFO consisted of the Dresden only, it still needed a background fabric.  I pulled several different fabrics from my stash but as usual I chose a light colored background.  You all know me, I love white backgrounds.


The Dresden applique was attached to the backing fabric by invisible machine applique.  You can find a tutorial for this method here.  Then I cut away the background fabric so the print would not show through on the front of my block.


Since I already have a LARGE quilt on the quilt frame I decided to quilt this one on my domestic machine.  It would be much quicker than taking the quilt off the frame.  Keeping the quilting simple was a must.  Using my ruler and a water soluble marker I added a simple 1 inch crosshatching design to the background fabric.


The crosshatching compliments the curves of the Dresden and also gives it very traditional quilting look.


I'm not a fan of Dritz Basting spray but it's what I have on hand and I don't like to pin baste.  Normally I use it for a non slip coating on rulers and templates or crafty type projects.  I've had issues with this stuff not washing out of a project and then turning yellow and showing through.  I was told by other quilters the trick is to wash it within a couple of weeks of using.  So we'll see how that works out.  I'm crossing my fingers and hoping the basting spray doesn't ruin this much loved project.   


Pedal to the metal and within 40 minutes the quilting was complete.  


As you can see I kept it fairly simple with stitch in the ditch and outlining the applique.


The simple envelope closure was quick and easy as well.  This closure is my go to for pillows no matter how I finish the edge of them.  More often than not I use binding as my edge finish just because it's easy and adds color.  Years ago I used to finish all my pillows with piping.  It's a nice finish also but a little more finicky and time consuming.


And the best thing about binding a pillow is it makes it multipurpose.  Just remove the pillow form and  TADA! you have a small wall hanging! 


As I mentioned at the beginning of this post the was Dresden was made for a tutorial here on my blog many years ago.  You can find the tutorial with the printable applique templates here.  You will also find links to the original quilt made with this block I call Cherry Blossom Marmalade.  


How many of you noticed that this block was the inspiration for my business logo?


Pin It

Friday, June 5, 2020

~ Nifty Notions #7 ~ Mini Stash 'n Store REVIEW ~


Today's Nifty Notion is a little item I received in a monthly quilting subscription box a few months ago.  The It's So Emma's Mini Stash 'n Store.


To be honest this is one of those things I would never buy since I tend to lean toward being cheap, practical and more of re-purpose kind of gal.  So it was quickly tucked away in a drawer.  Earlier this week while searching for another forgotten item I stumbled upon The Mini Stash 'n Store  and thought it was time put this little gal to work.  With quick grab of a few items for a photo shoot I was loving how well it held the notions.


Where will I use and what will it replace?   Here's my current little container beside my sewing machine, it holds everything I need and there's room for more.  This green container was a 50 cent thrift store find.  Functional, cute and cheap that's how I roll.


Now I don't have to tell you that all these items are not going to fit in to the Mini Stash 'n Store.  But lets give it a go anyway just for giggles.


To my surprise all but one item fit.  There's even enough room left for a few more items.


The Stash 'n Store seemed a little top heavy so I pushed it a little farther back on the table so it would be supported by the basket.


Sigh....And then this happened when trying to remove the tweezers.  Ugg...This isn't a good fit for the Stash 'n Store.


My next thought was " It can't fall on the floor if it's inside the basket".  I've just the place that she might be of use.  Below is a basket at the end of my cutting table.  At the end of the basket is a coffee mug filled with a little bit of everything. Yes, there are multiples of several items and that is intentional.  If I lose a pen or pencil while designing and taking notes, I just grab another until I clear off the table and expose the other or others.


I think I could make all of this fit in all the little holes of the Stash 'n Store but with each additional item it would over load it and make the items to hard to remove.  It would also make it harder to put the item back in the Stash 'n Store.  I would need to dramatically reduce the amount of items to make the Mini Stash 'n Store work in my basket.  Well that's not going to happen.  Anyway, I really love the yellow coffee mug.  It's another thrift store find for about 50 cents.


Maybe a larger Stash store would better but honestly I think it would take up far more space than my yellow mug and not be as efficient, effective and convenient.   Then I thought maybe this Stash 'n Store is more for looks, a display piece instead of being functional.   It would be really cute in a more modern sewing room on a shelf with some cute little notions that are rarely used sticking out of it.
 I suppose it could be nice to set on the end table when I'm doing hand sewing.  It could hold a small pair of scissors, needles(maybe) and a small spool of thread(not likely).  Nah, it's just not functional in my world.  I like my little bowl with a lid that can be tossed in the end table drawer when not in use. 

As I removed the items from the Stash 'n Store the darn thing came apart!  Is this a design flaw or does it need to come apart for some unknown reason?  Now that it's apart maybe a piece of lead in the bottom would help make it a little more stable.  It's easier and cheaper to stick with my cute little thrift store finds.  This little gal is going to a new home this week.  Maybe my best quilting buddy, Bev, will find it more useful than I.  If not she can pass it along to someone else.


REVIEW RESULTS

1.Cost
 At about $8 each it seems a little over priced to me since it doesn't really do much.  But remember I'm cheap.  

2. Ease of use
Yes it was easy to use.  Just stick whatever will fit in it and hope you can get it out without picking up the whole thing.

 3. Efficiency
No, I feel like this item made reaching for a tool more difficult.
It held the items well, almost to well.  Some items came out fine and others would stick and I would need to use both hands to remove them from the Stash 'n Store.  

Now in defense of this product and any product reviewed here on this blog or anywhere, please take the time to google the product and read other reviews.  This is just one person opinion.  I've many notions and quilting items in my Studio that other quilters find to be inferior but I love them.   

If you would like to see more product reviews here on my blog just click the image below or in the sidebar of this blog to be taken to all Nifty Notions reviews.


Just a little reminder that you can still gt 20% off you entire purchase at The Purple Hobbies website using the code PodunkPrettiesJan20 at checkout.  


Pin It
Related Posts Plugin for WordPress, Blogger...