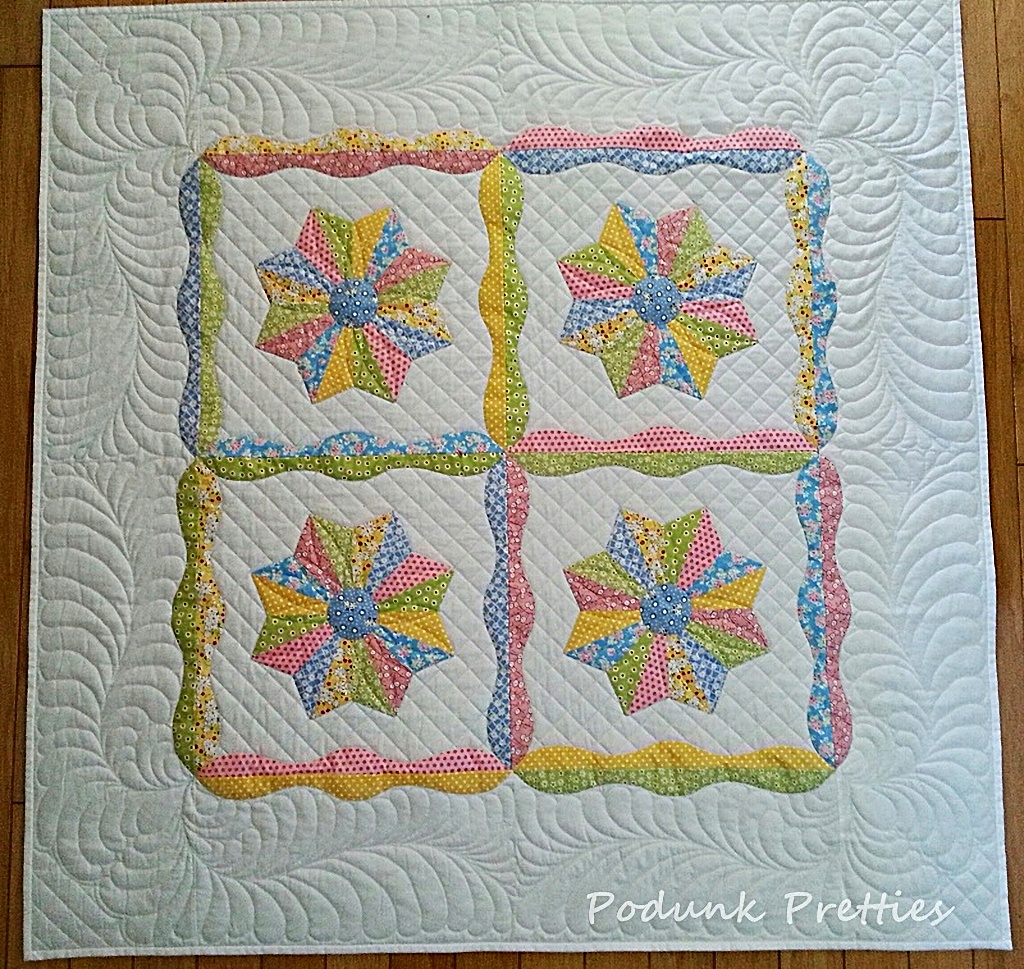
At last the Love Blooms quilt is finished. I love this little darling! As you all know, all dresden quilts make me happy. And it seems the smaller they are the happier I get.
Throw in some over the top quilt it to death quilting and its happiness overload!
Funny how quilting it to death gives it so much life.
The original quilt it death plan for around the hearts was to leave it unquilted. But while looking over the quilt before taking it off the frame I decided it needed more quilting. The meander was a perfect fit for me and the quilt....quick and easy!
The tiny scallops inside the dresden center were also added at the last minute.
Now I need to control this urge to start making more mini dresdens! Maybe I should dig through the UFO's. I know there's two or three dresden quilt tops needing to be finished. They aren't mini dresdens but I think the larger ones might stop me from starting another new project.
So, tell me do you have a favorite quilt block? One that is your go-to, that makes your little ole heart go pitter pat?
A quick little pop in to share the quilting progress on my Love Blooms quilt before heading outside to work in the flowerbeds. I'd rather stay inside and quilt, but mother nature won't wait for me to finish quilting.
The next few days weather forecast looks to be good quilting weather. Tomorrows forecast...HOT. I don't do hot, so I can work outside in the morning if needed and quilt later in the day. Then three consecutive days of rain. But you know how that goes...they call for rain but that doesn't mean it will rain here.
Another little cutie has been found hiding in the UFO quilt top stash. This one is only a little over a year old. Dresden quilts are my favorite. I've made so many that I've lost count how many. Hiding somewhere my stash of UFO's is three more needing to be finished into quilt tops. Maybe I can work on those later in the year.
Measuring 37x37 and having a lot of white space for quilting makes it perfect for quilting it to death. You all know I struggle with quilting. But coming up with a quilting plan for this one was a bit easier than most quilts. A feather wreath around each dresden was my first and final plan. Now it's time to mark the quilt so the quilting will be the same in every block.
I was like Goldilocks looking for the perfect kitchen item suit my needs. Many plates, bowls and saucers were auditioned and failed. And then a cake pan was just the right size for making the spine of the feathers. The patchwork was used to help center the cake pan.
To test my quilted feather wreath idea, I used a piece of plexiglass and a dry erase marker. I can quilt better than I can draw but it gives me a good idea of how this design will look on the quilt. I love it!
Then it was time to decide what would go in the blank border blocks. My first thought was a simple crosshatching, but it just wasn't right for this little quilt, well in MY mind it wasn't. After doing the quilt stare for a while it occurred to me that doing the same feathered wreath design would be best. The cake pan was carefully placed and traced (red arrow), using the patchwork seams as my guide for placement. Then Goldilocks headed back to the kitchen to find the perfect circle for marking the ghost dresden. This will give me place for the feather to stop and look just like the feathers around the dresden blocks.
After marking the circle/arc, the feather wreath plexiglass was auditioned...Perfect! I considered drawing a dresden for quilting under the feathers, but that was more work than I was willing to do. Maybe the two little hearts in this area would be cute. In the end one little heart was added because it was easier than the other two ideas. Now to let Goldilocks decide whether or not to add a background fill, and if so, what background fill.
The same design was marked at each corner of the quilt, but I can't decide if I want a heart in the corners or just a background fill. I guess Goldilocks has some things to think about today while I'm quilting.
Hello Quilty Friends! It's time to spice up the studio. I can't take one more day of playing with denim and flannel. It's like I'm creating my very own gray cloud right here in the studio. We've had enough of that outside for the last few days. No sunshine, just gray clouds, muddy landscape and cold winds.
You would think my brightly decorated studio would be enough happy colors to keep me happy. Nope I need to play with bright fabrics. That's what feeds my soul during yukky cold winters here in Indiana.
The UFO drawer is full of sunshine. This one was right there on top waiting to brighten the day. The bright happy colors of my Sugar -N- Spice quilt turned Mud-day Monday into Merry Monday.
This was a kit purchased way back in 2014, from the LQS, Back Door Quilts. What drew me in and made the sale was those tiny yo-yo's. Seriously, too cute! The pattern instructions suggested the yo-yo's be hand sewn to the quilt. But I wanted to finish this in my lifetime so I decided to try invisible machine applique. The worse thing that could happen is having to rip out the stitches and do them by hand.
To accomplish the invisible stitch I used Superior Threads Mono Poly. This is the best of the Monofilament threads. I've used many different brands over the years and this one is the only one that passed all the tests. It works above and beyond what it claims. The biggest test was the melting. Most will either melt in the dryer or when ironed on a higher heat than suggested. Now let me say all irons and dryers are different, so you will want to do your own tests. My results were...I can dry them on a normal dryer setting and I can iron them on a cotton setting. I did not try steam because I never use steam when quilting.
Before stitching the yo-yo's to the block, I first stitch them together with a tiny zigzag stitch. So what do you think? Can you see the zigzag stitch between these two yo-yo's?
The stitch holes can be seen on the outer edge but I think once this quilt is washed and dried they will disappear. We will soon find out! Yep, as soon as this girl is quilted and bound I'll do an update to let you know. The needle holes have gone away on other quilts I've made so I'm pretty sure they will on the this one as well.
If you are interested in seeing how I sewed them, here's a short YouTube video I made at the time. You can see better if you click on the words YouTube, that will take you to the video on YT. Or it will go full screen if you click on the square in the bottom right corner.
If you are considering purchasing the pattern and making this quilt you need to know the original quilt was made with only two borders. A yellow inner border and a wider outer border. The outer border looks like two borders but it's a "cheater" print.
Here's my THREE borders and they aren't mitered as the original above. I think the quilt shop made the change to the pattern in the kit. I might have made the change and have forgotten.
Oh well, it's time to get back to my sun filled Studio and get busy!
Just thought I would pop in today and share pictures of a quilt I made and gave away back in 2015. She's a little cutie made for my youngest granddaughter named Scarlet. Back in those days I didn't name or label my quilts like I do today. So we'll just call her this baby quilt.
This baby quilt was my own creation drafted with good old fashion pencil and paper. If interested you can see more about that process here. Designing quilts has been a passion of mine since the very beginning of my quilting journey. The quilting part however is a real struggle. I did a pretty good job quilting up this little gal. You just can't go wrong quilting it to death with feathers and crosshatching.
She turned out really cute but she had her issues when making the applique. I learned a very valuable lesson about shrinking freezer paper applique templates. Again...if your interested in that story click here.
Here's a picture of the back of the quilt showing all the quilting. Taking a look back in time makes me want to make another one for me. I bet if I dig deep enough in the studio I could find these templates. Maybe...but not today. Stay focused on the UFO plan Miss Lea Anne.
Until next time...
I hope you find time to stitch up something sweet!
What a shocker right? Me having another UFO dresden quilt. There's something about the dresden quilt block that keeps me coming back for more. This quilt was started in 2017. It was a free block of the month by Quilt Doodle Designs.
I've completed all of the blocks but the last two alternating blocks. I printed one of them back in 2017, now I need to find the last block PDF file on one of my many flash drives. It might be easier to purchase the one block pattern.
If you're interested in this quilt it's now available for purchase in her pattern shop here. Each block can be purchased separately or as a complete quilt pattern.
Most of the fabrics I chose for this quilt are Lori Holt prints but there's a few other prints from other designers mix in with them.
All of the blocks were stored in this 2 gallon zip lock bag just like my other dresden quilt I'm currently working on. When I found these bags I thought they were the best thing since sliced bread. Twelve inch blocks fit in them perfectly.
The Sugar and Spice dresden blocks came out of the bag looking perfect. But these blocks have yellowed. I'm not sure if I used a different starch or if maybe one of the fabrics caused the yellowing but I need to fix the problem before assembling them into a quilt top.
To make sure my eyes weren't deceiving me I decided to pull out the bolt of background fabric I was saving for the backing of the quilt. It too was stored in plastic. The plastic bag for the bolt came from a package of batting.
Again, I'm not sure if you can tell from this picture but there is a definite yellowing of the quilt block to the left of the line I added to the image. Luckily I think I know how to remove the yellowing. There's a few products out there made for removing the yellowing of vintage fabrics. However I'm going to try something suggested by Kelly Kline. She works almost exclusively with vintage quilt tops and linens. She suggests ammonia and water, then if needed a product called Retro Clean. You can read more about her process here and here.
Well I'm going to try an ammonia and dawn dish soap overnight soak. Then in the morning I'll rinse the one block and hang to dry in front of a fan. I'll let you know how it goes in tomorrows blog post.
While I'm waiting for the magic to happen in the laundry room I need to come up with a plan for finishing the quilt. The finished layout looks like this. The green vine with nothing on it isn't doing much for me. Not that is bad. You know me, I have a hard time sticking to a pattern.
A few google searches for border ideas and I found a few that have promise. Just how fancy do I want to get? Do I want pieced or applique? There's plenty of fabric left in the project box to do anyone of the borders below. There's also plenty of time to mull over these ideas and look for more if needed.
Well yesterday didn't go quite as planned. The 15 easy chain blocks could have easily been put together. But you know how it is, you can plan but sometimes the powers that be have other plans. Not that it was a horrible day, nothing bad happened. Since it's just us I'll tell you a secret. I screen phone calls. There's a handful of people at the top of my list of "you must answer". Almost everyone of them called yesterday. So that's my excuse and I don't regret it but it was a little disappointing. Three quilt blocks is better than no quilt blocks.
I could have sewn one or two more blocks had I not used a separate project for my leaders and enders. But I wanted to stay true to the leaders and enders method of sewing two quilts at one time.
I was all set up and ready to have a stitch marathon today and then.....I took a nap this morning. Well you now I am a grandma, and grandma's take naps every now and then. I can still get these done today.
I think I can
I think I can
I think I can
WOO-WOO! CHUGGA CHUGGA CHUGGA CHUGGA WOOWOO!
Wish me luck!
With the help of Investigation ID I'll have the next twelve blocks completed in no time. Provided the phone doesn't ring.
Hopefully my batting order will show up today. I like having a quilt on the frame and a quilt top being made at the same time. This allows me to stand awhile and sit awhile. I can't wait to get this girl quilted and on display.