Showing posts with label #backporchblooms. Show all posts

Tuesday, January 10, 2017

New Beginnings

Just popping in for a quicky share of one of my patterns reworked by a fellow blogger.  You can get all the details over at Vicki's Crafts and Quilting.  There's a giveaway!  The original pattern is called Back Porch Blooms and can be found in the Tutorials tab at the top of my blog.
Thanks Vicki for making my day, you have no idea how much that brightened my day!

Lea Anne
Pin It

Tuesday, August 16, 2016

Back Porch Blooms Linky Party and Giveaway

 I'm giving 'er all I've got Captain!  Some of you might recognize that quote and if you do your showing your age or you might be a Trekkie.   That's how I feel, giving all I got and it's not enough.   All we can do is our best by giving it all we have to give.  With all I had behind this project I'm still falling short of my self made deadline.  It's the same ole sad story, sickness and care giving.  So we'll continue on as best we can with the linky party and hope for a quilt top finish and pattern by this weekend.  I could give you the pattern now but I'm my own pattern tester.  I write the pattern and then make it from my directions in order to  make sure my measurements are correct.  The quilt top is close to being complete, all the blocks are made.  Now to put it all together.   Below is the borders and binding strips for my Moon Flower Magic quilt.
Cutting out all the scrappy pieces for this quilt took f-o-r-e-v-e-r because I don't like to stack and cut.  It was one fat quarter at a time.  Doesn't sound all that bad until I tell you it was 70 fat quarters!  I know what your thinking, why not stack and cut when your cutting the same size pieces.  Well I've done that in the past and had some bad results.  Examples...the ruler slips and cutting the wrong size.  I'd rather have one mistake than several stacked mistakes.  And yes there were a few miscuts and slips while cutting for this quilt. 
So below is how my design wall looks right now.  I'm hoping for a few minutes every evening this week to complete the top.
It's not to late to join in this linky party and giveaways.  There will be link ups in September and October also.  Please only link up projects made using my Back Porch Blooms pattern.  They are several FREE patterns in the tutorials tab at the top of this blog.  You can also click on the Back Porch Blooms image in the sidebar to be taken to all post about this quilt along.  The patterns provided are merely suggestions on using this block.  I encourage you to inspire us all by designing your own project and linking up.  The only requirement for linking up is it must be a post about your progress making any project using the Back Porch Blooms block, all other post will be deleted.  Finished projects that were linked up in the previous Back Porch Blooms Linky Parties are welcome in this link up also. 
Once you link up your Back Porch Blooms project from your blog or other social media you will automatically be entered to win this Windmere Jolly Bar along with a few other surprises.   


Pin It

Monday, August 8, 2016

Design Wall Monday ~ Moon Flower Magic ~

Good Monday Morning!  It's been a long time since my last Design Wall Monday.  Being back in the Studio is so nice.  The last couple of weeks have been a roller coaster ride, and not a fun ride.  So let me fill you in really quick.  Dad went for a yearly heart check up, found out he needed a surgery to open up an artery in his neck.  That went fine and he was home the next day.  Three days later mom has a heart attack and was hospitalized for 4 days.  Three days after that I became sick with a fever of 103.9 for two days.  Well we're all doing better and things are back on track.  All this commotion kept me out of the Studio for two weeks. Let me tell you, I NEED this stitching time!  It felt good to finally start working on the Moon Flower Magic.  The background fabric in this picture looks black but I assure it's Navy Blue.


Below is the quilt I had promised to make.  Well I had to make some changes in order to keep the units in this quilt the same dimensions as in the other quilt patterns in the Back Porch Blooms series.  


The new quilt below shows a thinner stem and leaves that are the same dimensions as in the Back Porch Blooms Block.  I'll also be adding an inside border to mine and a scrappy binding.  Of course the borders can be left off if you don't like adding borders.  


If all goes well I plan to have this pattern ready for printing by next Tuesday.   This will also be the date for the next linky party with a giveaway.  The linky party is for Back Porch Blooms projects only.  They don't need to be finished projects.  Any progress you've made is fine.  There's still plenty of time to join in the fun.  I'll be hosting two more linky parties, one in September and one in October to finish up the quilt along.  If you'd like to join in and need some inspiration I've posted several free patterns on my blog in the tutorials tab at the top of the blog or you can click on the Back Porch Blooms image in the sidebar to taken to all post about this series.  Projects of your own design using the Back Porch Blooms Block are also welcome in the linky party. 


Hope to see you next Tuesday!
~ Lea Anne ~
Pin It

Tuesday, July 19, 2016

What next? and a WINNER!

Wow!  What a great response to my question about my next free quilt pattern in my last post about Porch Blooms.  Thanks to everyone who took the time to vote.   I have to admit I was shocked that so many of you loved the one quilt I thought wouldn't get any votes.  The winner is Moon Flower Magic!  This will be the next free pattern in this series.  I've not started making it yet, well to tell you the truth I need to purchase the navy background sometime this week.   But as soon as I find the right blue fabric you'll be the first to know.


Now it's time to announce the winner of last weeks giveaway. Drum roll.....
Kate at Life in Pieces, CONGRATULATIONS!  I'm sending you an email for you snail mail address.  Kate shared her own quilt design made in EQ for using my Back Porch Blooms Block.  It's a super cute quilt design.  Hop on over and take a look at the borders...I may need to steal this idea...LOL!  Here's a little peek at the center portion of the quilt.  Love the patriotic colors.


If you'd like to join in the quilt along there's still time.  I've decided to extend this quilt along out another month.  The original plan was to have the last link up in August, but I've decided to go one more month and have a link up in September.  Just a little teaser for the next two months giveaways below.

So if you'd like to join in you can find all the tutorials for this quilt along here.  Or you can find them in the TUTORIALS tab at the top of this blog.  Or by clicking on the Back Porch Blooms image in the sidebar.


Happy Stitching!

~ Lea Anne ~

Pin It

Tuesday, July 12, 2016

Back Porch Blooms Linky Party #2 with A GIVEAWAY!

How about we start out this party with a few new ideas for using the Back Porch Blooms block.  To make this even more fun I'm going to let you pick the next quilt I make using this block.  
Quilt #1 is called Butterfly Garden.  It's a large wall hanging that measures 66x39.  I think it would look adorable in any sewing room.


Quilt #2 is called Bachelor Button Boogie, it measures 69x69.  All the open space in this one is hard to resist if you're like me and love to quilt it to death.


Quilt #3 is called Moon Flower Magic.  This one would be great for using up oodles of scraps.


So which one would you like to make?  Just leave a comment on this post telling me which one makes your little ole heart sing and the one with the most votes will be the next free quilt pattern.

To save space and time I'm not going to go over every new free pattern made using the Back Porch Blooms block.  Instead I'm going to tell you if your new here and wondering what I'm talking about just go to the tutorials tab at the top of my blog and you'll find several free patterns using the Back Porch Bloom Block.   Or you can click on this image in the sidebar to be taken to all posts about the Back Porch Blooms quilt along here on my blog.


It's not too late to join in the quilt along.  I'll be hosting at least one more linky party and giveaway next month.  So here's the rules for the link up.  
  1. One link per person during the week of July 12-18, 2016
  2. Your link must contain progress on your project using the Back Porch Blooms block.
  3. Your project can be of your own quilt design using my Back Porch Blooms pattern or one of my free back porch blooms patterns.
  4. It can not be the same post you linked up last month
  5. All post not containing a Back Porch Bloom will be deleted.
  6. By linking up you're automatically entered to win this months give away.  Comments on this post will not enter you in the giveaway.  The winner will be announced on July 19, 2016
This months giveaway is a bundle of half yard cuts of Indian Summer by Bentartex.


I'm looking forward to seeing all the beautiful Blooms in the linky below!  Don't forget to visit a few of the other links.  Everyone loves visitors and comments!

~ Lea Anne ~

Pin It

Friday, July 8, 2016

Cottage Blooms Pattern

It took a little longer than expected to write the pattern but it's finally done.  Thank you to all who helped with the quilt name.  Each idea was written down and stared at for what seemed like hours until I settled on a combination of a couple different ideas.  So here she is "Cottage Blooms". 


This series of quilts has been so much fun and I'm looking forward to seeing your creations.  There's one more quilt planned maybe 2, it all depends on TIME.  That's what we all wish we had more of, right?  I won't delve into that subject today.  Let's just move onto a happier subject like free patterns.   Cottage Blooms is the 3rd quilt I've made during the Back Porch Blooms quilt along here on my blog.  It's a free quilt along with giveaways, free patterns, pattern ideas and linky parties.  I'm often am asked how I come up with quilt ideas.  The answer is inspiration, one  little idea and I build upon it.  So I thought it would be fun to encourage my readers to do the same.  I give you a block and some fun ideas and let you create your own quilt.  Of course not everyone wants to design a quilt and do a bunch of quilty math so I'm providing a few patterns along the way.


The first free pattern was a simple wall hanging using the inspiration block Back Porch Blooms.  The block itself measures unfinished 9.5 x 18.5.  The large size block is great for making a cute quilt fast.  


The second was Hello Spring.  The inspiration for this one was my followers.  You gals really are the best!  Your suggestions and ideas for the block sparked a wave of new designs.


As much as I love this series and would love to make all the ideas, I just can't.  But I can share with you a few of my favorites and the measurements for making them.


The Ring Around the Posy is another one that was hard not to make.  It's a fun size, 49.5 square that would be great a baby quilt, large table topper or a cute large wall hanging.  You can find it and all the others in my tutorials tab at the top of my blog or by clicking on the Back Porch Blooms image in the sidebar.


Alrighty with all that out of the way we can move onto the Cottage Blooms quilt pattern.  


There's a few things you need to know before making.  
  1. Cottage Bloom pattern is for the borders and sashing.
  2. You will also need to print or save the Back Porch Blooms block instructions
  3. And the On Point Butterfly Block, this can be printed or saved by using the Print Friendly. PRINT FRIENDLY IS NO LONGER AVAILABLE ON MY BLOG BUT THE TUTORIAL IS STILL AVAILABLE TO READ AND USE ONLINE.
  4. Cutting list for the entire quilt is in the Cottage Blooms pattern.
  5. And the most important thing you need to know is Read all the instructions for the Cottage Bloom quilt pattern first.  


Don't forget this coming Tuesday, July 12th will be the next Back Porch Blooms Linky Party.  You'll be able to link up until July 18.  This linky party is for Back Porch Bloom quilt projects only, all other link ups will be deleted.  By linking up you'll be entered to win this bundle of half yard cuts of Indian Summer by Bentartex.  Winner will be announced on July 19, 2016.


I'm looking forward to seeing your creations!

~ Lea Anne ~
Pin It

Tuesday, July 5, 2016

Back Porch Blooms ~ Another Cutie

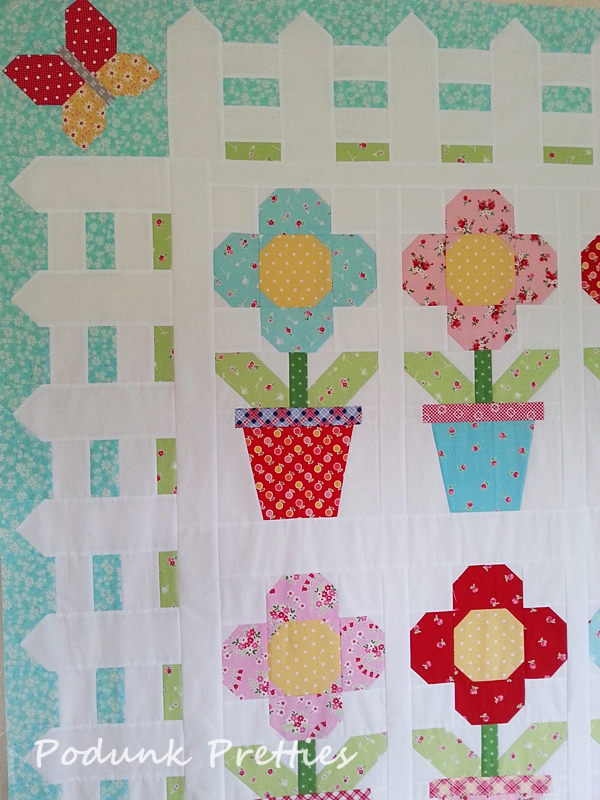
Hello sweet quilty friends!  I've got another super cute quilt to share with you. This is the third quilt in my "Back Porch Blooms" series of free quilts.   For some reason I'm coming up blank when trying to name this one, so if you've any suggestions let me know.


Tomorrow I'll start writing the pattern for the sashing and borders.   If you'd like to get a head start making the "Back Porch Blooms" blocks(flower and pots) you can find the tutorial here.


The corner Butterfly blocks are also a freebie here on my blog and can be found here.  TIP: The tutorial is for a 12 inch block.  You can make them 12 inch and trim them down to size later or you can make the 6 inch Butterfly and wait for new smaller on point instructions later this week.  My blog is a print friendly blog which means you can  print my tutorials in pdf just by clicking on a specific post and then clicking print friendly image at the bottom that page.  Print friendly allows you to remove any pictures or text that you don't want or need.


This quilt was designed after so many of you loved my quilt and chickens post.  The idea for a picket fence was in one of my first designs but it was a much smaller quilt.  It just occurred to me as I'm writing this post, you could replace the butterflies with baby chickens set on point...oh how cute would that be!?


Most of the prints in this quilt are Pam Kitty or Holly Holderman, Lakehouse fabrics.  The blue in the border is not.  It's a Bonnie and Camille print, I'm unsure which line of their fabric.


The border is actually made up of three blocks. The Butterflies and two different pickets and rails blocks.  Strip piecing made quick work of the fence borders.  


To see all the tutorials and posts about my "Back Porch Blooms" quilt block just click on this image in the sidebar.  Or you can find them in the tutorials tab at the top of this blog.


Don't forget there's a "Back Porch Bloom" linky party once a month.  You can link up your progress to be entered in a giveaway.   The only rule is you can only link up posts or pictures of your "Back Porch Blooms" project.   This month the prize is a bundle of half yard cuts of Indian Summer by Bentartex.   


So here's the plan.  Later this week I'll post the instructions for the fence quilt above.  Next Tuesday July 12- July18 you can link up any Back Porch Blooms projects.    Then the winner will be announced on July 19, 2016.  There will be at least one more linky party and giveaway next month so there's still plenty of time if you haven't started your blocks yet.  It doesn't need to be a finished project to link up.

Happy Stitching!
~ Lea Anne ~
Pin It

Wednesday, June 15, 2016

Ring Around the Posy pattern idea

This week my Studio is being repainted and redecorated by little ole me.  That means absolutely no sewing time.  While painting, the quilt ideas seem to creep into my overly quilty obsessed brain.  Luckily I can get my sewing fix from playing around in EQ7  each evening.   Yesterday evening I came up with another design using the Back Porch Blooms block and the Butterfly block.  It finishes at 49.5" square.  A good size for a baby quilt, a large wall hanging or a super cute large table topper.  I'm calling this one "Ring around the Posy".


Oh yes, I'll make this quilt someday.  All the open space for quilting...feathers, feather, feathers!


Here's some basic quilty math for those of you who would like to make it.  


I used the same butterfly block as in the last quilt "Hello Spring".  This time it's framed, but the frame is different than the one in the tutorial that can be found here.  Just omit the on point frame part of the tutorial and add this one.


You'll also need the "Back Porch Blooms" block tutorial that can be found here.
If you visiting for the first time, the "Back Porch Blooms" is a very relaxed quilt along I'm having here on my blog.  There's linky parties and giveaways, you can read more about it in the link provided for the block tutorial.  You can find all tutorials and posts by clicking on the "Back Porch Bloom" image in the right sidebar.


As I was writing this post a little idea hopped into my thoughts.  What about adding this adorable little bunny to the "Ring Around the Posy" quilt?  You can find the tutorial for the bunny in my Tutorials tab at the top of this blog.  The tutorial sets the block on point, which would work nicely in this quilt.  Just trim the block to 9.5".


Happy Stitching!

~ Lea Anne ~

Pin It

Monday, June 13, 2016

Hello Spring! Free pattern and we have a WINNER!

Hello quilty friends!  There's a lot to share today so grab a cuppa what tickles you and relax.  So first things first.  I have a finish, Yippee!  Say hello to "Hello Spring!"   I'll be sharing the free pattern with you later in this post.


Normally when quilting on the frame it takes a long time  to come up with a design.  Well I decided to quilt this one to death so there wasn't too much thinking involved.


There was very little premarking except for a few reminders.  I tend to get in a zone when quilting a quilt to death and forget where I want to add some repetitive detail.


The backing is a vintage solid from my stash, it shows off the quilting quite well with the help of the poly batting.  


After quilting this I realized I hadn't planned for the binding...uh-oh.  That usually means a run into town to the LQS.  Luckily I found this forgotten print in my stash, it worked out beautifully.


So if you've been following along over the last few weeks you know this quilt is in a series or 3(maybe 4) quilt patterns I'll be sharing with you FREE.  The series is called Back Porch Blooms.  Each quilt will include at least one of the flower pot blocks you see in the picture below.  If your new here and haven't a clue what I'm talking about, just click the Back Porch Blooms image in the right sidebar.  That will take you to all post, tutorials and free patterns published on the blog so far.


If you make a block or quilt you can link up your progress here once a month.  By linking up your progress your automatically entered to win a giveaway.  I'll be posting the items for next months giveaway sometime next week.  This months giveaway is closed and a winner has been chosen.  Thanks to everyone who linked up.....drumroll....


The winner is #3!


Congrats VroomansQuilts!  Would you look at those mitered corners!  The stripes add a extra special touch.  You can read more about her design and progress here.


PRINT FRIENDLY IS NO LONGER AVAILABLE ON MY BLOG
Before we go any further I want to let you know I've added a new feature to my blog.  Print Friendly.  What is Print Friendly?  It allows you to print or save any post on my blog in PDF format.  It also allows you to remove the pictures and text in the PDF before saving or printing.  The first thing you need to do is go to a specific post or tutorial.  Scroll to the bottom of the post and click on the Print Friendly image.

A new window will open, allowing you to delete whatever YOU want.  The decision was made to add this feature for those of you who like to print out free patterns.  Sometimes I just don't have time to write a tutorial plus a PDF.  I usually will make one or the other, not both.  With the "Hello Spring" pattern I've written a PDF but you will also need to use other tutorials on my blog to make the quilt.  

Okay lets get onto the free pattern. "Hello Spring!" It measures 21.5 x 61


The free Hello Spring PDF pattern   The templates for the flower pots and "Welcome" applique are included in this pdf.   Piecing for the heart flower pot is also included.  Use only the fabric cutting list in this pdf pattern.  Use the tutorials as a reference for how to construct and layout cut pieces for sewing.  Before you hit print make sure you are printing in original size.  I've included a 1" measuring square on all template pages.

Tutorials needed to complete pattern

Below is how I made my applique pieces.  I didn't want to include it in the pattern because not everyone wants to make their applique like mine.  Before we get started,  someone asked what font I used for this quilt.  I'm sorry but I really have no idea.  

The letter templates are not reversed.  After printing them, cut them out about 1/8th of an inch away from the solid line.  Next I placed them right side up in a box and sprayed with quilt basting spray.  This makes them stick to the paper sided of the Heat and Bond Fusible webbing.  I placed all the letters close together, this makes fusing to the fabric easier.  You can see in the 3rd picture how I've trimmed one large piece then fused it to the wrong side of the fabric per the instructions on the webbing.  After a quick fuse from the back, flip it over and fuse from the front.  This is a fool proof method of making sure it's completely fused to the fabric.

Let it cool for a few minutes and then cut out the letters on the solid line.  Peel off the templates and the fusible paper.  If you have trouble peeling, use a pin to score the paper.  Be careful of those edges, if you score to hard it could fray your fabric.  The letters are ready to fuse to your project. 


A few quick blanket stitches is all that's needed to finish it off.


Happy Stitching!  See you in a few with my new project.

~ Lea Anne ~
Pin It

Related Posts Plugin for WordPress, Blogger...